
Section Navigation

Introduction
For this module students will plan an escape room or code-breaking story in Twine. The theme of the story can be determined by the teacher to tie into curriculum. This module is for students who have completed the Introduction to Twine module or for those with a working knowledge of Twine.
Learning Goals
By the end of this module students will have a diverse understanding of the topic covered. They will learn how to add pictures to their story and to use different functions in Twine such as variables and conditionals.
Vocabulary
Passage - In Twine, a passage is a narrative unit, a building block for full stories.
Narrative - The process of telling and structuring a story.
CSS - Cascading Style Sheets is a styling language used for coding the presentation of a document in a markup language.
HTML - Hypertext Markup Language is the standard markup language for designing web pages.
Variable - A place to hold information to be recalled later. In Twine variables can be words, numbers or booleans.
Boolean - A binary variable that has two possibilities, either true or false.
Link - How passages are connected in the story that allow users to navigate, change variables, or go to external sites.
Hook - The text that follows an interaction with the story such as setting a variable or clicking a link.
If Statement - A conditional statement that completes an action if it is proved true.
Hexadecimal (Hex) Code - A six-digit number used to represent and specify colour.
Guiding Questions
Have you ever wanted to create your own escape room or mystery story? Do you like solving mysteries and deciphering clues?
Curriculum Links
This module is aligned with Computer Studies and English curriculum. Students will be writing creative passages and can incorporate specific vocabulary. It can be linked to other academic subjects based on the theme given to students. There are examples of themes found in the planning section and the subjects they match up with.
This code checks if the variables are true and displays the corresponding message. If only the three variables listed are true it displays another message otherwise it displays the last message and a link to the last passage. The variables and the hook can be changed based on what you want to happen.
Materials
- Twine – Download Twine
- Storyboard Handout – Download Assets Folder (ZIP)
Non-Computer Activity
In this module students will create a story that players try to solve based on information provided within the story. An effective escape room requires careful planning to get players through the story from start to finish. Students need to think about what clues to provide and how the user will access them.
Philome.la has an example of a code-breaking game to help get students thinking of ideas and planning their story.
Planning Activity
Here are some theme ideas and the curriculum they tie into. These ideas came from Lock Paper Scissors which has pre-made escape rooms that can be purchased for your class.
- Scientists must race the clock to find an antidote to a deadly bioagent. (Chemistry, Social Studies)
- Detectives must solve a murder mystery. (Chemistry, Social Studies)
- Archaeologists must find and destroy a cursed historical artifact. (Physics, History, Geography)
- Treasure hunters must escape from a cursed Egyptian tomb. (History)
- WWII spies must uncover a secret German or Soviet plot. (History, Geography)
- Party guests must discover how Jay Gatsby made his fortune. (Literature)
- Space explorers must avoid a collision with an asteroid. (Physics, Astronomy)
- Art thieves must steal the right set of paintings from a museum. (Art History)
- Space station engineers must write a program that keeps the life support system online while repairs are made. (Computer science, Physics)
Students will plan their story using a storyboard, to map out the path through the passages, what information will be given, and the appearance of the passages.
Computer Activity
Getting Started
- Open Twine and start a new story.
- Name your story something relevant to your topic. This can be changed later if needed.
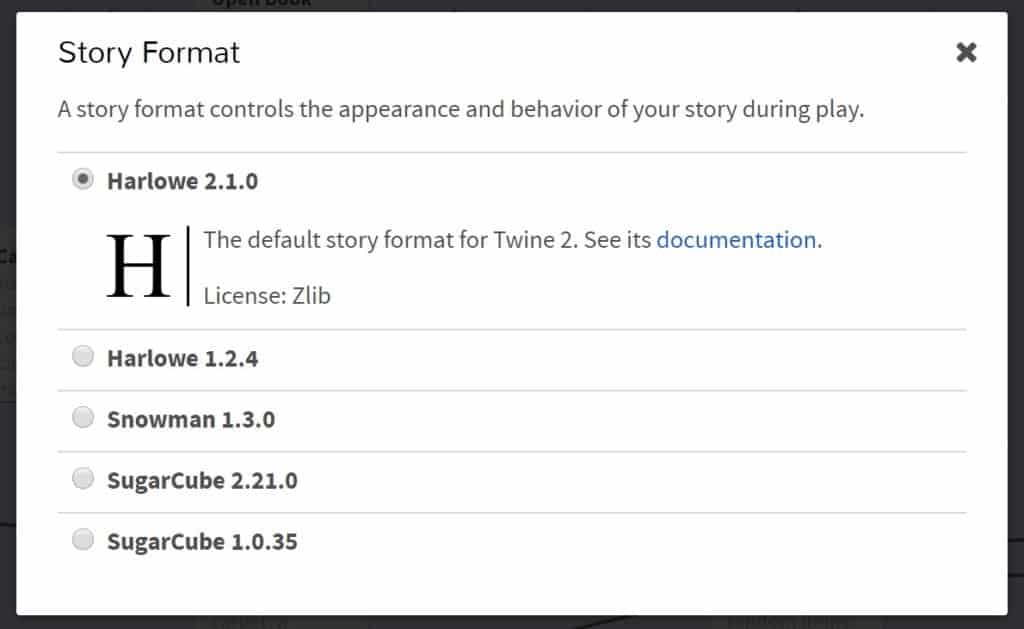
- Change the “Story Format” by selecting the arrow beside the story title. Select “Harlowe 2.1.0”.
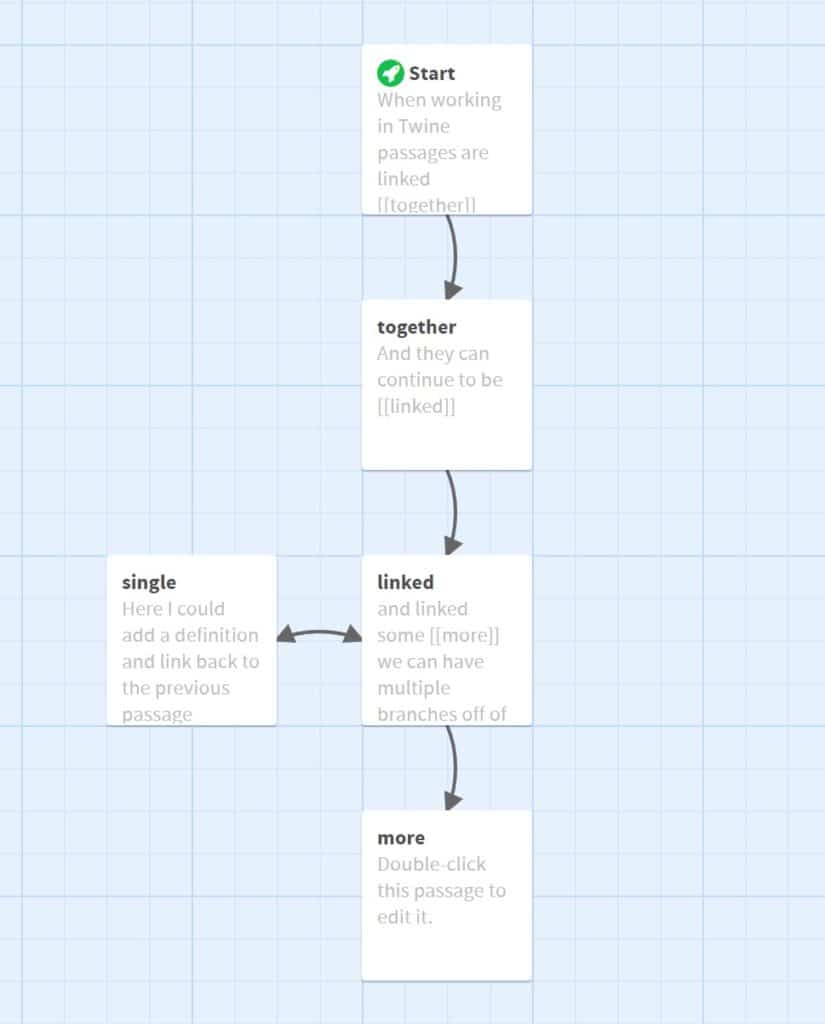
- Start typing your story and linking passages together. To link passages enclose the title in double square brackets [[ ]]
- To have the link one word and the title of the passage another, add a vertical line (pipe) in the brackets. In the example [[Next Room|Room 1]], “Next Room” is the link, and “Room 1” is the passage.
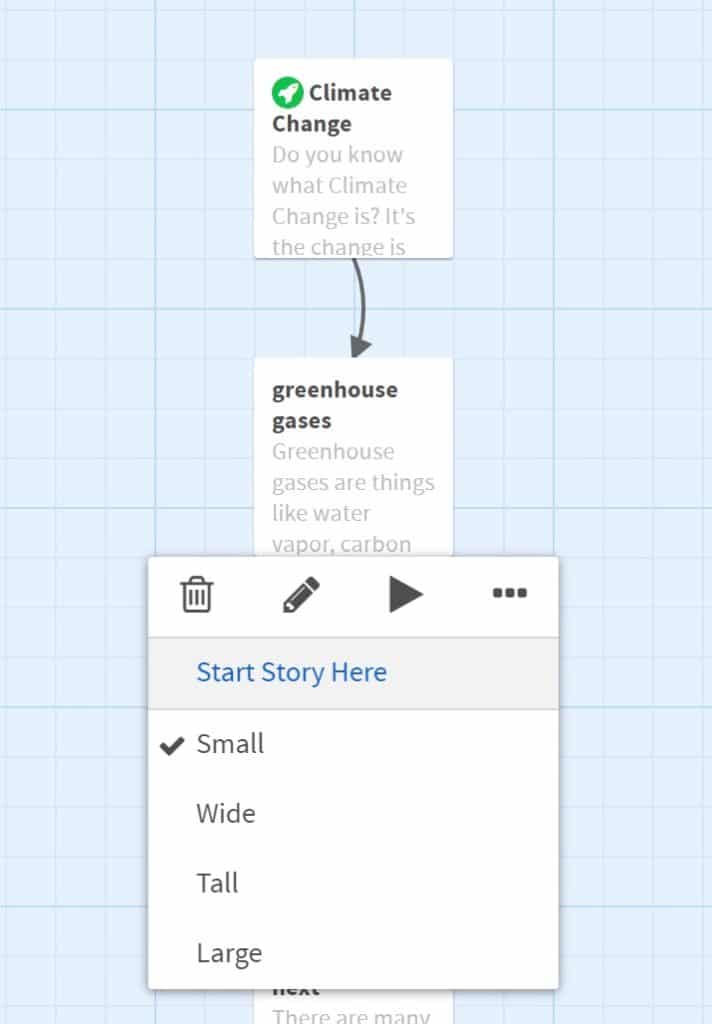
- The green rocket icon indicates the starting passage. To change this to another passage, hover over the passage, click the three dots (ellipsis) and choose “Start Story Here”.
- To create a two-way path between passages, put a pair of square brackets ([[ ]]) around the title of each passage. This is helpful for adding definitions or explanations to your passage.
Changing The Default Appearance
Once you have finished the layout and each path has an ending you can change the appearance of your story. Click the arrow beside the story title and select “Edit Story Stylesheet”.
There are a variety of colours that can be used in CSS and HTML programming. W3Schools lists colours by name and hexidecimal value.
Note: the Harlowe Story Format uses hexadecimal codes for colours rather than the colour names (except for primary colours).
tw-story {
  background-color: blue;
}

tw-passage {
  color: #708090;
  font-family: Futura,Impact,Helvetica,sans-serif;
  font-size: 6vh; font-size: 6vw; font-size: 6vmin; line-height:normal;
}
The “tw” stands for Twine and is followed by what part the formatting will be applied to (story, passage, link, etc.).
Line 1 states that the formatting will be applied to the story.
Line 2 changes the background colour of all passages to blue.
Line 4 states that the formatting will be applied to the passage.
Line 5 sets the colour of the text in our passages using a hex code.
Line 6 sets the font.
Line 7 sets the font size; “vh” is the height, and “vw” is the width.
tw-link {
  color: #DA70D6;
}

tw-link:hover {
  color: #FFA500;
}
Line 1 edits the links in our passages.
Line 2 sets the colour of our links using a hex code.
Line 4 edits the links when they are hovered over.
Line 5 sets the colour of the link using a hex code.
Adding Images
There are two different ways to add images to a story:
- By URL: add the URL of the image to your script. Some issues with this method is that you are limited to the images on the internet, and you have no control over the sites where these images were found. If the site is removed, your image will disappear.
- From a folder on your computer: create a folder where you will save your Twine story, and any images you plan on using. Then you can add these images by filename to the passage where you want them to appear.
<img src="ocean.jpg">This script inserts the image named ocean.jpg. When you test your program without publishing it, your image may not appear. To properly view your story, you need to “publish to file,” then open that file in a web browser. This will allow you to see how your story looks, and if any of your images need to be resized.
<img src="ocean.jpg" width="50%">This script sets the size of the image to be 50% of the original.
Adding Videos
There are three ways to add videos to your story. As with an image, you can use a URL or insert a file saved on your computer. The other way to display a video is to embed it. To do this from YouTube, click the share icon and select “embed”. Copy the text that appears and paste it where you want the video to appear in your passage. With any of these methods, you can adjust the dimensions of the file as in the following example:
<video src=“https://www.nfb.ca/film/maq_spirit_woods/” width=“640”  height=“480”>
</video>
Variables
There are three types of variables in Twine: numbers, words or strings, and booleans. Variables are indicated by a “$” before the name. For a word or string to be recognized they must appear in quotations. Numbers and boolean variables do not require quotations. Boolean variables are indicated by the word true or false without quotations.
(set: $food to 0)
(set: $switch1 to "off")
(set: $hasS1 to false)
Line 1 sets the variable food to the value 0 (number).
Line 2 sets the variable switch1 to off (string or words).
Line 3 sets the variable hasS1 to false (boolean).
To allow the user to change variables, use links and re-assign the value of the variable in the hook.
Links
Links are used to move from one passage to another, but can also be used to adjust variables or display a hook.
(link: "1. Fox Teasing Raven")[You have taken Statue 1(set: $hasS1 to true)]This line has a link that displays “1. Fox Teasing Raven” after it is clicked, displays the message “You have taken Statue 1”, and changes the variable hasS1 to true. The message displayed after the link is clicked and the change of the variable is the hook. A hook is always found after links in square brackets.
A link-repeat is a link that can be clicked multiple times. Here is an example of a variable that increases with each click:
(set: $cheese to 0)
(link-repeat: “Add Cheese”)[(set: $cheese to $cheese  + 1)]
This code sets the variable cheese to 0, and increases it by one each time the link “Add Cheese” is clicked.
If Statements
If statements check the condition to see if the variables meet the requirements. Add a hook after the if statement that tells the program what to do when the condition is satisfied. If statements can be extended by using else-if and else to check other conditions.
(if: $hasS1 and $hasS2 and $hasS3 and $hasS4 and $hasS5 and $hasS6)[You cannot carry all the statues. You need to put some of them back! [[Statue Room]]]

(else-if: $hasS3 and $hasS5 and $hasS6)[You have grabbed the correct statues! You were successful in completing the mission!]

(else:)[You have not grabbed the correct statues. Go back and try again! Be quick or you might get caught! [[Statue Room]]]
Timer
To add a timer to a passage use the following code:
(set: $counter to 10)
You have (css: "color: red; font-size: 250%")[|amount>[$counter]] seconds left!
(live: 1s)[
(set: $counter to it - 1)
(if: $counter is 0)[(go-to: "Next Passage")]
(replace: ?amount)[$counter]
]
Line 1 sets the amount of time, in seconds, a player has to complete the game.
Line 2 displays the number of seconds remaining in large, red numbers.
Line 3 sets the frequency with which the code is repeated.
Line 4 decreases the timer by 1 second.
Line 5 sends the player to the passage indicated by the title in quotations when the counter gets to 0.
Line 6 sets the time displayed as it decreases each second.
Conclusion
To end the module students can try each other’s escape room or code breaker and write a review. The review should include what they liked about the story, if it was too hard or too easy, suggested changes, and if they would recommend it to a friend.
Resources
- W3Schools has a list of HTML colours by name and hexidecimal value.
- Twine Wiki has links to specific actions such as adding a video.
- The Science Fiction and Fantasy Writers of America explains how to use variables in a Twine story.
- Twine Tutorial – Variables looks at the different types of variables in Twine and how to program them.
- Escape Room Tips has great suggestions of things to include in your escape room to make it unique and fun.
- Learning Twine: Escape Room runs through how to build a simple escape room in Twine.
You might also like

Using Twine For A Novel Extension Activity
 Grade 9 – Grade 12

Creating A Word Monster Game Using Twine
Grade 9 – Grade 12