Section Navigation

Introduction
Animaton is an integral part of almost every video game and application. In fact, animation has been cited as one of the most important factors in keeping a player interested in a game. The more animation a game has, and the better the quality of that animation, the more likely a player is to remain engaged in that game. Animating pixel art uses similar techniques to traditional animation in cartoons, anime, and films. Animation is created by rapidly cycling through a series of still images, called frames, that show a picture in stages of motion. The main difference with pixel animation is that it generally uses fewer frames, and is developed one pixel at a time.
Learning Goals
The techniques introduced in this module can help improve the quality of a student’s final pixel art graphics. Students will gain a better understanding of using image editing software to create graphics as well as common mistakes to avoid.
Vocabulary
Animation - A series of images displayed in sequence to give the illusion of movement.
Keyframe - An image representing the start or end point of movement in an animation.
Inbetween Frame - Frames drawn between keyframes to smooth the motion by showing intermediate steps.
Weight - The illusion of kinetic forces acting upon a drawn object.
Guiding Questions
- Can you perceive “keyframes” by rapidly blinking your eyes?
- How can animation be made smoother?
- What drawn changes could increase the feeling of weight in an animation?
Curriculum Links
This module provides an opportunity to address curriculum expectations in the Arts and Computer Studies in Grade 4-6. In particular, students will be introduced to the software Graphicsgale. This assignment will also demonstrate how to use image editing software to create graphics.
Materials
- GraphicsGale – Download GraphicsGale
- Art Assets – Download Assets Folder (ZIP)
- Flip-books/notepads/post-it pads
- Pencils or pens
Non-Computer Activity
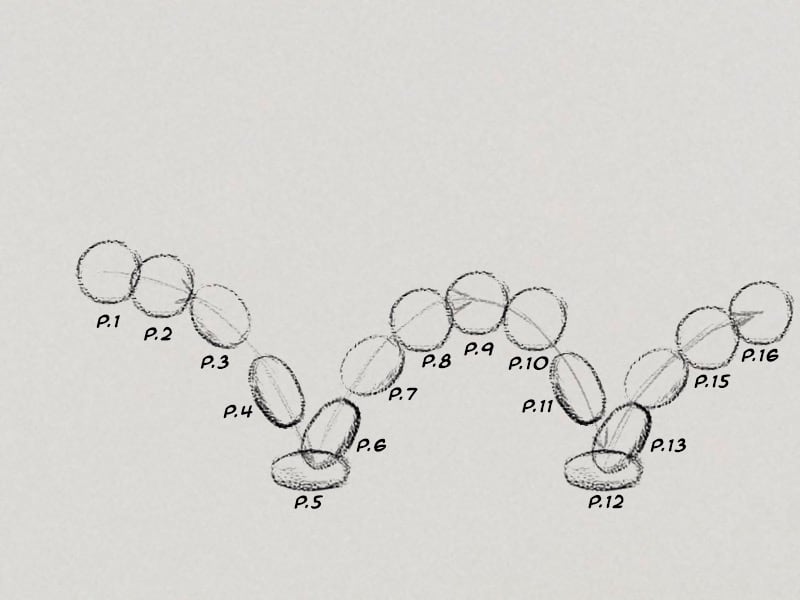
Traditional animation works by rapidly cycling through a series of still images showing a range of motion. Using flip pads and pencils we can easily create a simple animation of a bouncing ball. We will first use keyframing, then go back and draw the inbetween frames. We will need 16 pages in total.
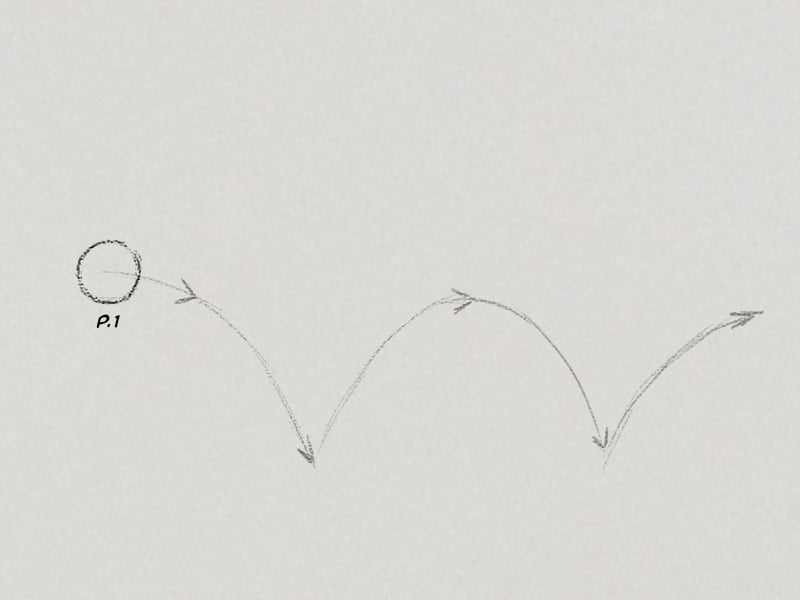
To start, draw a circular ball on the middle-left edge of your first page. This establishes the size of the ball to track across the following frames. The ball will follow a path like the one drawn below. Tear off the last page of your pad, or use a separate piece of paper to draw out this path. Use this as a template to keep the ball’s path consistent throughout the animation.
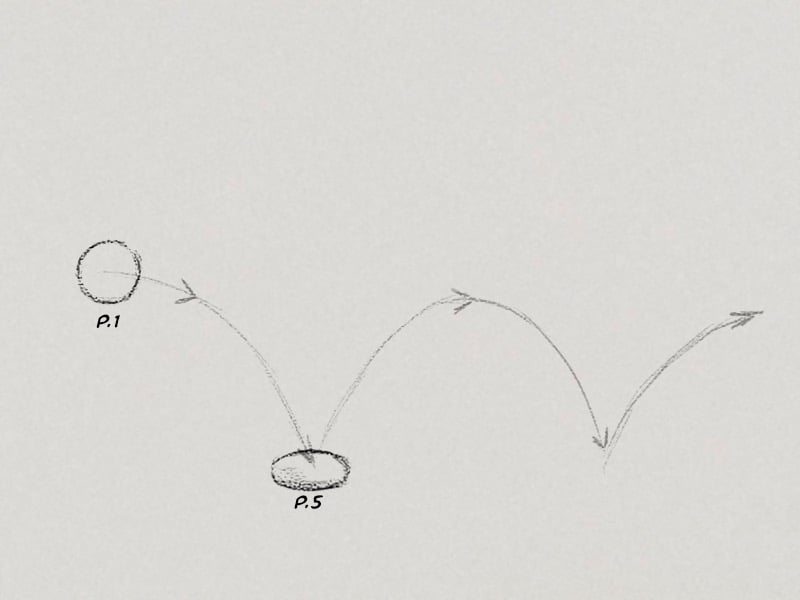
Turn to page 5 of your pad and draw a slightly squished ball at the bottom of the first arc, as shown below. Use your path template to line up where the ball should go. In traditional animation, the paper used is much thinner, so that multiple pages can be seen at the same time, but that likely isn’t the case with your pad, which is why a template is helpful.
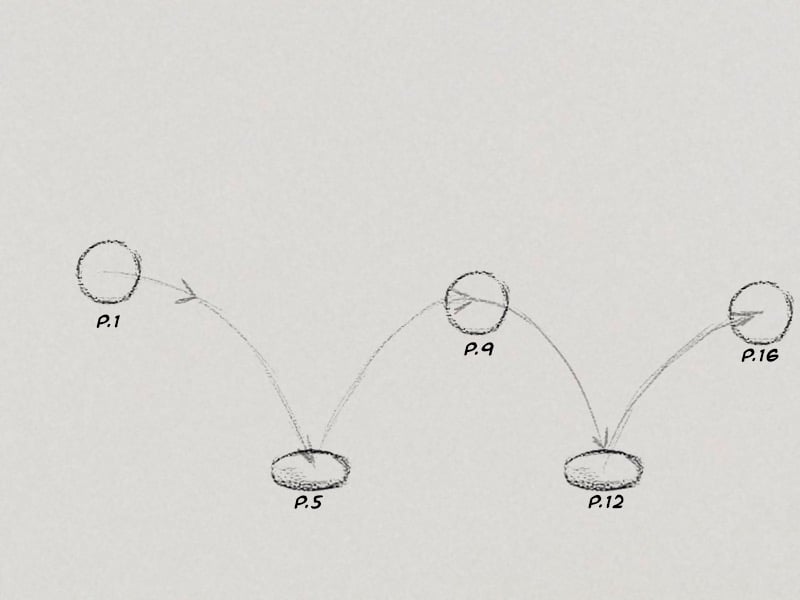
On page 9, at the top of the second curve, redraw the ball in its original shape and size. Then draw the same slightly squished ball at the bottom of the second curve on page 12. Finally, draw the full round ball at the top of the last curve on page 16. These are your keyframes; the major points in the motion of your ball.
Now we will add the in between frames, to make the motion complete and smooth out the transitions between the keyframes. On the pages before and after the keyframes where the ball is at its height we need to add frames of the ball travelling along the path, still in its original shape. At this point, there are no forces acting on the ball to deform its shape, so it is full and round. You can use the picture below to reference where you should place and draw your frames.
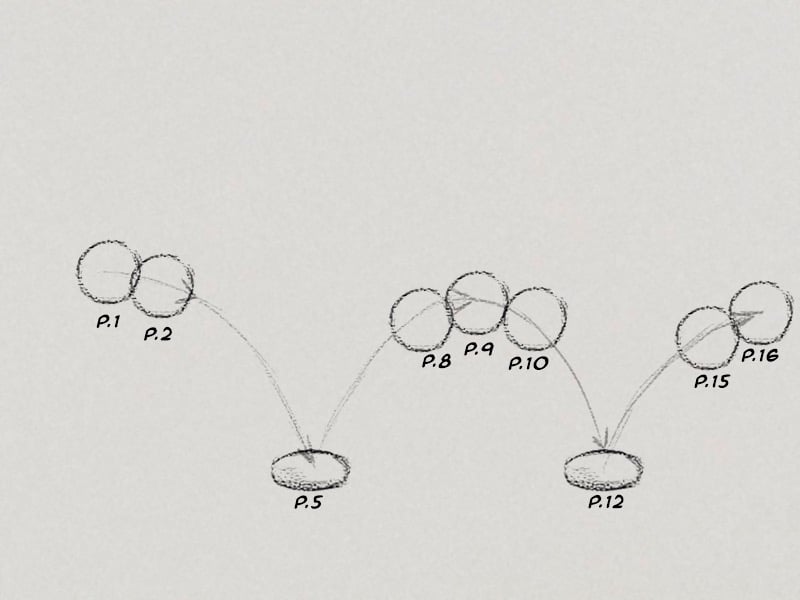
As the ball approaches the ground, out of the apex of the bounce, it begins to pick up speed. To help show this, we can stretch the shape of the ball slightly. In the keyframes where the ball has impacted the ground, all of that momentum is directed downward, but the ball has nowhere left to travel, so its shape squishes outwards. Then the energy bounces the ball back upwards, rapidly, resulting in another stretched image of the ball. This visual stretching is called adding weight to an animation. It depicts the kinetic forces acting upon an object in an image and vastly improves the realistic quality of the animation.
Here is the final reference image showing where you should draw the stretched ball shapes.
Now, use your thumb to flip through the pages of your pad, and you should be able to see the motion of the ball bouncing. You’ve made your first animation!

Computer Activity
Using the skills developed in previous modules—making sprites and working with layers—we will now create a simple character sprite and animate a walk cycle in four frames. For this animation we will use very basic keyframing, and create images that show a character at the most distinct parts of the motion we want to animate.
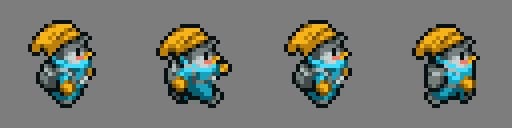
This example shows a very simple four-frame walk cycle. Frames one and three show the character standing upright, while frames two and four show him at the extremes of his step. This animation sequence is very common in games and is still used today. The only problem with this animation is that it lacks weight. In animation terms, weight refers to the feeling of gravity in the motion of a character or object.

Right now there is very little weight in this animation cycle. The clothing and hair feathers remain motionless while the character walks. With some minor adjustments we can make this look better.
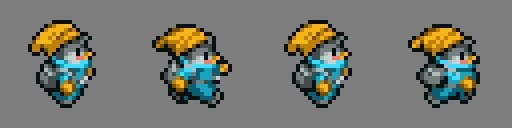
In this example some minor changes have been made that can have a great impact on the quality of the animation. The pompon on the character’s hat bounces upwards slightly, as does his hair feather and backpack. All of these elements are lighter weight, and more affected by the bobbing motion of the character walking. Making these small changes creates a more believable walking animation for the character.
Let’s animate a walk cycle in GraphicsGale using a simple character template.
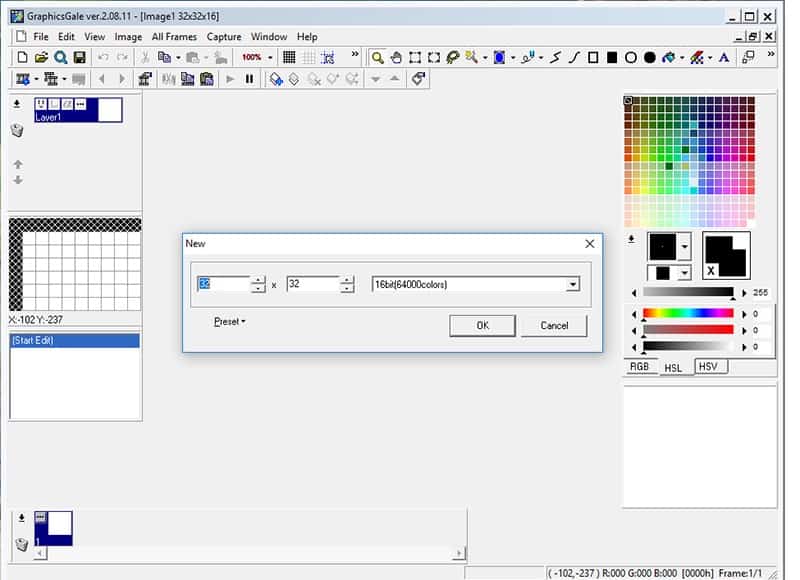
The source files for this walk template are walk_01.png, walk_02.png, walk_03.png, and walk_04.png. Open GraphicsGale and create a new 32x32px image (16-bit colour). Maximize the canvas and use the magnification tool to zoom in to 800%.
To import the existing template frames navigate to Edit>Import and find the location where you saved the template files. Select walk_01.png and left-click Open. The first of the walk template frames should open in your canvas. By default, any imported images are floating above the current layer until they are committed, to allow the user to adjust placement. We don’t need to adjust the image at all, so simply right-click anywhere off the image to commit it to the layer.
Because we want to create an animation, not a layered image, we will work with frames. To add a new frame, left-click the Add Frame button on the bottom left of the toolbar. Select this new frame by left-clicking it in the Frame Panel at the bottom of the screen. Import the second walk template image by going to Edit>Import, selecting walk_02.png, and left-clicking Open. Commit the imported image by right-clicking off of it. Repeat the process for adding layers and importing images for walk_03.png and walk04.png, adding a new frame, importing the image, and committing it to the frame.
Before working on the animation we should add an alpha colour to the background of each frame. An alpha colour is a colour not likely to appear in the colours used when drawing a sprite, so it can be easily selected to be made transparent in the final output image. For this, we will use an alpha pink. Select a swatch in the palette at the right by left-clicking it and click the RGB Tab below. In the input panels to the left of the sliders, enter R:255 G:0 B:255 Left-click the bright pink that should now be the Foreground Colour swatch, and drag it to a swatch in the palette.
Select the Flood Fill tool from the toolbar, with the alpha pink set as your foreground colour, and left-click in the background of the canvas to make the white background totally pink. Left-click to select each of the four frames in turn, from the bottom Frame Panel, and flood fill the background of each frame with alpha pink.
Now we need to ensure the pink background is not displayed in the final image. To do that, click on the option button on the active frame in the Frame Panel. The frame Properties tab will open, with a variety of options visible. Ensure the Transparent Colour box is checked, then click the eyedropper button below it. When a preview of the frame opens, click on the area of the frame you want to be invisible. Click anywhere the alpha pink is showing to set it as the transparent colour. Then click OK to apply the changes.
Pink will still be visible in the canvas, but that is for ease of drawing. There should be a preview of your animation running below the Palette Panel. You should be able to see all four frames running in a cycle, to test your animation. Now that one frame has a transparent background, it should show a pink background that flickers to a white one every four frames. Repeat the process for the other three frames, clicking the options buttons and setting alpha pink to be transparent in each.
Now we can start to draw over the frames to make a unique character. You can use the Pencil tool to draw over one pixel at a time. Another option is to use the Colour Replacer tool, to the right of the Flood Fill tool in the toolbar. To use the Colour Replacer, set the active colour as the new colour you want to place then CTRL+Right-click the colour you want to replace. Then you can rapidly draw over the image and only the pixels of the secondary colour will be affected. Remember, to set custom colours in the palette, use the sliders beneath to set the active colour, then drag that colour from the active colour swatch to a swatch in the palette.
When you are working on editing your frames, remember that you can click the frame you want to work on in the Frame Panel, or you can cycle through them using the left and right arrows in the toolbar. If you want a better idea of what you’ve drawn on the frames before or after the current one you can toggle off or on the Onion Skinning button. This makes other frames translucent, as if they were drawn on traditional animation paper. You can use the little drop-down menu to decide if the preceding frame, the following frame, or both are translucent.\
Once you have redrawn all of your frames, take a final look at the preview window. You can check if your animation is as smooth as you’d like it to be and you can track down any frames that might be an issue. Scrolling through them with the backward and forward frame buttons can also help. If you want to change the frame timing, to either speed up or slow down the animation, you can click the options button in the Frame Panel. The Delay tells the program how long to display each frame for, before switching to the next in the sequence. Play with the number in the box and see how it affects your animation. Once you are happy with the speed, click OK to apply the changes.
Now it’s time to export the final image as an animated GIF. GraphicsGale natively supports animated GIF as a format, which makes the process easy. Just go to File>Save As to open the dialogue. Choose the location you want to save the file, give it a name, then choose GIF from Save as type dropdown. Make sure the box marked Loop is checked in the bottom right, to ensure your GIF repeats endlessly. Click Save and you’re good to go!
If you want to enlarge the image for sharing go to All Frames>Resample before you save it. You can resize by pixels or percentage. To maintain the integrity of the pixels use percentage, and do it in factors of two. Try 200% to start, making sure Keep Aspect Ratio is checked and Smooth is UNchecked. Smoothing will blend and round your pixels, adding additional colours into your image and making it unusable for game applications, so it’s best to make sure it is always unchecked. After resizing, save as normal.
Voila! An animated sprite!
Conclusion
Animation brings life to on-screen images. By using some simple techniques you can greatly improve the quality of your game and asset graphics. Now that you have an idea of the process of creating animated sprites in GraphicsGale you can try applying those skills to other sprites, tiles, text, and so on. If you export your sprites as PNG files, you can even bring them into Scratch or another coding program and use them as a basis for developing your own games.
Resources
Additional Resources
- PXLFLX – Basic Animation in Photoshop
- Jason Perry – Animation Basics
- Gamasutra – 2D Animation Tips
Social Media Resources
- PixelJoint
- Pixelation
- Reddit – /PixelArt
- Twitter – #pixelart
