

Introduction
In this tutorial, we will be taking a more detailed look at the steps to create a video game narrative from the Video Game Narrative: The Different Types and How To Start Writing tutorial. We will be continuing with steps four to seven:
4. Create your main character(s)
5. Create a flowchart of your major story
6. Start writing the major story
7. Add in small details: side quests, NPCs, etc.
The goal of this tutorial is to give you more information and support on finishing your video game narrative and provide guidance so you can complete your narrative masterpiece!
For those who are interested in creative writing, storytelling, video games, script writing, film making or any other type of story-based media, this is a great opportunity to practice. At the end of this tutorial, you should have a better understanding of the last few steps involved in creating a video game narrative, as outlined by E.M Welsh in How to Create a Video Game World and How to Write a Good Video Game Story.
Vocabulary
Pre-established character - characters with a set backstory, behaviour and look
Player-created character - characters who are constructed by the player with the tools and objects that the game provides
Arc (story/narrative) - extended/continuing storyline in episodic storytelling (i.e. the story unfolds over time)
Story start/end nodes - used to convey the beginning or end of a story
Story exposition nodes - represent story fragments to the players
Story choice nodes - any story decision in the narrative
Challenge choices - story choices that are based on the player’ performance to overcome a conflict. Challenge choices always flow into failure or success story exposition nodes
Player choices - story choices based solely on the players will
Random choices - story choices generated based on randomness or luck
Cutscene - a scene that develops the storyline
Materials
The materials you use for this tutorial are up to you, but here are some suggestions:
- Pen
- Paper
- Twine
- Word processor
- Any digital art/drawing software, some suggestions:
- Free online flowchart builder, Lucidchart
Non-Computer Activity
Step Four: Create your Main Character(s)
We have already talked a bit about the types of characters in the previous lesson but in this step, we will be diving deeper into the steps to create your main character from scratch as outlined in the blog post by E.M. Welsh.
In video games, there are two ways in which the main character is created: pre-established or created by the player. This distinction is important because video games have a player-character dynamic that affects how we may perceive the character, and therefore, they need to be created in a way that allows the player to believe they are the game character at some level. This is where video game character creation is different from character creation in other mediums (books, tv, movies, etc.). Pre-established characters are those with a set backstory, behaviour and look, while player-created characters are those who are constructed by the player with the tools and objects that the game provides. For the purpose of this lesson, especially if this is your first time writing a video game narrative, it is suggested that you start with a pre-established character as it may be easier to conceptualize (i.e. you won’t need to account for the possibilities of player choices).
The first step is to choose which main character type you will write for your narrative. To do this, it may be helpful to understand the benefits and drawbacks of both choices:
Pre-established Characters
Pros
More control over character storylineIcon/memorable characterLess/no in-game possibilities to account for when writing
Cons
Backstory may be difficult to explain in-gamePlayers don’t always identify as the character enoughResults in writer “crutch” of amnesia storyline to explain backstory
Player-created Characters
Pros
Easier for player to believe they are the character on some levelAllows for player to build the character they wantMore personal journeyLess time spent plotting every specific detail of the character
Cons
Required to write many different versions of the character = more workToo much player freedom can cause issues with player-character dynamic
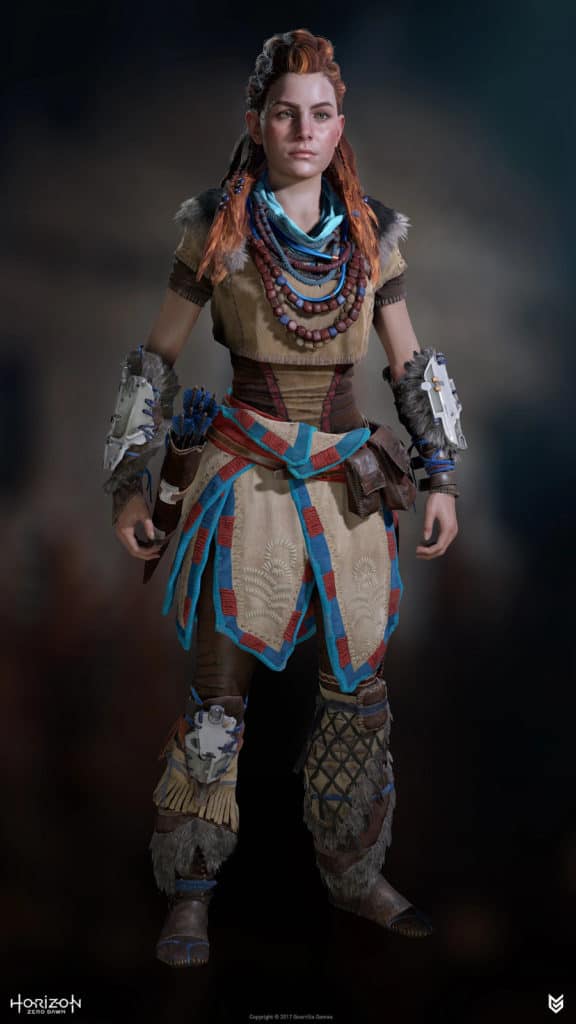
Regardless of your choice, you will have to account for the player-character dynamic and experience. You need to make the player believe they are going on the journey with/as that character. For those who are having a hard time choosing between the two main character types, try creating a combination of the two! This is a possibility if you want a generally pre-established character but allow the player to shape the character’s personality through dialogue choices, such as Aloy in Horizon Zero Dawn.
The next step is to give your character some characteristics and a background. This can be done in any way that you want and is similar to creating a character for other storytelling mediums. Some prompts to consider:
- What are their strengths?
- What are their weaknesses?
- Do they have pet peeves or obsessions/hobbies?
- What kind of personality do they have? Creative? Inquisitive? Shy? Adventurous? Etc.
Each person will have their own unique way of completing this step; some people may create physical vision boards or digital vision boards on Pinterest for the character, some may work out the characteristics by creating lists, charts, etc. Regardless of how you complete this step, the most important aspect to consider is WHY – why is your character in the story? Why is it important they are here? It’s important to be clear about why they are involved, then continue to plot the different characteristic options of who they are, what they look like, the different attitudes and personalities, etc.
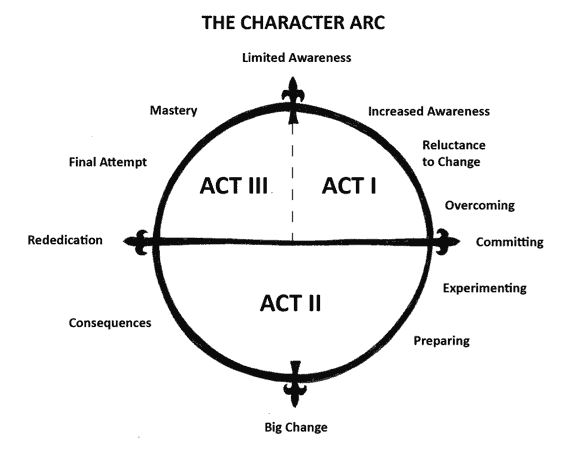
Next, you will need to write an arc for your character. Below is an example of a character arc template. It’s worth noting that there are many different ways to write a character arc, the visual below is only one way but it includes many aspects that are important to consider when developing a character. This arc is different from the story arc – they can be cohesive or completely separate. The goal is to make this distinction because they are two different stories that happen to coexist. The story arc will stay the same, but the character arc may change depending on the player choices (if this is the type of story you’ve written). This step assumes that you have finished writing the story arc; if you have not, you will need to complete that first. Once you’ve completed the story arc, you can write the character arc and see how it fits into the story arc as well as the world arc. Remember: your world will also have an arc including the history, lore, etc.
After you’ve written the main character arc, the next step is to use that arc to create relationships with other characters. This is where your main character will be expanded by creating interaction with others – both good and bad. You may have already established which additional characters you’d like to include in your narrative – great! If not, don’t worry! This is the time to brainstorm the other characters you’d like in the narrative. To begin, consider how relationships are created in the real world – how are they formed? How do individuals create a healthy (or unhealthy) relationship? What does it look like for platonic friendships vs romantic relationships? How do people stay true to themselves while going through changes in their life (and how can your character do the same)? Remember: People go through changes and grow, your character may do the same but the core values and traits of them as an individual must stay the same in order to create a believable character.
The last step to main character development is to keep adding other characters. The side characters in your world are very important to the overall development of your main character. The people we surround ourselves with are the ones who have the deepest influence on who we are, so we want to create other characters that will influence our character to be who we want them to be. How the main character interacts with these other characters will control how the main character/player perceives themselves in the main storyline and in the world. The amount of side characters added to your game narrative is completely up to you!
Step Five: Create a Flowchart of your Major Story
This step is where you can begin to start visualizing the progression of your story on a bigger level – it may be helpful to use Twine for this step. Creating a flowchart allows you to plan your narrative from start to finish and allows you to put together everything you’ve written thus far in the narrative process into one system.
The benefit of this step is to give you an idea of what happens in your narrative and how your ideas are currently fitting together. You may notice inconsistencies in your story, issues with characters arcs or relationships, new ideas for your world might emerge, and/or opportunities for side quests may appear – your flowchart will show you where these changes may fit the best for your desired narrative!
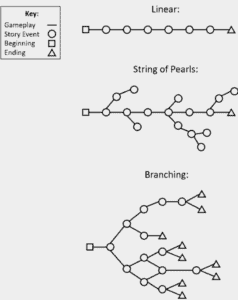
For those who aren’t quite sure how to get started when making your flowchart, here are some examples from Emanuel Montero at Gamasutra.
Interactive story flowchart Linear story flowchart
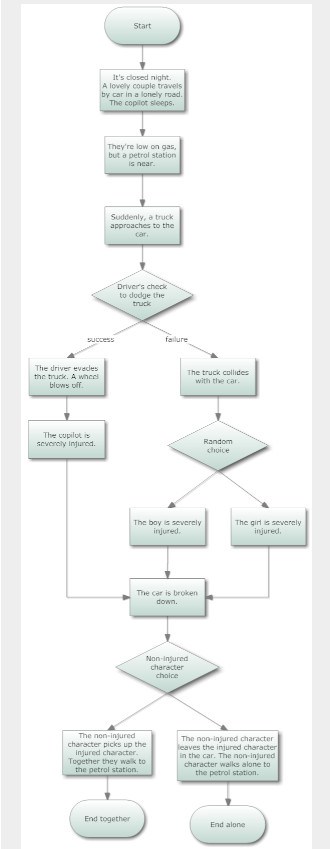
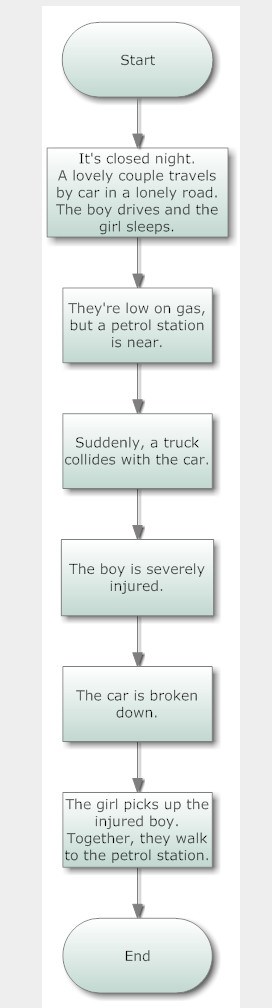
The above examples are small fragments of story narrative flowcharts to illustrate how a story can move from start to finish, depending on your chosen narrative type. The free flowchart builder, Lucidchart is a great online tool for those who prefer to work digitally. Note: Lucidchart requires you to create an account (or use a Google, Yahoo or Office365 account) but the access to the tools is free.
Here are a few flowchart elements to get you started with plotting your narrative:
- Story start/end nodes – used to convey the beginning or end of a story
- Story exposition nodes – represent story fragments to the players
- Story choice nodes – any story decision in the narrative
- Challenge choices are story choices that are based on the players performance to overcome a conflict. Challenge choices always flow into failure or success story exposition nodes
- Player choices are story choices based solely on the players will
- Random choices are story choices generated based on randomness or luck
Step Six: Start Writing the Major Story
Once you have your story plotted in a flowchart, it will be extremely helpful to reference when starting to write the major story. The key to remember when writing the details of the major story is to focus on one core version of the story, even if you decided to write a complicated and interactive story. Finishing one version of the story first will allow you to organize the events of your narrative and give you the opportunity to strategically add in any storyline deviations easily.
To begin writing, you can decide what method works best for you but if you are unsure how to start, here are a couple of options:
- Begin writing the story as a summary
- Pick out the essential elements of your narrative and organize them into a cohesive, forward-flowing story
- Start writing scene-by-scene
- Outline the specific events of each scene from beginning to end
- Focus on cutscenes with minimal interactivity/free choice
- Know your purpose of the scene and plan the major plot points involved
For those who are new to creative writing, consider starting with a summary of your major story, followed by writing the cutscenes and finally, writing the details of each specific scene. This method will allow you to build from the bottom-up and give you the opportunity to ground your story in the scenes with minimal interactivity.
This step is the opportunity to focus on the “structural bones” of your narrative – you are writing the framework of your story and in the next step, you will add the bulk/substance of your story. Remember: writing a video game narrative is a process that takes time and practice; your skills will get better the more you write so keep going, have fun and let your creativity come out!
Step Seven: Add in Small Details – NPCs, Side Quests, etc.
Congratulations on making it to this step of the writing process! You are on your way to finishing your video game narrative and this is the step where you can get really creative with the fine details.
Since this is the last major step in the process, feel free to tackle this any way you think is necessary for your narrative. For example, for some of you this may mean more work to fill out your world by adding NPCs, side quests, objects, tools, etc. to enhance your storyline, and for others (who are writing an interactive narrative) this may be the time to work on the branches of your story, write and explore alternate endings and how the player can achieve those endings.
Here are some things to consider when filling in the small details of your story:
- NPCs – Who are they? How are they going to interact with the main or side characters? What is their purpose?
- Side quests – What do the character(s) have to accomplish? What’s the issue they have to overcome? What part of the world does it take place? What is available to them to complete the quest? What happens if they fail or succeed?
- Objects/tools – What items are in your game? What is the purpose? What do they accomplish? Who are they for? How do the characters use them? Is there a storyline for any items? How does that storyline interact/affect the main story arc, character arc or world arc?
- Dialogue – Between characters, NPCs, narrator, soliloquy? What important information is included in these dialogues? Does it reveal something about the character, mission, or any items? How can the player use the information to their advantage and what happens if they don’t?
- Challenges – Are there any one-off challenges the main character has to complete? What is the purpose? What do these look like?
- Real-world influence – Does your story or world have any connection to the real-world? Is there historical information that affects your story? Why? How does this enhance your storyline and/or the player experience?
There are many different elements to consider during this phase of planning/writing and the more you practice writing the more you will be able to identify which details are important for you to explore. During this process, you may generate ideas that don’t necessarily work in this narrative but they may work in another narrative – write those ideas down! This will give you a great base to begin writing another narrative and practice your skills. As with any skill, narrative writing takes time, patience, practice and dedication to become great at it and for those who wish to pursue this further (perhaps as a career), here are some tips to enhance your skills:
- Read, read, read! As much as possible, read all types of stories: fiction, non-fiction, mystery, fantasy, newspaper articles, magazine articles, blogs, etc. There are many things you can learn from reading others’ writing (both good and bad)
- Play different video games! If you want to write a video game narrative, it is a good idea to expose yourself to many different types of games. This will help you better understand video game mechanics, what types of stories you enjoy the most and what elements make a good narrative
- Practice your writing! Use the skills you gained during this series to practice any type of creative writing, whether that is short stories, poetry, script writing, plays, songs, speeches, personal essays, memoirs, etc.
Conclusion
We want to see the awesome things you’re creating! Take a photo or video and share your work with us by emailing media@pinnguaq.com or tagging @pinnguaq on Facebook, Twitter, or Instagram. Don’t forget to include the hashtag #LearnWithPinnguaq!
Resources
- Lesson 1: Video Game Narratives Types and How-to Start Writing
- Lesson 2: Game Narrative in Detail Steps One, Two, Three
- Adam Schnitzer, “How to Build a Better Cut Scene” Gamasutra (blog), March 6, 2003,
- Emanuel Montero, “Story Flowchart Diagrams” Gamasutra (blog), November 6, 2009,
- E.M Welsh, “How to Write a Good Video Game Story” taken May 2020.
- E.M. Welsh, “How to Write Video Game Characters” taken May 2020.
- E.M. Welsh “How to Create a Video Game World” taken May 2020.
- “Narrative Designer: How to Kickstart Your Career” Game Designing online May 2020.
You might also like
Lost In Space: Intermediate Moving Maze Game Tutorial
 Primary – Grade 6
This tutorial for Lost in Space will explore a different way to move a sprite and make a costume rotate in Scratch while building on knowledge that was learned in the Beginner tutorial.
Video Game Narrative: The Different Types and How-to Start Writing
Grade 7 – Grade 12
An introduction to video game narratives: the different types of common narratives. Learn how to begin conceptualizing your own video game narrative and practice applying your knowledge!
Game Narrative in Detail: Step One, Two, Three
Middle – Grade 12
This tutorial will take a detailed look at the first 3 steps involved in creating a video game narrative and provide the learner with more direction to get started on writing their own narrative.
