
Introduction
In this tutorial, we will be taking a more detailed look at the steps to create a video game narrative from the Video Game Narrative: The Different Types and How To Start Writing tutorial. We will be starting with steps one to three:
- Outline the major storyline
- Decide the type of game
- Develop your world
The goal of this tutorial is to give you more information and support on beginning your video game narrative and provide guidance so you can flex those storytelling muscles!
For those who are interested in creative writing, storytelling, video games, script writing, film making or any other type of story-based media, this is a great opportunity to practice. At the end of this tutorial, you should have a better understanding of the first few steps involved in creating a video game narrative as outlined by E.M Welsh How to Create a Video Game World and How to Write a Good Video Game Story.
Vocabulary
Narrative - spoken or written account of connected events (a story)
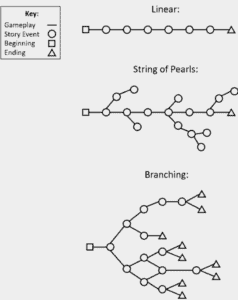
Linear narrative - A type of narrative that follows a very specific forward-motion set of events; it doesn’t allow the player to back track, skip ahead or influence the storyline at all.
String of Pearls narrative - A type of narrative that creates game play as a general linear progression but can be influenced by the player.
Branching narrative - A type of narrative that is central to the players choices. Allows the player to control the progression of the plot and the changes the ending depending on their choices.
Amusement park narrative - A type of narrative that allows the player to control the story through interaction but rather than completing missions or side quests, the player finds these branches through interacting with the NPC that is attached to that particular storyline.
Protagonist - Main character; the character that the story revolves around.
Deuteragonist - This is the second-in-command or “sidekick” to your protagonist.
Antagonist - Anything that causes the protagonist drama or conflict.
Love interest - Anyone who the protagonist is meant to fall in-love with.
Mentor - someone who guides the protagonist through their journey.
Secondary character - Joins your protagonist on their journey and is usually there to help them accomplish their goals.
Subplot - Created for secondary characters to give them depth.
Open world - No restrictions on where the player can explore.
Linear world - A path the player must stay on in order to progress in the game (no exploration).
Materials
The materials you use for this tutorial are up to you, but here are some suggestions:
- Pen
- Paper
- Twine
- Word processor
- Any digital art/drawing software (optional)
Non-Computer Activity
For those of you who are new to narrative writing or storytelling, it may be helpful to start with a simple narrative. I would suggest creating a linear or string of pearls type of story to begin as this will create a smoother experience for your first attempt. You can go through these lessons as many times as you want and challenge yourself to create more complicated narratives each time! Keep in mind, writing a video game narrative isn’t going to be accomplished in one day so if you run into frustration, don’t be afraid to take a step back for a while and return to your story once inspiration hits again – it’s all part of the creative process, embrace it!
Step One: Outline the Major Storyline
The major storyline will depend on the type of story you choose to write but the goal of this outline is to identify the story’s path along with the major plot points you want your character to experience. For those who want to write a linear story, your task will be less involved than those who choose to write a more interactive story; however, regardless of your choice consider starting with these areas:
- Note all the major events for each character
- List at least three different ending possibilities (if applicable)
- Make your outline as large as possible
The first thing we want to do to complete this step is choose the type of story you’re interested in writing. As I previously mentioned, a linear or string of pearls style would be a good place to start, however, feel free to choose branching or amusement park style if you’re up for the challenge!
Before youcan get started on writing major events for characters, you need to determine how many main characters you’re going to have in your story. This is completely up to you but I would recommend starting with 1-3 characters. To help you decide the central characters in your story, here is a short list of common character-types from the 9 Character Types blog post by Kristina Adams:
- Protagonist (main character)
- This is the character that the story revolves around. Sometimes the protagonist is the narrator of the story as well but not always. This is usually a single individual, however, some stories are written with two protagonists (this isn’t recommended for novice writers). For example, the classic story of Romeo and Juliet, and video games with multiple playable characters such as Heavy Rain.
- Deuteragonist
- This is the second-in-command or “sidekick” to your protagonist. Although this character is considered to be second to the protagonist, this does not make them a secondary character; in fact, this character is usually very important to the story and development of the protagonist. For example, Samwise Gamgee to Frodo Baggins (protagonist) in The Lord of the Rings or Clank from the game Ratchet and Clank.
- Antagonist (villain)
- This is a very interesting character because it can essentially be anything that causes the protagonist drama or conflict. The villain of your story is a way to create deeper connections to the protagonist and their journey, but keep in mind they are not always “evil”. It doesn’t always have to be an individual; it could be an internal villain such as mental health issues. Other antagonist-types could be: evil (e.g. Lord Voldemort from Harry Potter) opposing (natural actions that oppose the protagonist’s goal, e.g. Toby to Michael from The Office ) and superior (anything that naturally dominates the protagonist such as religion, nature, etc., e.g. machine vs humanity in the Terminator series).
- Love Interest
- This is anyone who the protagonist is meant to fall in-love with. This character usually has a strong influence on the protagonist and can be a secondary character, the deuteragonist or perhaps, the narrator.
- Mentor
- This is someone who guides the protagonist through their journey and is often meant to be a temporary character. For example, Gandalf the Grey to Frodo Baggins in The Lord of the Rings.
- Narrator
- This is the person or general voice taken during the storytelling journey; it can be the protagonist, deuteragonist, or a third-person voice. For example, the Prince of Persia games have a prominent narrator voice.
- Secondary character
- This is someone who joins your protagonist on their journey and is usually there to help them accomplish their goals. Subplots are sometimes created for secondary characters to give them depth. For example, Ron and Hermione in the Harry Potter series.
Once you’ve decided the 1-3 types of characters you would like in your story (don’t worry about their personality/specific characteristics just yet), begin to write their major events.
TIP: if you’re having trouble choosing the type of characters to include, start writing the major events you want your protagonist to go through and often ideas will spark on how-to include the antagonist and others.
Remember, this is just a summary of the major events that the character(s) will endure – don’t worry about being too specific; that will be written later. It might be helpful to think about the major events in relation to the story progression. What could happen to your character(s) during the main elements of the story? Write down all of your ideas! The more options you brainstorm now, the more support you’ll give yourself later during step six, when you begin writing the fine details.
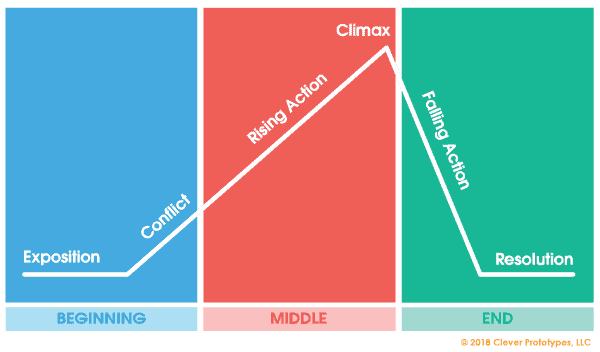
- Exposition: the beginning of the story
- Conflict: the struggle between two opposing forces; this is what drives the story
- Rising action: the journey leading up to the climax
- Climax: the turning point(s)
- Falling action: the events that happen directly after the climax
- Resolution: the consequence of the conflict (resolved or unresolved)
After the major events have been mapped out, move on to writing three different ending possibilities. This is beneficial because it allows you to envision the storyline from start to finish and for those who wish to write an interactive narrative, you must account for multiple endings depending on the player choices. Again, write these endings in a general sense without getting too specific – this is to give you a starting point for further imagination later in the process. The ending to your story can be anything you want. If you’re not sure how to begin writing different endings, take a look at the major events and brainstorm potential endings based on those events.
Don’t be afraid to go back and expand on your work so far; creating a narrative will not be a linear process, rather, a more arbitrary process where you may want to return to a previous step and add more ideas.
Step Two: Decide the Type of Game
In order to effectively create a cohesive video game experience with your story, you must consider game mechanics and the different types of games out there (this is where video game experience comes in handy!). The type of game acts like a framework for your story. There are many types of games including hybrid games, so the more experience you have playing several different types of games the better, as this can help you decide how you want your game to be structured. Common video game types include:
- Action-adventure (e.g. The Legend of Zelda series)
- Role-playing games (RPG) (e.g. World of Warcraft)
- First-person combat (e.g. Goldeneye 007)
- Puzzles (e.g. Professor Layton series)
At this point in your planning, you should start thinking about how your story so far could fit into the above types of games. Perhaps you’ve already thought about the type of game you’d like to write for and have had that in the back of your mind thus far, that’s great! For those that are still deciding and are having difficulty choosing, this is where I would recommend playing different video games!
Pause from planning and take the time to experiment with different video game types and envision the mechanics as it relates to your story. Sometimes the games you enjoy playing the most are the types that you could write for and sometimes they’re not. For example, I personally love playing puzzle games but I’m pretty certain I wouldn’t be great at writing the narrative for one.
Step Three: Develop your World
For this part of planning, you may want to create your main character(s) first if you have a really clear idea but E.M. Welsh suggests beginning with the world, as it aids in character development. Developing the world may be the most exciting aspect of story creation because a lot of the emphasis in video games is dependent on the world the player experiences. Begin creating ideas about your world with these topics:
- History of the world
- Culture
- Lore
- Setting (time, location, etc.)
Take the time to brainstorm some aspects of human/real-world history, mythology, aspects of pre-existing stories/movies/games that interest you so that you can take inspiration to build your video game world. Write down any ideas you have.
To begin planning your world, you’ll want to think about the type of world that fits best with your story. It could be a completely open world (e.g. Skyrim), linear world (e.g. The Last of Us) or a combination of both. An open world means there are no restrictions on where the player can explore, while a linear world means there is a path the player must stay on in order to progress in the game (no exploration).
Next, you will want to develop a backstory for your world. This step is important because it gives context to your story and where the player seems to be. The backstory is often discovered piece-by-piece when the player is exposed to hints through items, interactions with objects and through visual cues.
While you’re developing the backstory of your world, you will likely have begun the next step which is creating the culture of your world. This can be as complicated or as simple as you’d like. For example, many game worlds have an order or hierarchy (especially fantasy worlds) where one class/species is more superior to another. This is a specific way to develop the culture of your world because it could open possibilities for conflict to occur. Another way to be specific is to develop multiple cultures for your world, although I would recommend keeping it simple for your first time.
Next, you will want to consider how the backstory and culture of your world is going to be presented to the player. This is where you can build in organic ways of telling the backstory by creating the specific items you’d like the player to find. These items can be anything you want. Some suggestions are chests, letters, photos, signs, or historical artifacts like pottery, talismans, etc. It may be helpful to organize these items in a chart or spreadsheet and if possible, describe where the items might come into play for the player – you don’t have to be specific about the location, rather, a general sense of when/where it may appear.
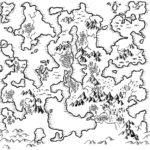
The final step to creating your world might be the most exciting of all (at least in my opinion) – draw out your map! Using paper, pencil or any digital art software, this is where you can take all the planning and brainstorming you’ve just completed and create a visual of your world. Take the time to give yourself a layout as this will really help you when you begin to write the fine details of your story. This map can be as detailed as you want. It can focus on the entire open world or it can be confined to one area of your world the player will be. The world layout will be very helpful for planning quests, placing items and creating an overall cohesive narrative for your game.
Conclusion
Stay tuned for next week where I will be getting into the details of steps four, five, six and seven of video game narrative creation!
We want to see the awesome things you’re creating! Share your work with us online by tagging @pinnguaq on Facebook, Twitter or Instagram. Don’t forget to include the hashtag #LearnWithPinnguaq! You can also send us your work by email at media@pinnguaq.com.
For more tutorials, visit www.pinnguaq.com/learn.
Resources
- E.M. Welsh: How to Create a Video Game World
- E.M. Welsh: How to Write a Good Video Game Story
- 9 Character Types blog post by Kristina Adams
- Types of Antagonists essay by Seb Reilly
- The Evolution of Video Games as a Storytelling Medium, and the role of Narrative in Modern Games by Chris Stone
- Practical Guide to Game Writing by Darby McDevitt at Gamasutra
You might also like
Scratch Mix and Match Challenge #1: Make Your Own Game
Learn how to make your own game with the Scratch Mix and Match Cards Challenge! Each challenge, you’ll get three cards showing different pieces of code to jump start your game creation.
Lost In Space: Intermediate Moving Maze Game Tutorial
This tutorial for Lost in Space will explore a different way to move a sprite and make a costume rotate in Scratch while building on knowledge that was learned in the Beginner tutorial.
Video Game Narrative: The Different Types and How-to Start Writing
An introduction to video game narratives: the different types of common narratives. Learn how to begin conceptualizing your own video game narrative and practice applying your knowledge!
