
Section Navigation

Introduction
For this module students will explore different types of chemical reactions. The teacher can decide if students will cover a specific type of reaction or if they should cover all types. Students will include videos of reactions and a description of the reaction. This module is for students who have completed the Introduction to Twine module or for those with a working knowledge of Twine.
Learning Goals
By the end of this module students will know how to add images and videos to their Twine story and be more familiar with HTML and CSS. In the process they will develop a better understanding of chemical reactions and their equations.
Vocabulary
Passage - a narrative unit; a building block for stories.
Narrative - The process of telling and structuring a story.
CSS (Cascading Style Sheets) - a styling language used for coding the presentation of a document in a markup language.
HTML (Hypertext Markup Language) - the standard markup language for designing web pages.
Reactants - substances that start a chemical reaction.
Products - substances that are produced from a chemical reaction.
Chemical Reaction - the process in which one or more substances (reactants) is changed into one or more different substances (products).
Chemical Equation - a written symbolic representation of a chemical reaction.
Law of Conservation of Mass - a Chemistry principle that states that no matter can be created or destroyed in a chemical reaction; the mass of the products must equal the mass of the reactants.
Guiding Questions
- Have you ever wondered what happens when chemicals are mixed together?
- Have you ever wondered about the science behind chemical reactions?
- Have you ever thought about what different items are made of?
Curriculum Links
This module connects directly with the Chemistry curriculum as students explore chemical reactions and how the types of reactions differ from each other. As students adjust the appearance of and add images and videos to their Twine story, they will be drawing on their CSS and HTML knowledge which links to the Computer Science curriculum. Students will draw on their English knowledge through their use of appropriate grammar and vocabulary to create an interesting story.
Materials
- Twine – Download Twine
- Cards with elements on them
Non-Computer Activity
Balancing Chemical Equations Activity
In order to understand how chemical reactions work, students must first understand how chemical equations work and how to balance them. This activity involves the students pretending to be elements (holding cards to represent their element) and rearranging themselves to show the reaction. Students will form “bonds” by linking arms. Have reactants stand on one side of the room and products on the other. The goal of this activity is for students to notice that you need the same number of people on each side of the equation (which represents conservation of mass and a balanced equation). Modify the following equations as needed to match the level of your class.
CaCO3 → CaO + CO2
For this reaction you need one calcium and carbon element on each side and three oxygen elements on each side.
Zn + H2S → H2 + ZnS
At this point ask students what they have noticed about these reactions. Are there any similarities?
2H2 + O2 → 2H2O
For this equation, start by only showing the reactants, and ask students to brainstorm what they predict what the product is. Have you noticed any consistencies yet?
CH4 + 2O2 → CO2 + 2H2O
Again show only reactants, have students brainstorm what they predict will be the product before revealing it.
- What have you noticed now?
- How many people (elements) are on both sides?
Let’s go back and look at how many people are on each side in the previous reactions.
- What does this mean?
- Keeping all this in mind, what do you think the law of conservation of mass means?
According to the law of conservation of mass, the mass of the products in a chemical reaction must equal the mass of the reactants.
Computer Activity
For this module students will create an interactive story using the vocabulary they learn from studying chemical reactions. Students can add pictures and videos of chemical reactions to enhance their stories. Teachers may add specific details they want included such as balanced equations, a description of the type of reaction, etc.
An alternative to this activity is for students to find a visually impressive reaction from an online source such as YouTube. Then research about the reaction and provide the equation, type of reaction and more.
Getting Started
- Open Twine and start a new story.
- Name your story something relevant to your topic. This can be changed later if needed.
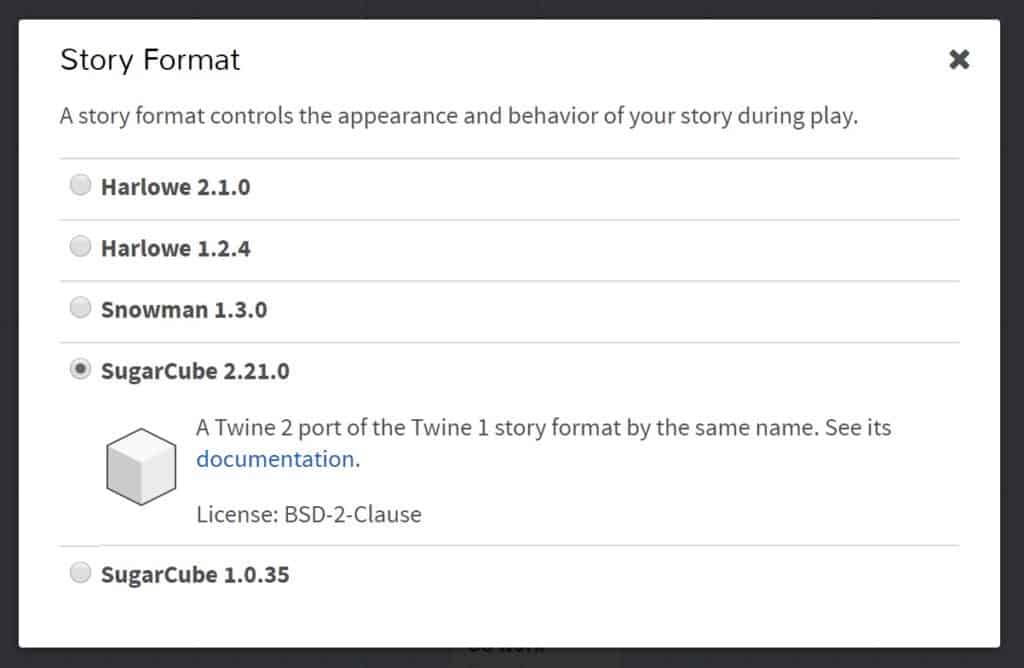
- Change the “Story Format” by selecting the arrow beside the story title. Select “SugarCube 2.21.0”.
- Start typing your story and linking passages together. To link passages enclose the title in double square brackets [[ ]].
- If you want the link to be one word and the title of the passage to be another you can add a pipe in the brackets. For example [[Lungs|Left Lung]] has the word Lungs as the link but the passage will be title Left Lung.
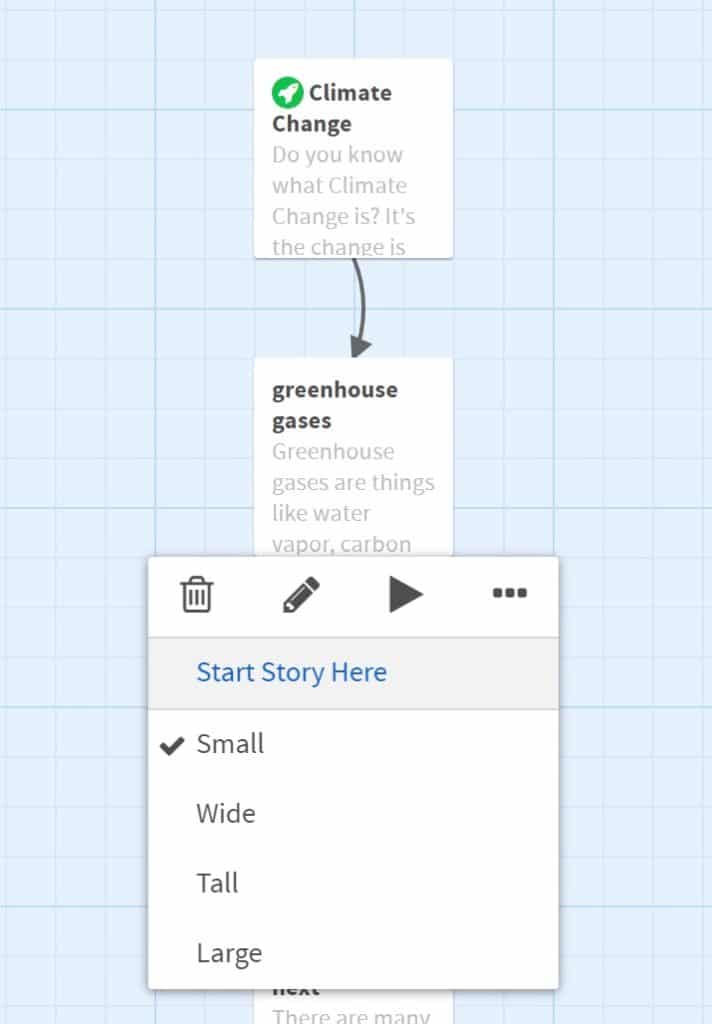
- The green rocket icon indicates the starting passage. To change this to another passage, hover over the passage, click the three dots (ellipsis) and choose “Start Story Here”.
Changing The Default Appearance
Once you have finished the layout and each path has an ending you can change the appearance of your story. Click the arrow beside the story title and select “Edit Story Stylesheet”.
There are a variety of colours that can be used in CSS and HTML programming. W3Schools lists colours by name and hexidecimal value.
body {
  background-color: MediumSeaGreen;
  color: white;
  font-family: Futura,Impact,Helvetica,sans-serif;
  font-size: 120%;
}
Line 2 changes the background colour to Medium Sea Green.
Line 3 changes the colour of the text to white.
Line 4 sets the fonts. Select multiple fonts to accommodate computers that may not have all of these fonts.
Line 5 makes the font size a little larger.
a {
  color: LightBlue;
}
This script changes the link colour to Light Blue.
a:hover {
  color: LightSteelBlue;
}
This script changes the colour of the links when you hover over them to Light Steel Blue.
Changing The Appearance Of An Individual Passage
To change the appearance of an individual passage you need to add a tag to that passage. To add a tag, double click the passage and select “+Tag” under the passage title. Name the tag something that relates to the passage. For example, let’s add a tag called “water”, as the passage talks about oceans, and this tag could be used on other passages that include the topic of water.
.water {
  background-color: CadetBlue;
  color: Coral;
}
To program a class for water, add a period in front of the name, and then format the same way as our default settings.
Adding Images
There are two different ways to add images to a story:
- By URL: add the URL of the image to your script. Some issues with this method is that you are limited to the images on the internet, and you have no control over the sites where these images were found. If the site is removed, your image will disappear.
- From a folder on your computer: create a folder where you will save your Twine story, and any images you plan on using. Then you can add these images by filename to the passage where you want them to appear.
<img src="ocean.jpg">This script inserts the image named ocean.jpg. When you test your program without publishing it, your image may not appear. To properly view your story, you need to “publish to file,” then open that file in a web browser. This will allow you to see how your story looks, and if any of your images need to be resized.
<img src="ocean.jpg" width="50%">This script sets the size of the image to 50% of the original.
Adding Videos
There are three ways to add videos to your story. As with an image, you can use a URL or insert a file saved on your computer. The other way to display a video is to embed it. To do this from YouTube, click the share icon and select “embed”. Copy the text that appears and paste it where you want the video to appear in your passage. With any of these methods, you can adjust the dimensions of the file as in the following example:
<video src=“https://www.nfb.ca/film/maq_spirit_woods/” width=“640”  height=“480”>
</video>
Again, “publish to file” to test that your video works by opening the HTML file in a browser.
Conclusion
To end the module students can test out each other’s Twine projects. This gives them more opportunities to learn and review the different reactions.
Resources
- A fun example of a combustion reaction is fireworks. This video explains how fireworks work and how they can be different colours.
- W3Schools has a list of HTML colours by name and hex value.
- Adam Hammond is an assistant professor at the University of Toronto. He has created a guide to programming in Twine. This guide includes videos and detailed instructions on how to make your Twine project the best it can be.
- The Twine Wiki page has links to specific actions such as adding a video.
- LibreTexts has a section on chemistry and covers the different types of reactions and includes videos and equations.
- Owlcation has helpful information on types of reactions and a flowchart for determining what kind of reaction is happening.
- Bill Nye the Science Guy has an informative video that examines the basics of chemical reactions.
- This video shows 10 impressive chemical reactions that will get the students interested in their project.
You might also like
Mythology Using Twine
 Grade 9 – Grade 12
Students will learn about mythology, legends and folktales while programming a Choose Your Own Adventure style story in Twine.

Using Twine For A Novel Extension Activity
Grade 9 – Grade 12
Students will be creating an interactive story based on a novel they have already read through Twine!
Introduction To Twine
Grade 9 – Grade 12
This lesson is geared towards students who want to learn code or make games. Students will be introduced to Twine with a working prototype.
