
Introduction
Scratch is an amazing way to introduce children to coding and instill an intrinsic motivation to use code in different ways, such as creating animated stories, interactive games, exciting simulations, and beautiful artwork. In using Scratch, children are developing their computational thinking skills while creating their own ideas and bringing them to life. In this lesson, learners will be introduced to coding concepts and computational thinking by creating a simple computer game.
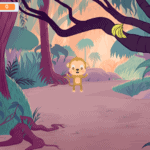
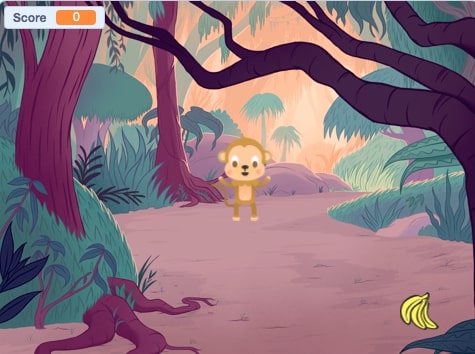
This is a beginner level lesson introducing learners to game development in Scratch. They will design a simple ‘Chase’ game in Scratch where a monkey is chasing bananas around the jungle to score points.
Through creating this game, the learner will use:
- Events blocks
- Keyboard inputs
- Touch sensors
- Conditional statements
- Loops
- Movement blocks
- Sound blocks
- Variables
Scratch makes it easy for learners who are just starting out on their coding journey by eliminating the need to write any code script. Instead it uses code blocks that are grouped by categories, such as Motion, Events, Controls, Sensing, and much more. These code blocks can be pieced together in the scripts area like clipping lego pieces together. Students can easily test their code and debug problems with their code by having the script area and the stage both visible at the same time.
By learning to code, learners can turn their love of playing games into a passion for making their own games to play and to share. Game design can help develop computational thinking skills and can encourage learners to learn how to program.
Vocabulary
- Control (Scratch Block Category)
- these blocks are used to control scripts and provide various loops.
- Event (Scratch Block Category)
- these blocks are mainly hat-shaped and sense events that trigger a script to run.
- Motion (Scratch Block Category)
- these blocks are used to control the movement of a sprite.
- Sensing (Scratch Block Category)
- these blocks are used to detect different factors in your project.
- Stage
- the stage is the background of the project, which can have scripts, backdrops (costumes), and sounds. It is 480 pixels wide and 360 pixels tall. This is where you can play your code that you create.
- Variables (Scratch Block Category)
- used to hold and refer to (i.e. use later) values and is often a temporary piece of information that can change in a code.
- X-Coordinate
- A number on the x-axis that describes where something is in terms of left and right (or horizontally).
- Y-Coordinate
- A number on the y-axis that describes where something is in terms of up or down (or vertically).
- Input
- An action that tells a computer to do something.
- Sound (Scratch Block Category)
- these blocks are used to control sound in your project.
Materials
Scratch 3.0 Online or Desktop Version
Computer Activity
The following steps will take you through the process of developing a chase game in Scratch where a monkey will chase around bananas in the jungle to score points. You will explore how to use keyboard inputs to move your ‘Monkey’ sprite around, how to code your ‘Bananas’ sprite to glide randomly around the screen for the monkey to chase, how to use conditional statements and how to add a variable to score points if the monkey catches the bananas. You will also learn how to add some fun sound effects to your game.
Step By Step Instructions
Add Your Sprites and Background
- Delete your cat sprite by clicking the garbage can with the ‘x’ on it in the right corner of the sprite box.
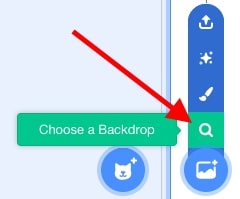
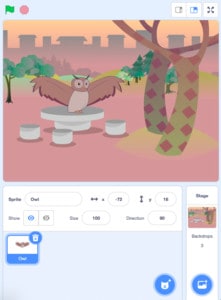
- Add your jungle backdrop by clicking on the picture icon in the bottom right corner of the screen and selecting the magnifying glass to access the Scratch backdrop library.
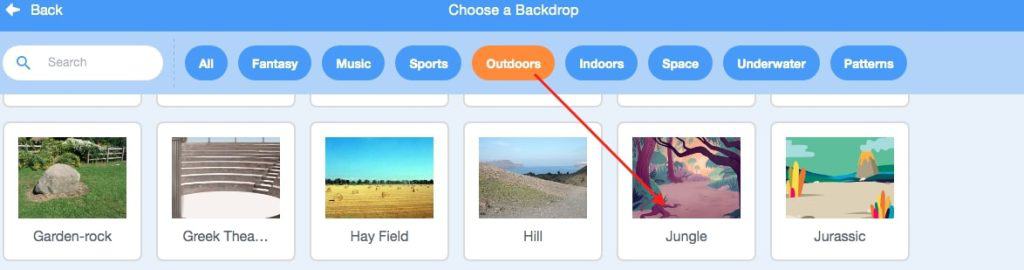
Click on the ‘Outdoors’ tab in the top menu and scroll down to find the jungle backdrop.
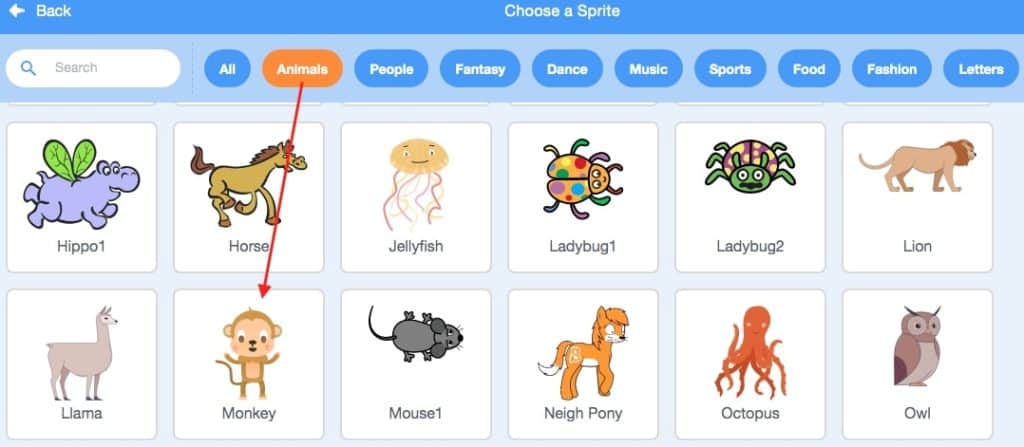
- Add your ‘Monkey’ and ‘Bananas’ sprites by hovering over the ‘Choose a Sprite’ icon in the bottom right corner of the screen and selecting the magnifying glass to access the Scratch sprite’s library.
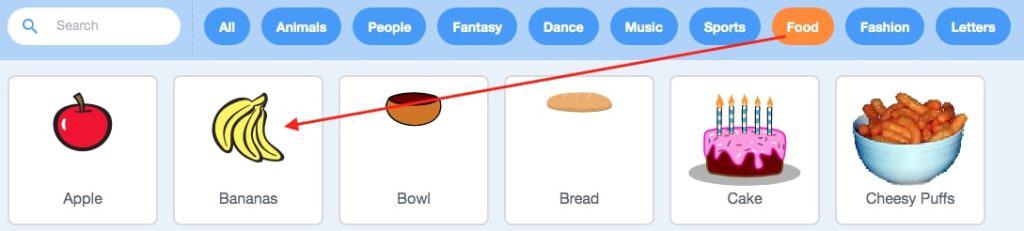
Select the ‘Food’ tab and click on the ‘Bananas’ sprite.
Select the ‘Animals’ tab and scroll down to find the ‘Monkey’ sprite.
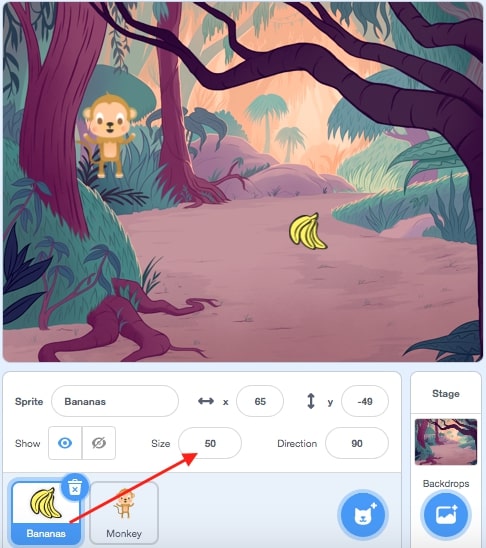
- Let’s change the size of the ‘Monkey’ and the ‘Bananas’ sprites. Click on the ‘Monkey’ sprite and change the number in the size box from 100 to 50.
Follow the same steps to change the size of the ‘Bananas’ sprite down to 50% of its original size. You can always come back to this step and make the ‘Bananas’ sprite even smaller if you’d like to make it more difficult to catch them.
Code Your ‘Monkey’ Sprite to Move Using Arrow Keys
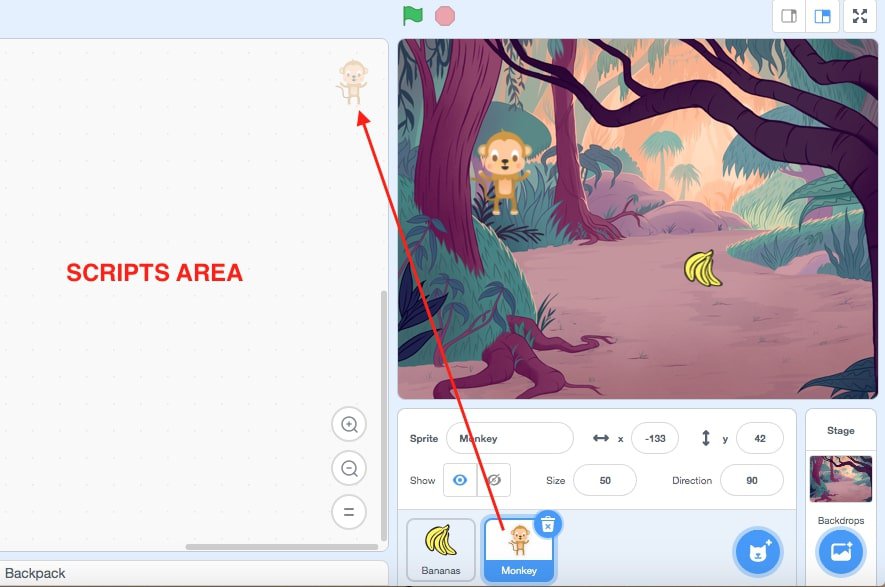
- Now you will code your ‘Monkey’ sprite to move when the arrow keys are pressed on your keyboard. Click on the ‘Monkey’ sprite in the sprite’s pane and check to make sure you are coding the correct sprite by looking at the faded picture in the top right corner of the ‘Scripts Area’.
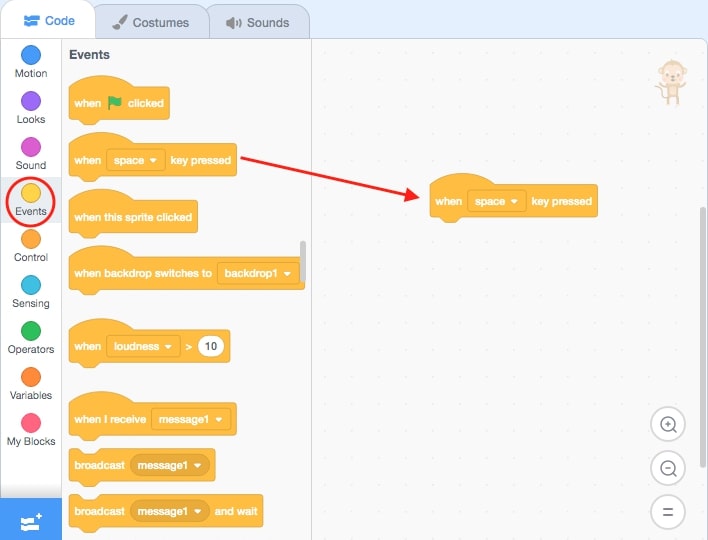
- We want our program to move the ‘Monkey’ sprite around whenever the player presses the arrow keys. To do this we will use keyboard inputs. An input is an action that tells a computer to do something. For your inputs you will go to the yellow Events block category in the code blocks menu and choose a “when key pressed” block. This means that when we press the space key, the code you add underneath will run.
- Click the drop-down menu in the middle of the Events block and change it to the ‘up arrow’. This now means that when you press the up arrow, the code you add underneath will run.
Follow this same step to add a keyboard input for the ‘down arrow’, ‘right arrow’, and the ‘left arrow’.
- Next, we need to add code to each keyboard input to tell the ‘Monkey’ to move in the same direction as each arrow when the arrow keys are pressed. To do this we are going to code our up and down arrows on the keyboard to move our ‘Monkey’ sprite along the y-coordinate. We will code our left and right arrows on the keyboard to move our ‘Monkey’ sprite across the x- coordinate.
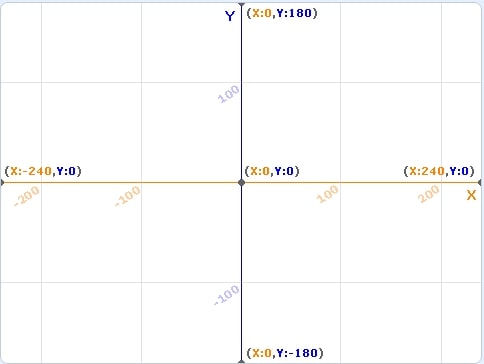
First, let’s talk a little bit more about x and y coordinates. Every sprite that is added to the Stage has a set x,y coordinate. The Scratch stage is an xy-plane, which means that it uses two numbers, the x-coordinate and the y-coordinate (x,y), to describe the location of the sprites on a grid.
The y-axis is shown on the following grid as a blue vertical line and it determines where something is in terms of up or down. The number of the y-coordinate gets bigger as you move upwards along the y-axis, and smaller as you move downwards.
The x-axis is shown on the grid as an orange horizontal line, which determines where something is in terms of right and left. The number of the x-coordinate gets bigger as you move to the right along the x-axis, and smaller as you move left.
Click and drag the ‘change y by 10’ block from the Motion common group and add it underneath the ‘when up arrow key pressed’ block. This will move your sprite 10 steps upwards along the y-axis when you press the up arrow key because you are changing the coordinate to a bigger number.
Add another ‘change y by 10’ block underneath the ‘when down arrow key pressed’ block, but this time you will change the number in the white bubble to -10. This will move your sprite down when you press the down arrow key because you are changing the coordinate to a smaller number.
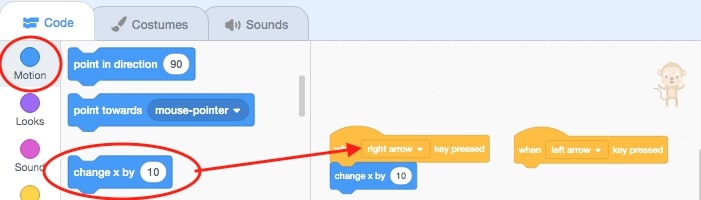
Click and drag the ‘change x by 10’ block from the Motion common group and add it underneath the ‘when right arrow key pressed’ block. This will move your sprite 10 steps to the right along the x-axis when you press the right arrow key because you are changing the coordinate to a bigger number.
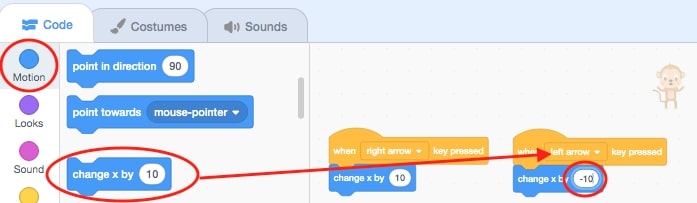
Add another ‘change x by 10’ block underneath the ‘when left arrow key pressed’ block, but this time you will change the number in the white bubble to -10. This will move your sprite left along the x-axis when you press the left arrow key because you are changing the coordinate to a smaller number.
- Test your code! You should be able to now move the ‘Monkey’ up and down and left and right with the arrow keys. If your ‘Monkey’ sprite is not moving in the right direction, you may have to debug your code. Check to see if you have the correct negative and positive numbers underneath each arrow input.
If you’d like to experiment with different ways to code your ‘Monkey’ sprite to move, check out this tutorial from Jonathan Weber at Pinnguaq called Player Control In Scratch Movement Techniques.
Code the ‘Bananas’ Sprite to Glide Randomly Around the Jungle
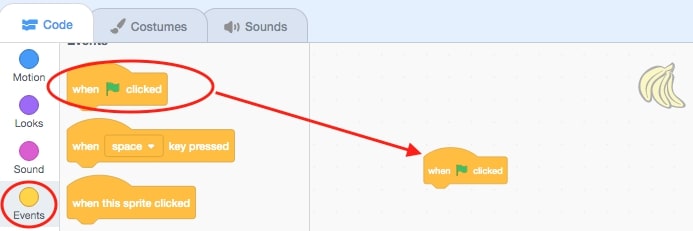
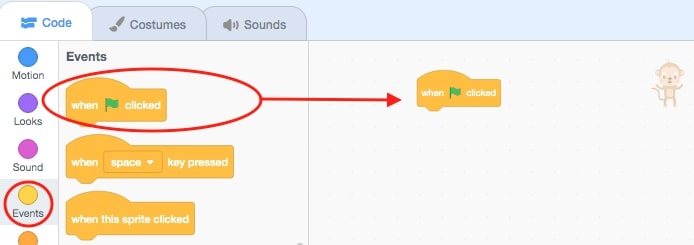
- We are going to add code to the ‘Bananas’ sprite so that it moves randomly around the jungle for our ‘Monkey’ sprite to chase! Click on the ‘Bananas’ sprite in the sprites pane and add a ‘when green flag clicked’ block from the Event block category into the scripts area.
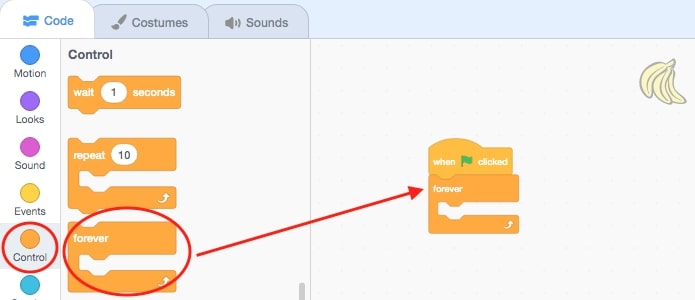
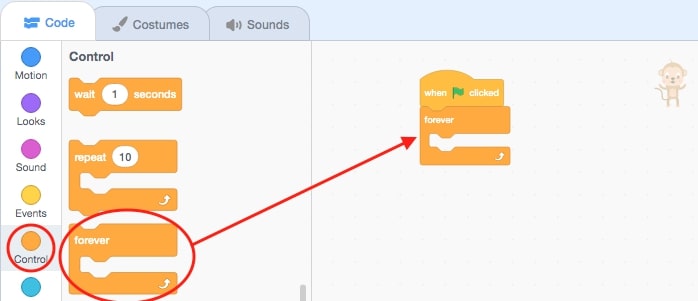
- We want our ‘Bananas’ sprite to glide around the stage forever during our game. Add a ‘forever loop’ control block underneath the ‘when green flag clicked’ events block. This means that whatever code we put inside the ‘forever loop’ will keep running over and over again.
- Next we are going to add a ‘glide to random position’ block from the Motion block category and drag it inside the ‘forever loop’.
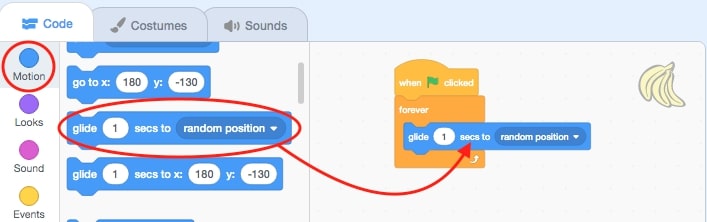
- Test your code by clicking on the green flag! Try changing the number of seconds in the white bubble of the ‘glide to random position’ Motion block to change the gliding speed of your ‘Bananas’ sprite.
Add a Cool Sound Effect to Your Chase Game!
- Now you will add code to your game so that each time the ‘Monkey’ sprite catches the ‘Bananas’ sprite, it will make a chomping noise. First click on the ‘Monkey’ sprite in the Sprites pane, then drag a ‘when green flag clicked’ from the Events block category onto the Scripts Area.
- We want the chomping sound to happen every time the ‘Monkey’ sprite touches the ‘Bananas’ sprite. Add a ‘forever loop’ control block underneath the ‘when green flag clicked’ Events block.
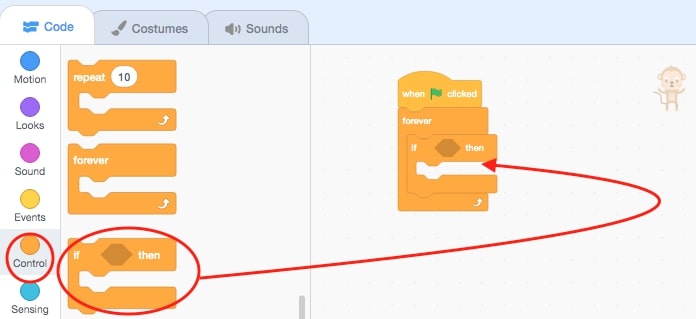
- Next, grab the ‘if…then’ block from the Control block category. This is a conditional statement that means if one certain thing happens, then something else will happen. Put the ‘if…then’ conditional statement block right inside the forever block.
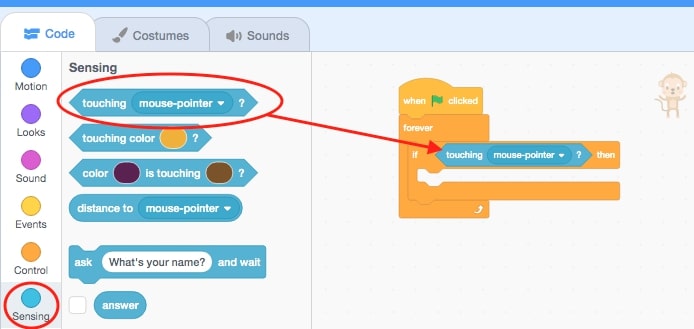
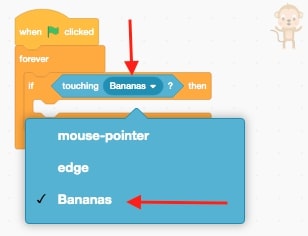
- You want the chomping noise to happen ONLY if the ‘Monkey’ sprite touches the ‘Bananas’ sprite. To do this we will add a ‘touching mouse pointer’ block from the Sensing block category to check whether the ‘Monkey’ sprite is touching the ‘Bananas’ sprite. Drag this block into the hexagonal shape between the if and the then of your conditional statement. Then click the drop-down on the Sensing block menu and change the mouse-pointer to Bananas.
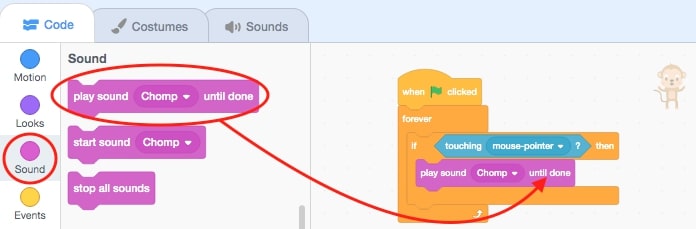
- Now your conditional ‘if…then’ statement says that if the ‘Monkey’ sprite touches the ‘Bananas’ sprite, then something else will happen. You want the “something else” to be the chomping noise. Add the ‘play chomp sound until done’ from the Sound block category into the ‘if…then’ block.
- Test your code by clicking on the green flag and moving the ‘Monkey’ with the arrow keys to touch the Bananas! You should hear a chomping sound every time the ‘Monkey’ catches the Bananas!
Add a Variable to Score Points When the ‘Monkey’ Catches the Bananas
- Now we will be adding a Variable to keep track of the score for how many times the ‘Monkey’ Sprite catches the Bananas. By tracking the score, the chase game becomes competitive and gives a target for the user to try and achieve, then beat. Think of a Variable like a box that stores values. Our Variable will hold the value of the score, which will start at a value of zero and change by 1 every time the ‘Monkey’ sprite catches the ‘Banana’ sprite.
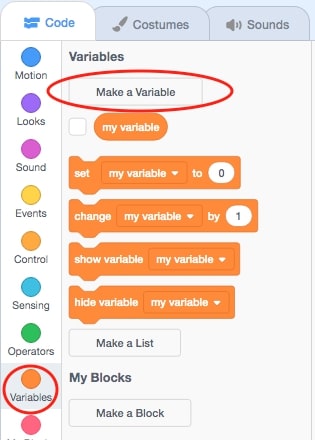
- First select the ‘Monkey’ sprite and then go to the Variables control group. Then click on the ‘make a variable’ tab.
- A window will open that will allow you to name your Variable. I named mine ‘score’. Make sure that you set the New Variable to ‘For all sprites’.

- Once you hit ‘OK’ you will see the Variable appear in the top left corner of your Stage.
- Drag the command ‘Set my variable to 0’ from the Variables control group under your Green Flag. This will clear the score back to 0 every time you start a new game.
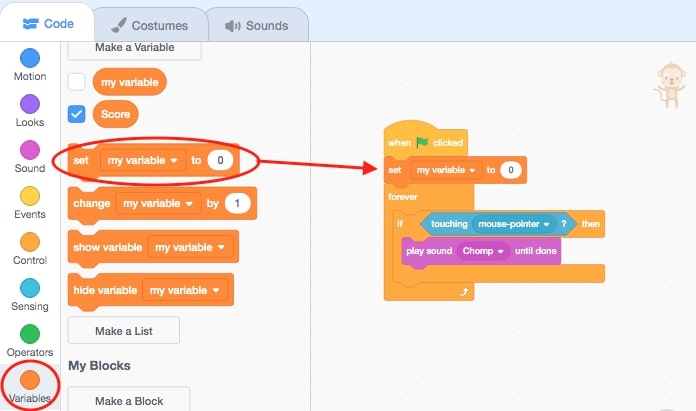
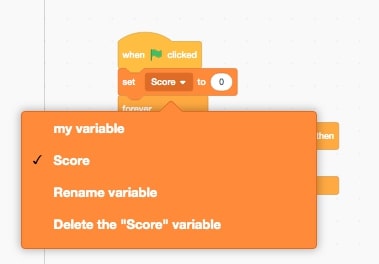
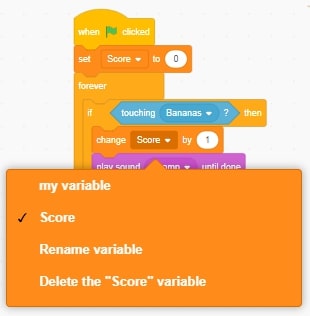
- Click the drop-down menu on ‘Set my variable to 0’ and change it to “score”.
- Now add a ‘change my variable by’ block from the Variables block category inside the ‘if…then’ conditional statement.
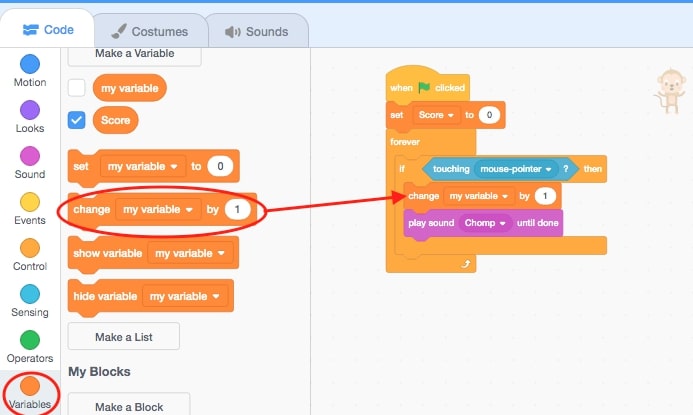
- Make sure you Click the drop-down menu on ‘change variable by 1’ and change it to “score”. Now the score will go up by 1 every time the ‘Monkey’ sprite touches the ‘Bananas’ sprite.
Congratulations! You’ve completed coding your ‘Chaser’ game! Now it is time to play!
Here is what your final program should look like for your ‘Chase’ game:
‘Monkey’ sprite:
‘Bananas’ sprite:
Conclusion
Try making your own version of this chase game with a different background and different sprites. You can challenge yourself by trying to add in a new Variable for a timer and check out the Scratch Mix and Match Challenge Bonus: Levels tutorial by Mary McDonald from Pinnguaq to see how to add levels to your Chase game!
We want to see the awesome things you’re creating! Take a photo or video and share your work with us by emailing media@pinnguaq.com or tagging @pinnguaq on Facebook, Twitter, or Instagram. Don’t forget to include the hashtag #LearnWithPinnguaq! You can also upload your project to the Pinnguaq Studio.
You might also like
Scratch Basics Episode 10: Coding Backdrop Changes
 Grade 1 – Adult
In this series, the basics of Scratch will be introduced to provide learners with the foundational skills required to begin creating in Scratch.
Scratch Basics Episode 9: Coding Costume Changes
Grade 1 – Grade 12
In this series, the basics of Scratch will be introduced to provide learners with the foundational skills required to begin creating in Scratch.
Scratch Basics Episode 8: Moving Up and Down
Grade 1 – Grade 12
In this series, the basics of Scratch will be introduced to provide learners with the foundational skills required to begin creating in Scratch.
