Overview
The premise of this experiment is that wind around us can be harnessed, and used for many purposes. It’s a first step to understanding the concepts of renewable energy as well as the historical uses of wind power, and is a starting point to help learners grasp the potential of renewable energy sources. It’s a hands-on activity designed for children aged 5-9.
Background Information
Whether you call it a windmill, a turbine or a pinwheel, there’s something magical about seeing a physical object moving simply because of air around it.
This experiment combines art, engineering and science, and focuses on letting learners aged 5-9 harness the wind, on the path to understanding how renewable energy works. It’s also a great art project that will keep them busy for hours, and amazed for days!
Learning Outcomes
- Introduces the concept of renewable energy, specifically wind energy
- Enhances understanding of how wind energy can be harnessed for practical use
- Encourages creativity and problem-solving through building and testing a wind turbine
- Develops scientific observation and experimentation skills
- Promotes discussion on sustainability and the importance of using renewable energy sources
- Gross and fine motor skill development.
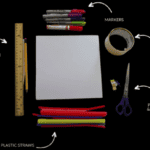
Materials
- Paper or lightweight cardboard (e.g., cereal box)
- Scissors
- Straws
- Pin or thumbtack
- Tape
- Optional: Marker, ruler, string
Note: Adult supervision may be required, especially when using scissors and pins. Remind children to be cautious when handling the pin or thumbtack. If conducting the activity outdoors, choose a safe location away from obstacles and ensure the wind conditions are appropriate for testing.
Step By Step Instructions
Step 1 – The Crazy Idea
The air around us can run a car, power a house and light up a city? The obvious question is “how”, and that gives you an opportunity to introduce the concept of wind energy. by building a simple turbine that converts wind power into mechanical motion.
Step 2 – Build Your Turbine
Start by cutting out a square shape from the paper or lightweight cardboard. The square should be approximately 6 inches by 6 inches.
Cut two diagonal lines from each corner of the square towards the center, stopping about 1 inch away from the center.
Fold the four corners with the cut lines towards the center, overlapping them slightly. Tape the folded corners in place to create a cone-like shape.
Insert the pin or thumbtack through the center of the cone, securing it to the tip of the straw. Make sure the pin or thumbtack is tightly attached.
Step 3 – Get Artistic
Big white turbines are boring use a marker and ruler to draw decorative patterns or colors on the wind turbine blades.
Step 4 – Mount Your Turbine
Hold the straw firmly between your hands or tape it to a steady surface, ensuring the wind turbine is in an upright position.
Blow gently or wave a fan towards the wind turbine to simulate wind. Observe the rotation of the wind turbine blades.
Optional: Use a string to hang the wind turbine outdoors in a location with a gentle breeze. Observe and measure the rotation speed of the blades.
Discuss with the children how the wind energy turns the blades of the wind turbine, demonstrating how renewable energy can be harnessed.
