Section Navigation

In the series: Pixel Art
Introduction
While sprites tend to get all of the attention, forming the core interactive elements of 2D games and software, tilesets provide the framework for those sprites to exist in. They generally comprise the bulk of a game’s graphical content. Tilesets, a collection of the tiles within a program, allow developers to create expansive in-game areas with a minimum of visual assets by essentially copying and pasting from the available tiles. Seamless tiling, made by matching up opposing edges of tile, allow a developer to cover large areas in similar tiles and disguise the fact that tiles are being placed and reused in a predictable grid-like pattern. Even 3D games will use similar techniques when texturing environments, so being able to create seamless, tileable images is quite valuable. In this module students will learn the basics of tile creation using the pixel art skills acquired in Pixel Art modules 1 and 2.
Learning Goals
Students will learn about the function of tiles within a game and how to create their own. Building on techniques acquired in previous modules they will build important game framework tiles. Students will also learn how to work with layers and transparency within the image creation software GraphicsGale.
Vocabulary
Tile - A modular graphic used to construct scenic elements in a game.
Tileset - A full group of tiles containing all of the scenic elements for a game or a game section.
Seamless Tiles - A tile, or group of tiles, which are placed adjacently without any visual indication where one ends and the next begins.
Layer - A transparent “level” in a graphics editor file which allows separate images or elements to be created and manipulated in the same canvas space, without affecting the other elements.
Transitional Tiles - Tiles used in areas where two or more different environmental textures meet.
Permutations - A set of variant tiles within a tileset that allow for multiple arrangements.
Guiding Questions
- What is a pattern?
- Where are repeating patterns used in real life?
- Have you seen repeating patterns used that don’t have a clear pattern break?
Curriculum Links
This module aligns with Art, Computers, and Technology curriculums through the learning of new software and ways of creating graphical game elements.
Materials
- “Spot the Pattern” Pages – Download Assets Folder (ZIP)
- GraphicsGale – Download GraphicsGale
Non-Computer Activity
Spot the Pattern
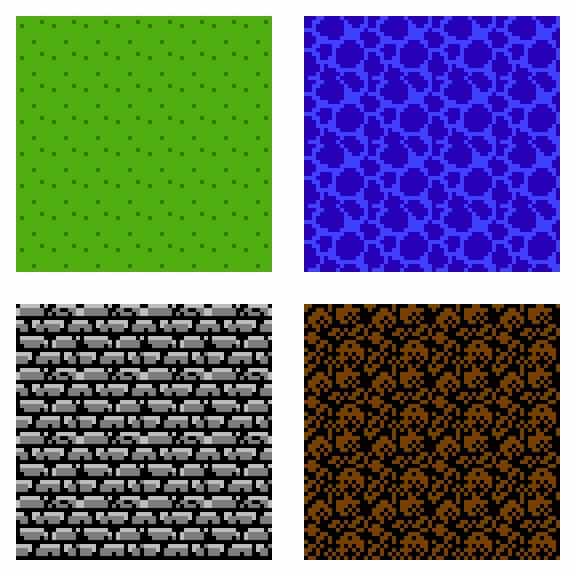
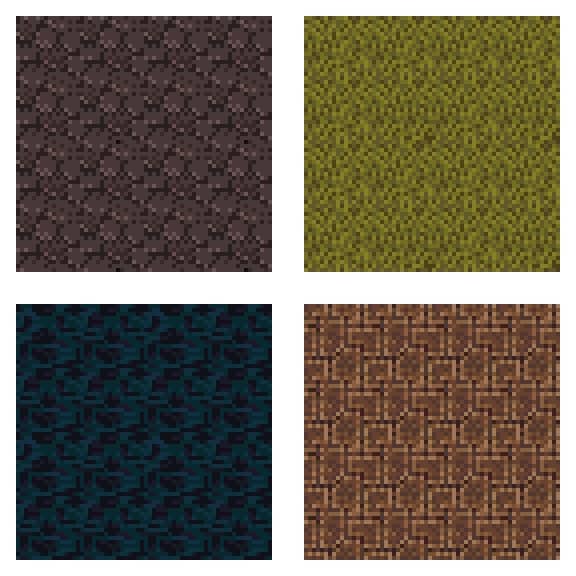
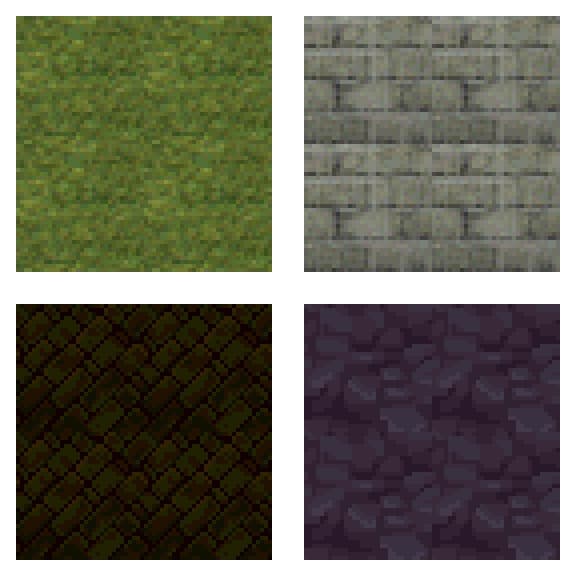
Seamless tiles are used to cover an area of similar texture by using tiles with repeating patterns. Over large areas, and when mixed with other tiles and textures, it’s often difficult to spot the edges where one tile ends and the next begins. In the following pages are three sets of images of seamless tiles from three generations of gaming consoles:
- The first set contains NES-era (Nintendo Entertainment System, an 8-bit console) graphics, which used a very limited palette;
- The second is from SNES (Super Nintendo, a 16-bit console), which had expanded colours at its disposal;
- and the third is from PSX (Playstation, 32-bit), which had virtually no restrictions on display colours.
Take a look at each and try to see how the tiles blend into one another. Are there any obvious spots of repetition? Over larger, uninterrupted areas these spots often become more apparent, but it can be tricky in smaller numbers. Try to find areas that reveal the fact these are made of a single tile. These more obvious spots are what you want to avoid when making our own seamless tiles.
Computer Activity
Part 1 – Seamless Tiles
Using guides and a grid for reference, seamless tiles can be made fairly simply. Working on a larger canvas allows tiles to be tested before being saved. In addition, we will create a second seamless tile and some permutations of them where they meet. All of this allows us to make a basic top-down game map.
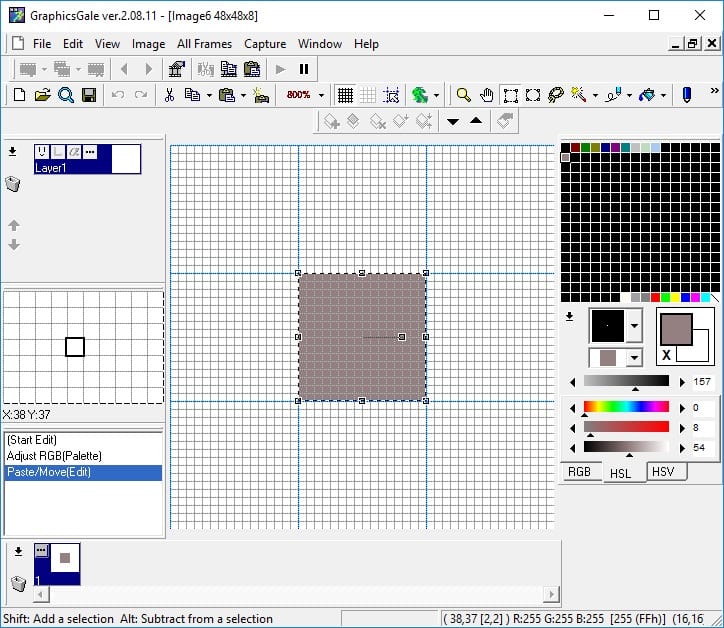
First, let’s open GraphicsGale and create a new canvas by going to File>New (or pressing CTRL+N). Set the size to 48x48px and the colour to “8bit(256colors)”.
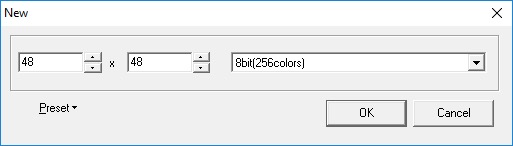
Maximize the canvas window, if not already maximized (click the large rectangle in the new canvas window). Use the Magnification drop-down to zoom in to 800%, then use the Custom Grid tool to set a 16×16 grid. We only want to use the centre 16x16px square to make our base tiles, so zoom in as far as needed to make working easier.
To start, we will make a paving stone tile. The structure of the tile makes it a little easier to appear seamless. Use the blank palette slots at the right to set the base colour. Use the Rectangular Selection tool

to select the 16×16 centre square area. With the base colour set and the centre square selected go to Edit>Fill. In the Fill dialogue that opens, make sure “Current Color” is selected and click OK. The centre square should now be filled with the base colour. Filling a selection with colour can save time over drawing out large areas of colour pixel at a time.
Press CTRL+left-click to drag your base colour to a new palette spot. Select the new colour and use the HSL sliders to adjust the Lightness (the bottom slider) to the left, to make a darker shade of the base colour. Using the Pencil tool, draw horizontal lines every 4 pixels across the width of the tile.
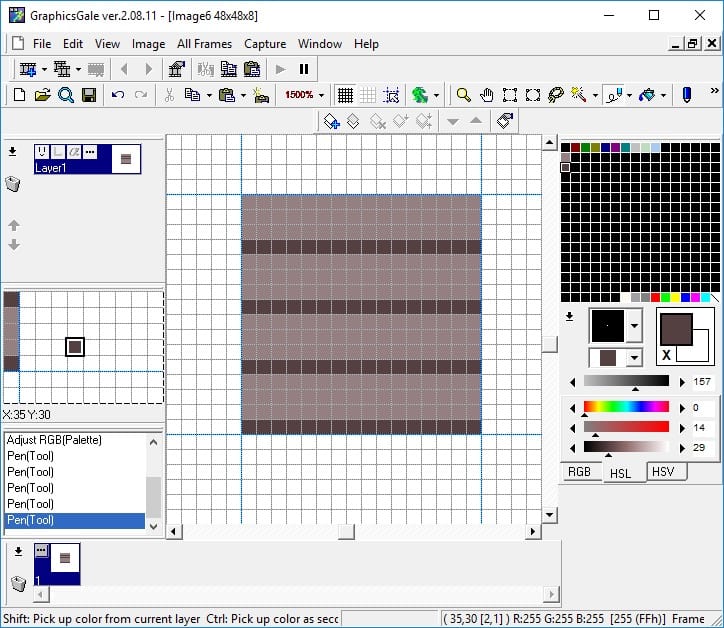
We now have some horizontal rows of bricks, and need to divide them vertically. On the first and third rows, draw vertical lines 4 and 12 pixels from the left. On the second and fourth rows, draw vertical lines 8 and 16 pixels from the left. This gives us four rows of staggered bricks.
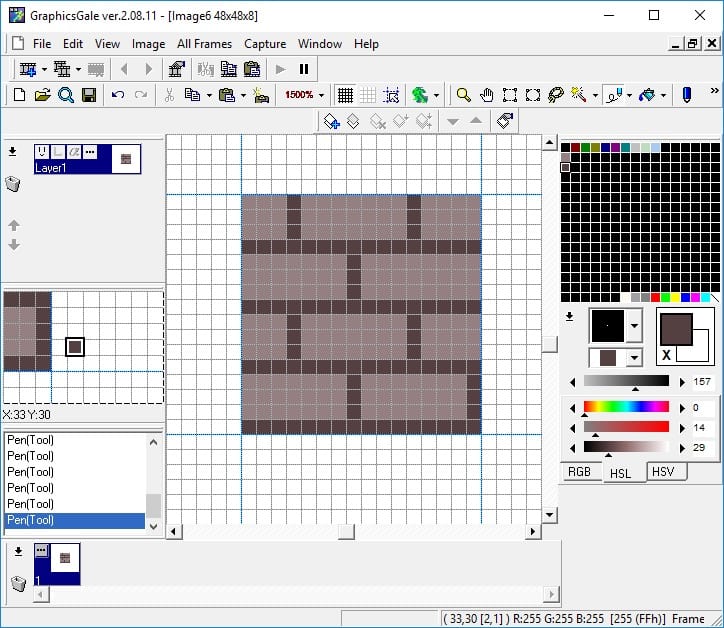
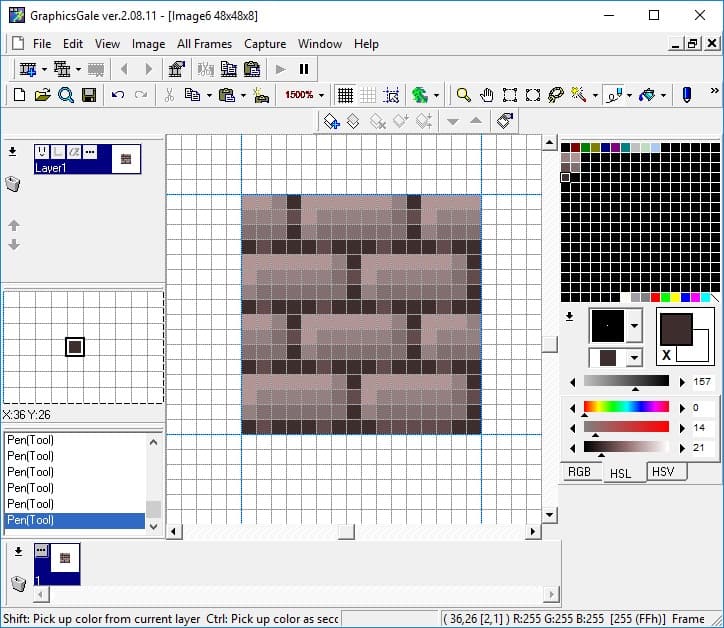
Use the palette (using the CTRL+left-click method) to create some additional colour swatches of lighter and darker shades. Use these to add highlights to the top left edges of the bricks, shadows to the bottom right edges, and a darker shadow to the corners where the bricks meet.
Now, to test it! Select the tile using the Rectangular Selection tool, then press CTRL+C to copy it. Press CTRL+V to paste a copy. Move the cursor over until it changes to the four-way arrow Move icon, then click and drag the pasted tile to the left square beside your base tile. Continue to copy and paste tiles, moving them into the empty squares in your grid, until the canvas is full. Turn off the grid (if you’ve used one) and set Custom Grid to “None.” The tiles should align seamlessly with the others on all sides. If it doesn’t, make any edits to the base tile, and test it again until you are satisfied with the pattern it creates.
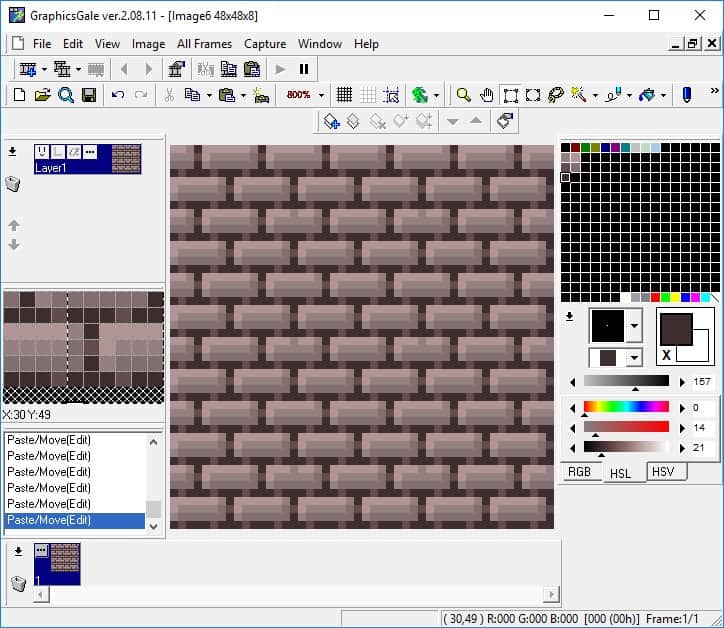
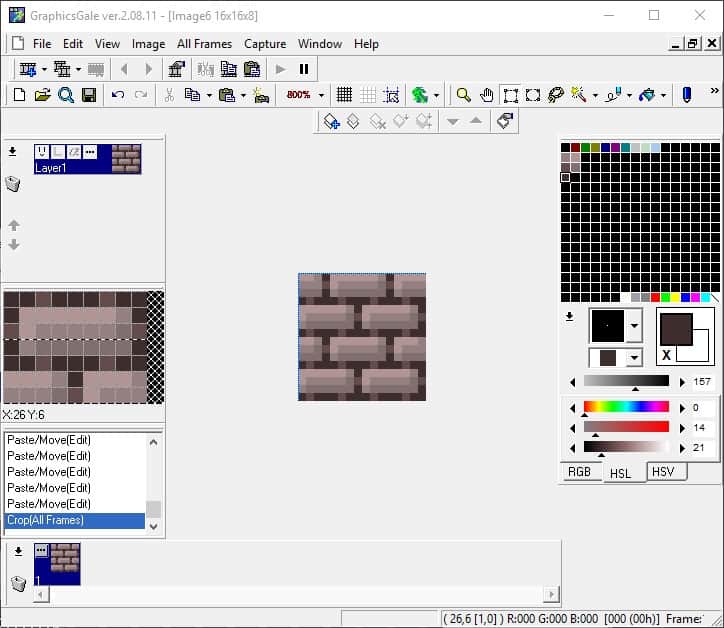
Now to select and save the base tile, return to Custom Grid and set it to 16×16. Using the Rectangular Selection tool, select any 16×16 square of the grid, then go to All Frames>Crop. This cuts away all tiles but the selected one. Then go to File>Save As, and save the tile as a PNG.
Now let’s make a seamless grass tile. Tiles of organic materials are a little trickier, because you want to avoid obvious patterns that make them look artificial. Start the same way: File>New (or CTRL+N) and make a 48×48 canvas with 8-bit colour. Magnify to 800%, turn on the grid, and set Custom Grid to 16×16. Select a palette slot and make the base grass colour, for instance a yellowy-green. Then use the Rectangular Selection tool to select the centre 16×16 tile and Edit>Fill with the current colour.

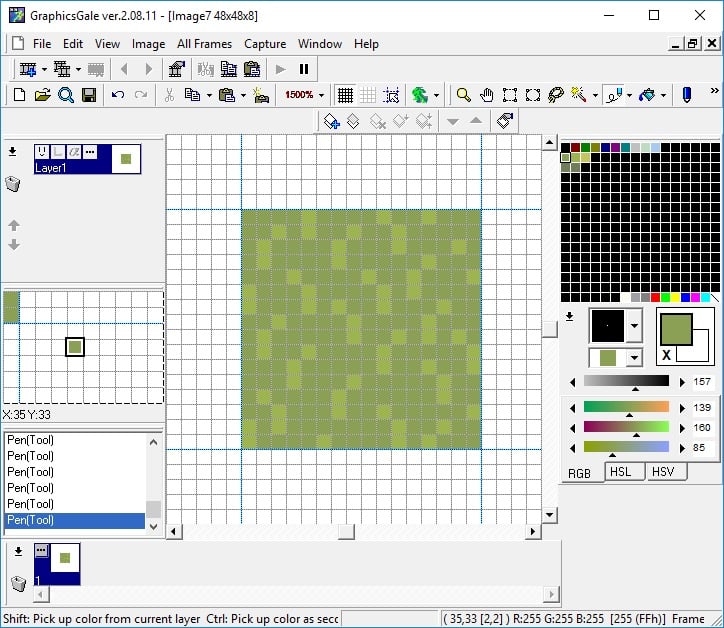
In the palette, CTRL+left-click and drag to create four copies of the current colour, and adjust them to make a slightly lighter, moderately lighter, and one slightly darker shade. Select the slightly lighter colour and use the Pencil tool to draw some grass shapes made of two pixels atop one another and one above and to either side. Increase the magnification as needed.

If we were to test how this tile repeats at this point, the edges would be fairly obvious. To solve this, we need to “wrap” elements from one side of the tile to another. Using the same grass shape as above, start drawing at the top edge, then wrap the shape to where it would align on the bottom edge. Do the same on the left and right edges.
Now is a good time to check your seams. Use the Rectangular Selection tool to select the tile, then copy (CTRL+C), paste (CTRL+V), and drag tiles to the top, bottom, and sides of the centre tile to check how the seams match up. If they don’t align well, Undo (CTRL+Z) to return to the base tile, and correct any spots that need touching up.
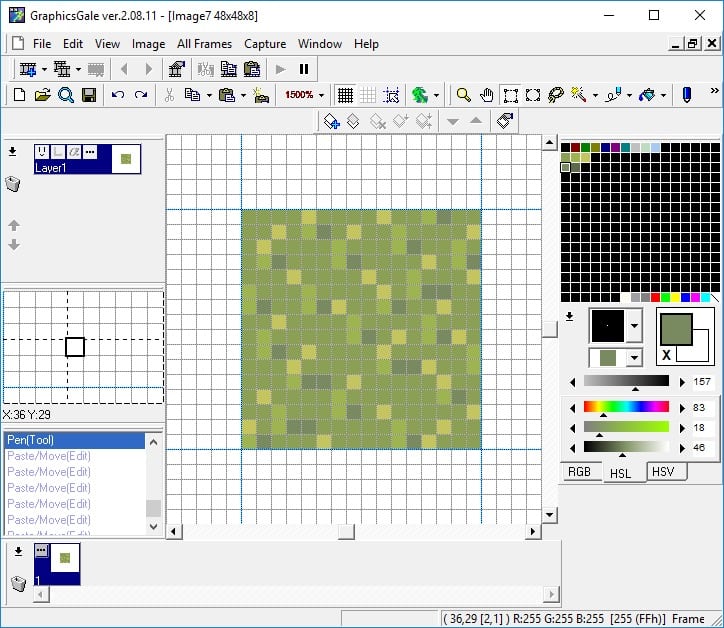
Use the lightest colour to draw over the top-most or top two pixels of your grass shapes. Randomizing this helps make the tile appear more natural and organic. Choose the slightly darker colour and add some shadows to the right of the bottom of the grass shapes. Add some single pixels in different shades in the larger open areas. Once you have tested your tile and are happy with how it repeats, select it, crop it, and save it as a PNG.

Conclusion
Seamless tiles and textures are essential tools for creating game art, both in environmental and character designs. Large areas of similar texture or material can be generated by repeating a single tile, or made more natural by including variant or animated tiles. Understanding how to create repeating patterns that blend naturally to the viewer’s eye adds a level of polish that has come to be expected by users.
