Section Navigation

Introduction
2D graphics form the basis of most software applications, both in gaming and non-gaming programs. In this module students will create a pixel art sprite with physical media and then transfer that image into a freeware program called GIMP to make a useable PNG image file. This module provides the very basics of what pixel art is and how to create pixel art. The module will introduce the basic tools and functions of image manipulation software and how the tools are best used to create classic 2D game or application graphics.
Learning Goals
Understanding pixel art and how to create it will provide a means of creating content for their own software, or modifying existing content of software they currently engage with. Students will also use a variety of tools and technologies to create integrated art.
Vocabulary
Pixel - The smallest element of a computer-displayed image, made up of a tiny square of colour.
Sprite - A computer graphic that can be displayed, moved, and manipulated separately from other on-screen elements.
Palette - A set of colours used for a specific piece of art or series of artworks.
Colour Depth - The number of colours available to display an image, the higher the colour-depth, the more colours available.
Guiding Questions
- What is digital art?
- Why can a piece of digital art reach a broader audience than one in a traditional art gallery?
Curriculum Links
This module provides an opportunity to address curriculum expectations in the Art and Computer Studies in Grades 7 to 10. In particular, students will be introduced to the software GIMP and build on the skills they have learned in an entry-level assignment. This assignment will also demonstrate how visual cues can help communicate feelings, ideas and understandings when telling a story.
Materials
- Graph Paper
- Coloured Pencils/Markers
- GIMP (Gnu Image Manipulation Program) – Download GIMP
Non-Computer Activity
In pixel art, a series of coloured squares work together to form an image. The number of colours used in the image gives a clue to the colour-depth. You may hear people refer to 8-bit graphics or 16-bit graphics from time to time. This is a common misconception, as these terms actually refer to how a computer organizes and stores information, and has little to do with the amount of colours used. When someone calls something “8-bit graphics,” they’re probably referring to NES (Nintendo Entertainment system) style graphics. This system had very rigid display restrictions, where graphical elements could only be displayed with three colours and one transparent colour. Here’s an example of an NES-style sprite:
*”px” is the abbreviation for pixel and the numbers indicate the canvas size of number of pixels horizontally and number of pixels vertically. This indicates the maximum boundaries of the sprite.
The next generation of gaming systems used 16-bit colour, which allowed thousands of colours to be stored, though only a few hundred colours could be displayed on screen at a time. This expanded restrictions on colour palettes, though they were still typically limited to 15 colours plus one transparent colour. Here’s an example of a “16-bit” style sprite:
Since then, processing power has increased dramatically, but the number of colours used in pixel art graphics hasn’t expanded that much. This is because working with pixel art, especially in animation, requires you to keep track of the colours used. Expanding colour use much farther can make this difficult. Here’s an example of a modern sprite in slightly higher resolution:
The colours displayed beside the sprite are known as a palette. This is a visual list of all colours that make up a sprite. Limiting colours used is known as an indexed palette, which results in a smaller file size and makes colours easier to track.
Students can select a “palette” of 8 to 16 colours from the available media and create their own sprite using graph paper. Have students define an area of 16×16 squares as a “canvas” and fill in squares with solid colours, using them to make a picture of their choice.
Computer Activity
Using our graph paper sprites as a reference, we will use the program GIMP to recreate those images as actual digital sprites.
- Open GIMP and press CTRL+N to create a new image canvas. Set the size width and height to 16x16px (16 pixels square).
- 16×16 pixels is a very small area and might be difficult to see. You can use the 1-5 keys to zoom in and make it easier to work. Try pressing “5” to zoom in to 1600%.
- Navigate to View and select Show Grid to display a grid that will match your graph paper. This will make it easier to copy your picture. You can turn this grid off at any time by selecting Show Grid again to uncheck it.
- Select the Pencil Tool

- then click the Foreground Colour swatch in the bottom left of the Toolbox.
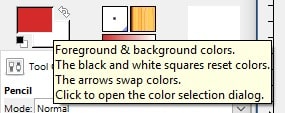
- You can use the colour bar and the value grid to pick the active foreground colour. Try and match the colours from your graph paper pixel art.
- Use the Pencil Tool
- to place pixels on the canvas to make a digital copy of your graph paper pixel art. If you place a pixel in the wrong spot you can always draw over it in another colour or use the Eraser Tool

- to remove it.
- When you’re finished, navigate to File > Export As. The best file type for saving your work will be .png (portable network graphics). Choose the location where you’d like to save your image, choose a name for your file (ending in .png), and click Export! Be sure to share your sprite and check out other students’ sprites as well.
Conclusion
Once students have completed their sprites they should present what they’ve created to the other students. Have them talk about the palette or colour depth of their sprite, any difficulties they encountered in using the program, what they might do differently in the future, or any ways that they might like to use that sprite in a game or application. Group feedback and support is one of the most important tools in developing art skills.
Resources
Additional Resources
- 2D Will Never Die
- The Verge – 2D Is Here To Stay (article on pixel art in modern gaming)
- Pixels (A short documentary)
- Elizabeth LaPensée
- Make Your Own Pixel Art: Creative Graphics for Games, Animations and More. Book by Jennifer Dawe and Matthew Humphries.
Social Media Resources
- Pixels (A short documentary)
- JaeBum Joo
