Section Navigation

Introduction
This module teaches, at its core, the basis of all computer programming: how to create the commands for a computer to perform a task. Understanding these basics is essential for a full understanding of programming, and here we apply the concepts to add custom images created with Small Basic into a Pathfinder game. The simplicity of Small Basic is a perfect platform for teaching the basics, but is robust enough to allow for advanced learning as well.
This module provides documented examples and source code samples that can be used to insert computer graphics into the Pathfinder Video Game students have been creating. At the end of this module students will be able to:
- create graphic subroutines,
- understand offset and coordinate placements in Small Basic, and
- use variables to control the display of graphics.
Learning Goals
This module shows students how to integrate artwork created with the modules Drawing Pictures in Microsoft Small Basic and Drawing Pixel Art in Microsoft Small Basic into their Pathfinder text adventure game.
Vocabulary
- Offset – A value that indicates how far an object is placed from the original point of origin.
Guiding Questions
Do you want to know how to draw pictures using only computer code?
Curriculum Links
This module can be linked to an Arts and Computer Science curriculum, as students learn to integrate the digital art they have created into the game they are designing.
Materials
- A computer with the Microsoft Small Basic application installed OR Internet access to the online interface
- Pen and paper for taking notes
Non-Computer Activity
There is no non-computer activity for this lesson.
Computer Activity
This module demonstrates one method of including graphics developed with the modules Drawing Pictures in Microsoft Small Basic and Drawing Pixel Art in Microsoft Small Basic into the Pathfinder text adventure video game module, Introduction to Programming with Microsoft Small Basic. This module assumes students have covered the previous modules on this topic and are well-acquainted with the Small Basic programming environment. Additionally, students should now have several of their own images created as part of the drawing in Small Basic modules.
In this module we will learn how to integrate drawings that have already been created into our Pathfinder text adventure game. The original game code (Pathfinder.sb) from the module Introduction to Programming with Microsoft Small Basic and the modified game code to include the graphics (PathfinderWithBuffalo.sb) are included in the SourceCode folder for this module.
Planning
As always, planning plays an important role. Though we will be using an existing drawing, it is always best to plan your graphics ahead of time and know where you want to place them. Because we are revisiting an existing module there are additions and updates that need to be made to the image file.
For this module we will use the buffalo picture from the SourceCode (assets) folder. There are two versions: buffalo.sb and buffalo_withOffset.sb. Both will be referenced in order to understand what modifications are required to make the graphic usable in our game.
The first step in planning is deciding the size of our graphics and where they will be placed. Let’s look at our current game screen and see how we can modify it. Figure 1 shows the original game screen from Pathfinder.sb and a modified version from PathfinderWithBuffalo.sb that allows room for some graphics.
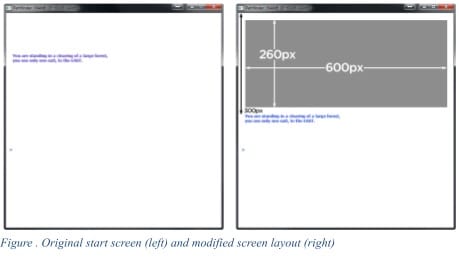
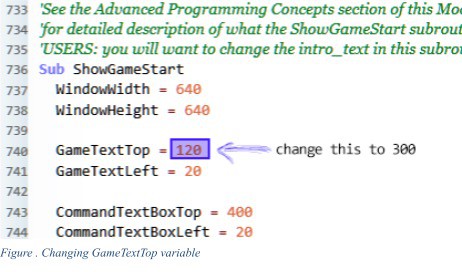
We have created a space for graphics that is 260px by 600px. Our original screen size is 640px wide by 300px tall, so our revised size allows for a 20px border on all sides. After this adjustment we need to move our current TextTile position to below our image area. Change the position from 120 to 300 in the Pathfinder.sb code (remember that we have a subroutine called ShowGameStart inside which the window sizes and game text positions are assigned. Figure 2 shows the modification to GameTextTop, where we change the value to 300).
Now that we have space for our graphics, we need to layout the size of our graphics as well. At the top of our program where we set all of our variables, we will define our graphics settings:
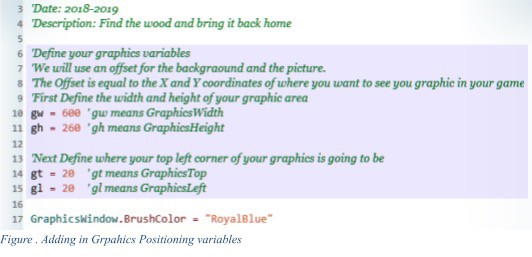
Because the variables GraphicsWindow.Height and GraphicsWindow.Width refer to the size of the entire window, we cannot use these settings for the graphics; if we did, our graphics would be positioned in the top left corner. What we want to do is offset the origin using our own positioning variables. In our example gw and gh are the variables that define the graphics space. You will notice that there is a comment beside each:
gw = 600 'gw means GraphicsWidth
gh = 260 'gh means GraphicsHeight
This simply means that we will use gw instead of GraphicsWidth, and you will understand why shortly, but essentially writing gw is much faster and easier.
The Offset
An offset refers to a position that is a certain distance away from an origin point. In our game we want to position our graphics 20px from the top and left of the window frame. In other words we are going to offset our image 20px from the left and 20px from the top. So let’s add those settings:
gt = 20  'gt means GraphicsTop
gl = 20  'gl means GraphicsLeft
There is an additional setting to define at the top of our code, and that is:
GraphicsWindow.BrushColor = "RoyalBlue"We set our BrushColor to RoyalBlue because BrushColor is also used to paint our screen text, and because we will be changing BrushColor frequently, we will need to reset our BrushColor after each graphic back to RoyalBlue so our story text is always in this colour. We use RoyalBlue here, but you can use any colour you like, just remember to set the BrushColor back to this color each time you finish a graphic drawing.
Including the Graphics
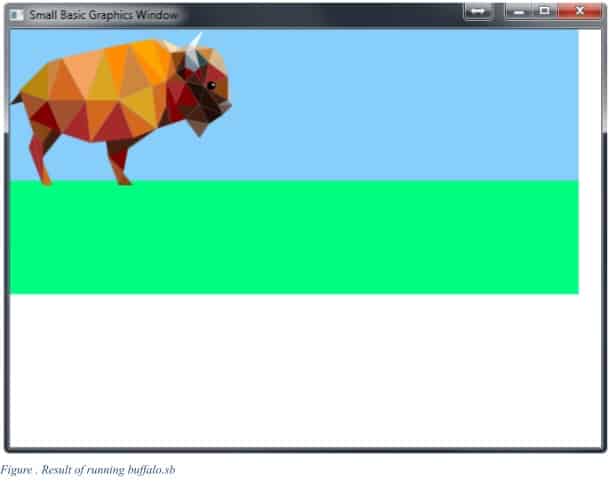
Now that we have prepared the game, we can begin add our graphics. Each graphic needs to be updated to include your offset settings. In Small Basic, open the file buffalo.sb from the SourceCode folder and run it. You should see something similar to Figure 4. This picture is made in a style called low-poly art or polygon art. It is similar to pixel art but the individual shapes vary in size and are triangles instead of squares.
Whether your background is one solid colour, or two, as in our case here (blue sky and green grass); there are many instances where you want to move the graphic, but not the background. This is where offset comes in. To move only the buffalo, we will separate the code into two subroutines: one for the background and one for the buffalo.
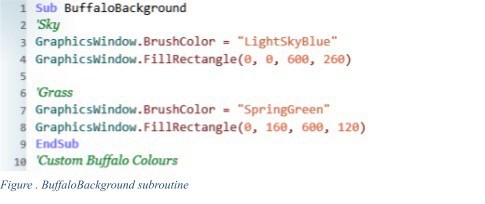
First, put the background into one subroutine. Enter the following as the very first line of code:
Sub BuffaloBackgroundThen go to the line right before the ‘Buffalo Custom Colours line and add the end:
EndSubYour changes should resemble Figure 5.
Now do the same for the buffalo: add the following under the BuffaloBackground’s EndSub:
Sub BuffaloPictureThen scroll all the way to the bottom and add the EndSub.
Now that our graphics are in the proper subroutines, let’s copy and paste that into our Pathfinder code. Open the Pathfinder.sb file, then in the buffalo.sb window, select all the text with the mouse, or using CTRL+A. When it is selected, it will be highlighted in blue. Copy (CTRL+C), and paste (CTRL+V) at the very bottom of the Pathfinder.sb window.
Now that we have our graphics in the game, we need a way to display it. Because we are using two subroutines – one for the background and one for the buffalo, we will make a subroutine to place both of these instead of calling them separately. Underneath the code you just pasted in, add the following subroutine:
Sub Tile_2_Picture
'Tile 2 has the Buffalo on it
BuffaloBackground()
BuffaloPicture()
EndSub
This way, to display the Buffalo we only need one line of code: Tile_2_Picture().
We are almost done! Now we just need this to show when a player lands on Tile_2. We do this by adding a check to our UpdateScreen subroutine. Scroll through the Pathfinder code and find the Sub UpdateScreen code (tip: Use Small Basic’s Find function (CTRL+F) and type “Sub UpdateScreen” to find the code you are looking for).
This subroutine clears our screen first, so we want to add our picture in after we clear; otherwise it will get cleared and nothing will appear. Also, we only want to show this picture when we are on Tile_2 (our buffalo tile). So we need to perform a check to see what tile we are on and then call our picture subroutine. Modify the UpdateScreen subroutine to resemble this code (new code is highlighted in blue):
Sub UpdateScreen
GraphicsWindow.Clear()
GraphicsWindow.DrawText(GameTextLeft, GameTextTop, TileText)
GraphicsWindow.DrawText(CommandTextBoxLeft - 10,
CommandTextBoxTop, ">")
GraphicsWindow.DrawText(CommandTextBoxLeft,
CommandTextBoxTop, gameCommand)
If CurrentTile = "2" Then
Tile_2_Picture()
EndIf
EndSub
For each picture you want to include, you need to add an If…Then statement in the UpdateScreen subroutine.
And that should be it. BUT… If you run the code at this point you will see that when a player lands on the buffalo tile the graphics appear in the top left corner. Why? This is because we didn’t alter our graphics code to accommodate the offset settings, so all of our code is being placed with respect to the top left corner of the game window not the gt and gl variables (GraphicsTop and GraphicsLeft) that we set at the beginning of the code. So how do we fix this?
Converting the Graphics
Well, this takes a bit of time. You need to change every line of code in the graphics to accommodate the offset. The following is an example of how we do that. We’ll change the sky and grass backgrounds first; here is our original code:
'Sky
GraphicsWindow.BrushColor = "LightSkyBlue"
GraphicsWindow.FillRectangle(0, 0, 600, 260)

'Grass
GraphicsWindow.BrushColor = "SpringGreen"
GraphicsWindow.FillRectangle(0, 160, 600, 120)
Because we want our background to fill the entire graphics area, we can replace the four values for FillRectangle with the four variables (gl, gt, gw, gh):
gt = 20  ' gt means GraphicsTop
gl = 20  ' gl means GraphicsLeft
'Sky
GraphicsWindow.BrushColor = "LightSkyBlue"
GraphicsWindow.FillRectangle(gl, gt, gw, gh)

'Grass
GraphicsWindow.BrushColor = "SpringGreen"
GraphicsWindow.FillRectangle(gl, gt+160, gw, gh-140)
Here we re-defined gt and gl (even though they are the same values we originally had, our buffalo will change, so we want to make sure these are set properly). Now if we ever change our window size or want to resize our image we don’t have to anything but change the values in gt, gl, gw, and gh.
Let’s look at our buffalo now…
It is time-consuming pasting “gt+” or “gl+”, so we will address the first few lines so you get the idea, and you can continue on your own if you wish.
The first few lines set the custom colours used for the buffalo that are not in the list of named colours in Small Basic:
ReallyDarkBrown = "#441E12"
DarkChocolate = "#230D07"
BuffaloGray = "#6F5045"
You don’t have to use custom colours, but Small Basic is limited in named colours so we created some new ones to make our buffalo look as good as possible. Setting your own names is a handy trick to avoid having to remember the hexadecimal values for colours that are not in the list of named colours.
On to converting our buffalo. The start of the buffalo is the tail:
GraphicsWindow.BrushColor = ReallyDarkBrown
GraphicsWindow.FillTriangle(20, 55, 0, 80, 20, 75)
The brush color is one of our custom colours, so ReallyDarkBrown does NOT need to be in quotations marks, because it is treated as a variable. In order to make the FillTriangle work, we need to add our gl and gt variables to the respective X and Y coordinate values. Remember that FillTriangle uses X, Y coordinate pairs to designate points of the triangle. To set the location of our graphics horizontally, we need to set a distance offset from the left of the window. This means that all of our X coordinates need to have the GraphicsLeft (or gl) variable added to them, like this:
GraphicsWindow.FillTriangle(gl+20, 55, gl+0, 80, gl+20, 75)This is why we use gl instead of GraphicsLeft; to make our code smaller. Now let’s add the GraphicsTop (or gt) variable to all the Y coordinate values:
GraphicsWindow.FillTriangle(gl+20, gt+55, gl+0, gt+80, gl+20, gt+75)We can specify different settings for the gt and gl variables before we start our drawing, and it will reposition our graphics according to those offset settings. In the code for the Buffalo_withOffset.sb file we have set the gt and gl variables in both the BuffaloBackground subroutine and BuffaloPicture. This is so we can move the buffalo, but the background always remains in the same location.
Before you change each line with the gl and gt variables, let’s look at the buffalo’s eye. Because the eye is made of two ellipses, they only use one coordinate: the top left. So:
GraphicsWindow.BrushColor = "Black"
GraphicsWindow.FillEllipse(208, 55, 9, 9)
GraphicsWindow.BrushColor = "Silver"
GraphicsWindow.FillEllipse(213, 57, 3, 3)
Will become:
GraphicsWindow.BrushColor = "Black"
GraphicsWindow.FillEllipse(gl+208, gt+55, 9, 9)
GraphicsWindow.BrushColor = "Silver"
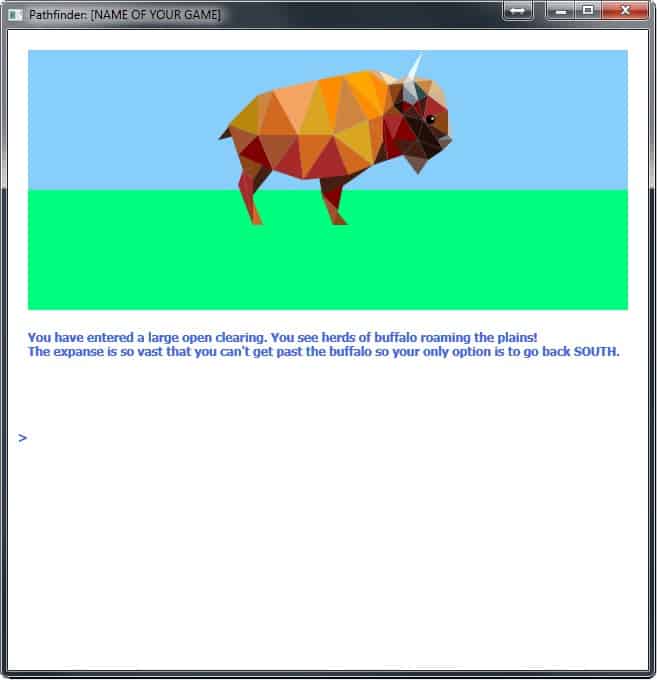
GraphicsWindow.FillEllipse(gl+213, gt+57, 3, 3)That’s it! We are done! That is how you add graphics to your Pathfinder game. The included file PathfinderWithBuffalo.sb displays our buffalo picture when we arrive at Tile 2. If you want to try it, load PathfinderWithBuffalo.sb, start the game, and then enter these movement directions:
E, E, E, N, N, W, N, N, NFigure 6 shows what you see when you arrive at the appropriate tile.
Conclusion
Now that you know how to work with graphics in your games, it is a good idea to program them with gl (or GraphicsLeft) and gt (or GraphicsTop) variables when you start, even if those values are 0. This makes them easier to copy and paste into subroutines. Also, to write graphics efficiently, you should always work on them in their own project window – this way you do not need to run the entire game every time you want to test them. Good luck and happy coding!
Resources
Additional Resources
- Small Basic Getting Started Guide
- Introducing Small Basic Full Guide (PDF)
- Online Tutorials
- Program Gallery – includes Small Basic examples for things specific to games, math and science applications, and graphics
Social Media Resources
The graphic sample in this module can be categorized as low-poly art or polygon art. It is often used as a way to represent dimensional objects in a flat space due to its 3D mesh-like structure. Students interested in this type of artwork can use graph paper and the coordinate system used in Pathfinder 5: Drawing Pixel Art in Microsoft Small Basic to create their own graphics in this style.
Additionally, the Pixel Art module exercises can be modified to create polygon art by changing the squares to triangles and using graphed points instead of the 10 by 10 grid format described in that module.
Students can search polygon art and low-poly art to see examples and get inspired.