

Overview
You will be learning how to create a simple Scratch game from start to finish. You will learn how to create code to make clones, add a scoreboard and add a timer for your game! Follow the steps below to create the “Colour Hunt” game.
Background Information
To control this game, a computer mouse might be most helpful, however, a touchpad will work as well.
The goal of this game is to hunt the yellow Prey while avoiding the dark blue Invaders. The Prey and Invaders will both create clones as the game goes on, increasing the difficulty. Score more than 30 points to win and score less than -30 points to lose. To play the completed game, click here!
Materials
- Scratch desktop or Scratch online
- Computer mouse
Step by Step Instructions
Step 1
The first step is to create the sprites we will be using for the game. We will need three different sprites: the player, the prey and the invader. We will be drawing our own sprites as paint splatters; start by opening a new project in Scratch and selecting the paint brush from the “choose a sprite” menu. Your project will automatically include a cat sprite; keep this for now as a reference for size.
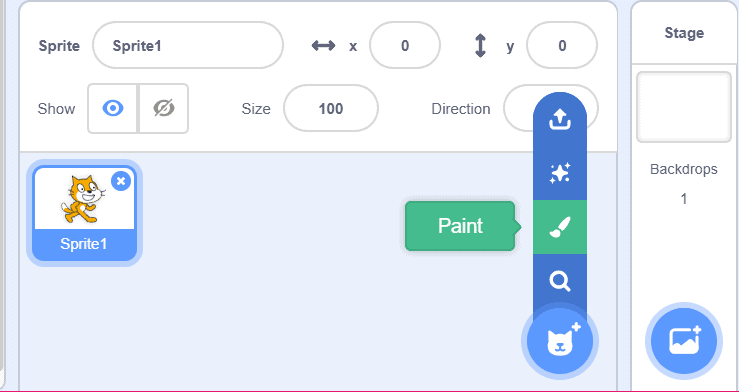
This will bring you to the costumes tab on the top left corner and we will be using the brush tool to draw the outline and then filling it as a solid colour using the bucket tool:
Step 2
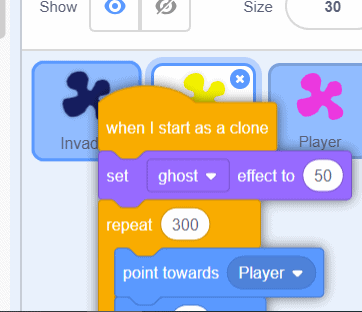
We will need to create three colours of paint splatter: the Player can be any colour you choose (I chose pink!), the Prey will be yellow and the Invader will be dark blue. Once you create the first sprite, you can right click and select “duplicate” to create two more sprites. Once duplicated, name each sprite. Once you’ve created each sprite, we want them to be about the same size as the cat’s head: change the numerical value of the size box (for my project, it was size 30):
Step 3
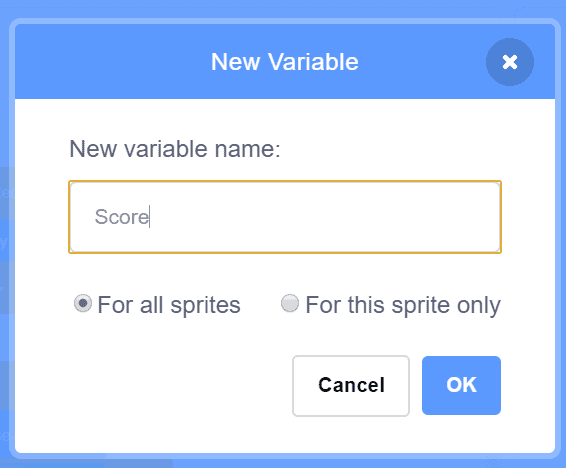
Now we’re going to begin coding! Select the Player sprite, click on the “variables” command and click on the “make a variable” button. Name the variable “score” and click “for all sprites”:
Step 4
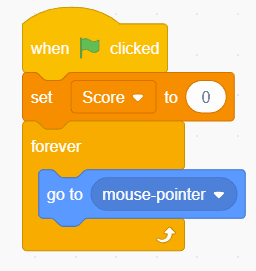
Click on the Player sprite and add the script below. This will ensure the Player sprite follows the mouse when moved. The other sprites won’t do anything yet.
Step 5
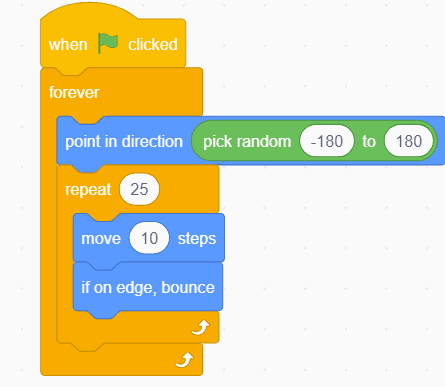
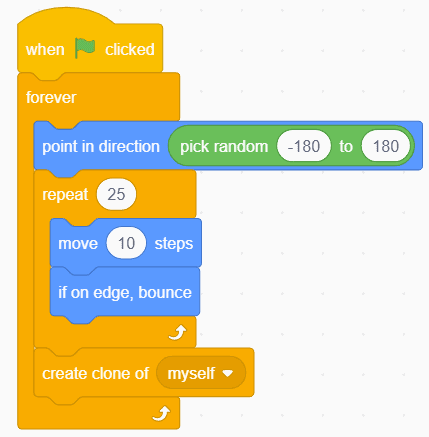
Select the yellow Prey sprite and add the script below. This will make the Prey sprite travel around the stage randomly, with a random change in direction every 250 steps. The repeat loop will move the sprite 10 steps, 25 times (10×25=250). Since the repeat loop is within a forever loop, the repeat cycle will continue forever. Test your code!
Step 6
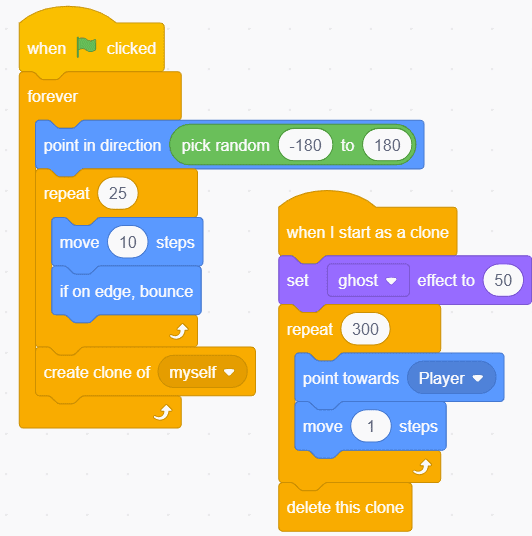
Now we’re going to create a troop of sprites from our two Prey and Invader sprites! To do this, we need to create clones. Continuing on the Prey sprite, click on the “control” command and add a “create clone of myself” block in the “forever” loop. This will create a clone of the Prey sprite after every 250-step movement.
Step 7
Fun fact: the clones we just created are fully functioning copies of the original sprite, which means we can give them their own commands!
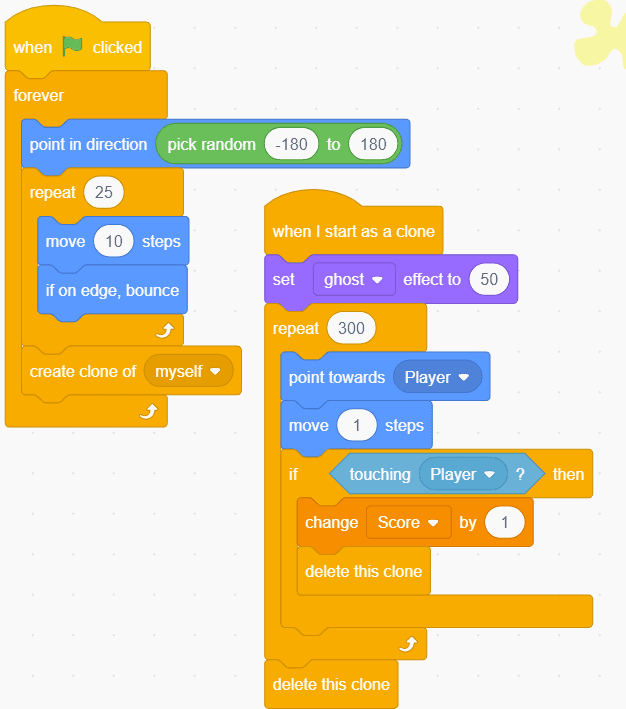
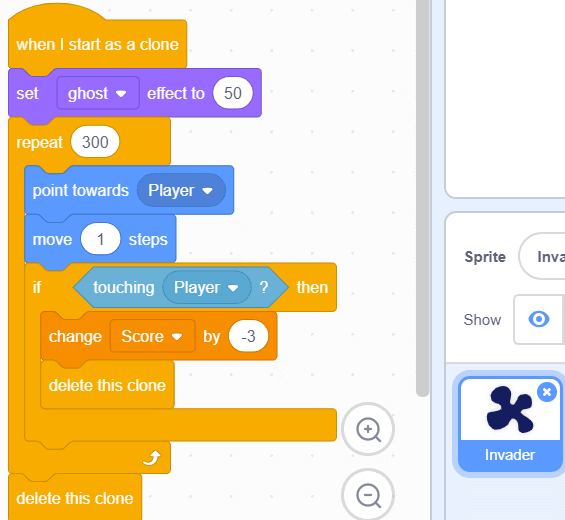
Add the script below to the Prey sprite. This will tell each clone that’s created to look translucent as well as move towards the Player sprite in 300 steps, and once that repeat cycle is finished, the clone will be deleted from the stage. Test your code!
Step 8
In order to make this into a game, we need to write some code to control the score. We are going to ensure the Prey clones check if they are touching the Player sprite, and if so, we want it to be deleted. To do this, add the script below. Add an “if then” block from the “control” command and place it inside the “repeat” loop.
REMIX TIP: try adding some sound effects to the code!
Step 9
Congratulations! You’re all finished writing the code for the Prey sprite! Now, we will work on the Invader sprite. Good news: all we have to do is copy the code we wrote for the Prey sprite to the Invader sprite and make minor changes. To do this, click and drag each piece of code from the Prey sprite onto the Invader sprite and release the mouse when the Invader sprite is highlighted blue (it will also shake to indicate when it’s selected):
Ensure each piece of code was copied from the Prey sprite to the Invader sprite by clicking on the Invader sprite. The copied code will automatically be oriented to the top left corner of the scripts area. To organize this, simply click the top of one piece of code and drag it away from the other. At this point, you should have two pieces of code for both the Prey and Invader sprites that are exactly the same.
Step 10
Now, we are going to make small adjustments to the Invader sprite’s code to reduce the score when the Player sprite touches the clones. To do this, adjust the value of the “change score by” block to -3. Test your code and keep an eye on the scoreboard to ensure it’s working correctly.
REMIX TIP: try adding some sound effects to the code!
Step 11
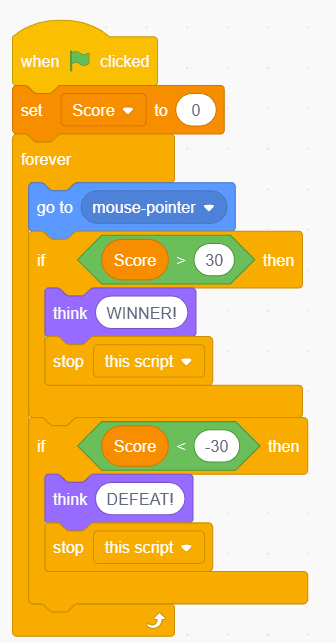
Now that we’re finished with the Prey and Invader sprites, we have to add some more code to the Player sprite. We want the game to tell us if we have won or lost; to do this, add the script below. By adding “if then” loops, we will be able to track whether or not our Player sprite’s score is above 30 or below -30. Test your code!
Step 12
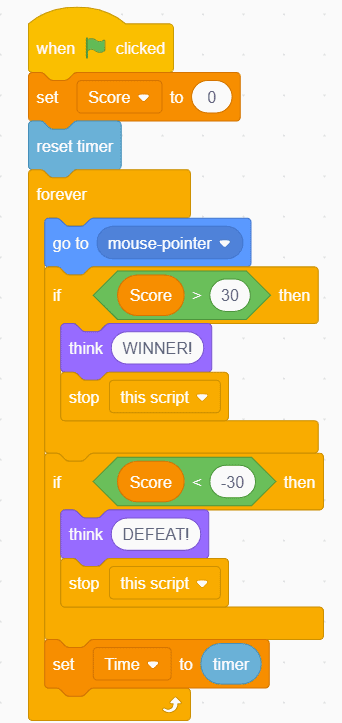
If you want to add some competition to the game, we can add a timer to track how long it takes to complete the game. To do this, we need to add another variable. Click on the “variables” command and click on the “add a variable” button. Name the variable “Time” for all sprites. Remember, to ensure it shows on the stage, check the box next to the variable’s block once created. Add the script below to the Player sprite.
Step 13
PLAY YOUR GAME! Congrats! Your game should be fully functioning. If some part(s) don’t seem to be working, review the steps to see where you may have gone wrong, or find tips on the Scratch 3.0 wiki page.
Follow Up
Feel free to remix this game with adjustments to the min/max score to win/lose, change movement, add sound effects or adjust point system!
Share your work with us! We want to see the awesome things you’re creating with Pinnguaq. Share online with us and tag @pinnguaq on Facebook, Twitter or Instagram for your work to be featured. Don’t forget to include the hashtag #LearnWithPinnguaq! Keep tuning into Pinnguaq for more lessons and fun activities!
Check out the Scratch website to find other timer/scored-based games for inspiration on how-to remix your game. Stay tuned for next week’s lesson where we will be editing and creating more with this game!
Useful Resources
- Scratch 3.0 Wiki page
- Scratch Team Twitter account
- Scratch website
You might also like
Responsibilities to Mother Earth: Interactive Storytelling with Scratch
 Grade 7 – Grade 12
Learning how to make interactive stories in Scratch.
Goose Hunt In Scratch
Grade 5 – Grade 7
Students will learn how to create a goose hunting game using Scratch!

Hungry Shark Scratch Game for Beginner Game Designers
Grade 1 – Grade 6
Learners will design a predator-prey style game in Scratch where a shark sprite will move around the screen gobbling up a bunch of fish!
