
Section Navigation
Introduction
The game we are going to make is based on a book called “Trip to the Moon.” The book was written by Vera Evic, an author from Pangnirtung, Nunavut, and was illustrated by various artists, including Elisapee Ishulutaq, Andrew Qappik, Jolly Atagoyuk, Peona Keyuakjuk, and Jessica Akapalialuk. This module will introduce the basics of animation as well as the basics of sprite movement. Animation is vital to the creation of most games and provides a level of immersion that still images cannot.
Learning Goals
Students will learn how to animate sprites and move them around the screen using the program Scratch. Students will learn the difference between movement and animation when coding.
Vocabulary
Animation - A series of images that tricks the brain into thinking that movement is occurring
Sprite - A computer graphic that can move independently of the backdrop
Backdrop - A static or moving image providing background scenery
Code - A list of instructions for a computer to follow
X & Y Coordinates - A way of indicating location on a visible or invisible grid. X indicates horizontal location and Y indicates vertical location
Animation uses changes in artwork in sequential order (frames) to simulate motion, while movement uses code to change the position of those frames.
Guiding Questions
- Have you ever wanted to make a character move in a video game?
- How do we make a character in a video game move from one side of the screen to the other?
Curriculum Links
This module provides an opportunity to address curriculum expectations in the Science, Computer Studies, and Math in Grade 3-6 expectations. In particular, students will be learning different programming skills in Scratch and build on the skills they have learned in an entry-level assignment. This assignment will also demonstrate how visual cues can help communicate feelings, ideas, and understandings when telling a story.
Materials
- Scratch – Download Scratch
- Adobe AIR (required for Scratch to run) – Download Adobe AIR
- Trip to the Moon art assets – Download Assets Folder (ZIP)
- Notebook, notepad or stack of paper to create a “flip book”
- Writing tool or a stamp
Non-Computer Activity
Apparent motion An optical illusion where stationary objects appear to be moving.is the basis for animation. Separate frames of illustration, when flipped through quickly, trick your brain into thinking that motion is occurring
Start with a simple exercise – using a flip book and a marker or pen, make a ball bounce. On the first page of the book, draw a ball or use a stamp on the top of the rightmost side of the paper. On successive pages, draw the same ball slightly lower. After about 10 pages, have the ball reach the bottom and come back to the top after 10 more pages. In this way, we’ve created 20 frames of animation, which when flipped through quickly, create the apparent motion that the ball is bouncing.
You can try some other things using the same technique, like making a face smile, making a rocket ship take off, or just making an abstract shape change. Remember to make sure that adjacent frames don’t change too much from each other or your animation will appear choppy.
For a comprehensive version of this lesson, check out the Science Buddies website.
Computer Activity
Step 1
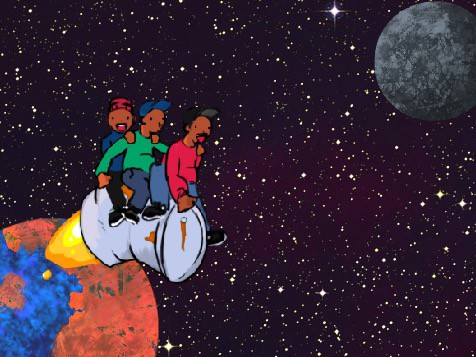
In this activity students will program to make the sprite (the barrel with the people) move towards the moon and back to earth. To allow the sprites to go back and forth, you have to use X and Y coordinates. X and Y is a way of indicating location on an invisible grid. X indicates horizontal location and Y indicates vertical location.
Start a new project and delete the cat sprite so that your project is empty.
Tutorial: Adding sprites to projects
To import a sprite, click on the “import button” underneath the stage and select the sprite file or supported image file to import.
Follow the same steps to add new backdrops to projects, using the New Backdrop buttons.
Step 2
Add ‘RocketBoys_nofire.png,’ ‘Sprite_Moon.png’ and ‘Sprite_Earth.png’ to your sprites.
Step 3
Add your choice of ‘Bckg_Space.jpg’ options to your backgrounds.
Tutorial: Costumes
The Costumes tab is where you can adjust what your sprite looks like, change how big your sprite is, or animate your sprite. We’ve included several frames of animation for the barrel, but you can add your own if you like by using the image editing feature – we’ll elaborate on that in the Qajak Race module.
Let’s start by making the moon smaller.
- Click on the moon in your sprite list.
- Click on the ‘Costumes’ tab.
- Click ‘convert to Vector.’ This allows you to resize the moon while retaining the visual detail.
- Click on the moon using the arrow tool. This will allow you to resize it by clicking and dragging the control boxes in the corners of the blue box surrounding the moon. Drag it until it is significantly smaller than the earth.
Now, let’s animate the flame for the barrel.
- Click on the barrel in the sprite list.
- Click on the ‘Costumes’ tab.
- Import RocketBoys_01.png, RocketBoys_02.png, RocketBoys_03.png in the New Costume section. These images are now ‘costumes’ for your sprite. We will use a script to switch quickly between them, making the flame appear to be growing and shrinking.
- In your costume list, duplicate RocketBoys_02 and RocketBoys_03 by right-clicking on them and clicking duplicate.
- Order the costumes by clicking and dragging them in the costumes list into the following order:
- RocketBoys_noflame,
- RocketBoys_03,
- RocketBoys_02,
- RocketBoys_01,
- RocketBoys_02,
- RocketBoys_03.
- Now, still with your rocket can selected, click on the Scripts tab and drag and drop the following commands into the script area to the right of the scripts tab.
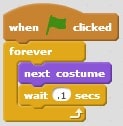
When you click the start flag, this script will rotate between costumes in the order that you put them in in the costume tab. It will repeat forever (until you press the stop button). You can change the amount of time the animation takes to complete by changing the wait time. .05 seconds causes the animation to run quickly and have a smoother appearance, where changing it to 1 second will cause the animation to run slowly and choppy.
Test your animation! The rocket barrel should appear to have an animated flame. The sprite animation will continue forever unless you add code to stop it or close the program.
Now that we have an animated sprite let’s send the boys from the earth to the moon. You can leave the other script running where it is. Select the Rocket Boys sprite and drag and drop the following script.
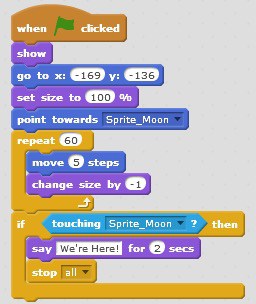
Let’s explain the commands of this script:
- Show: Makes all the sprites visible in case a prior script hid them.
- Go To: Puts the sprite in a starting position. This may be different on your display. If you place your mouse pointer in the middle of the earth, you will see x and y coordinates. Use these as a starting point.
- Set Size: This resets the size of the sprite. If you don’t have this command, it will start out as the same size from the last time you ran a script.
- Point Towards: This sets the angle for the motion of the sprite. You could select ‘Sprite_Earth’ if you were starting from the moon and heading to the earth.
- Repeat (60): This is a command that is telling the computer to repeat the commands below it 60 times. In this case, it is saying to move 5 steps (in the direction of the moon) and get 1% smaller sixty times. Test it to make sure that’s enough! If you need to, increase the number of repetitions.
- If (touching) [Sprite_Moon] then: This command is an if/then statement. In this case, we have directed the program that IF the sprite is touching the moon, THEN say “We’re Here!” and stop moving.
Test your script! The boys on the barrel should travel to the moon and then say “We’re Here!”
Conclusion
Discuss, as a group:
- How did the story change when they animated the book illustrations?
- What did you like best about using Scratch?
- What did you find was the hardest part?
- If you had more time what would you add or change?
Note: Participants who are interested in animation may want to refer to some of our later lessons around 2D animation.
Resources
Additional Resources
- Inhabit Media – An Inuit-owned publishing company and publisher of Trip to the Moon.
- NFB(National Film Board of Canada) – An animated short film by Alan Syliboy and Nance Ackerman, inspired by the Mi’kmaq legend “The Stone Canoe.” This short-film is part of a series called Vistas comprised of 13 short films on nationhood from 13 Indigenous filmmakers from Halifax to Vancouver. It was a collaborative project between the NFB and APTN to bring Indigenous perspectives and stories to an international audience.
- Skateboarding Pants – An animated film by Cree and Blackfoot First Nations artist Colton Willier, when he was in Grade 2.
Social Media Resources
- @scratchEdTeam – The Scratch education team at @HGSE supports educators using Scratch.
- @scratch supports educators using Scratch.
You might also like
Goose Hunt In Scratch
 Grade 5 – Grade 7
Students will learn how to create a goose hunting game using Scratch!
Creating An Animated Card In Scratch
Grade 1 – Grade 3
Learn the basics of animation in Scratch as we look through the Looks section and create a short card animation!
Joke Telling Using Scratch
Grade 1 – Grade 3
In this fun lesson students will create their own jokes and discover their sense of humour using Scratch to share with their peers!
