Section Navigation

Introduction
In this module students will be exploring conditional statements and how they can be used in game design. When looking at game design if-then statements work well with variables such as a players health or score. If-then statements allow you to control what happens when a players health becomes 0 or once their score reaches a specific value. For this module we will be creating a game that includes a “lives” variable that we will use with a conditional statement. Conditional statements can be used in solving simple algebraic equations and in regular conversation.
Learning Goals
The learner will understand the concept of conditional statements and how they are used in game design. They will also examine how we use conditional statements in conversation and mathematics.
Vocabulary
Conditional Statement - A true or false statement used to make a decision in a program.
Loop - A part of a program that repeats itself.
Clone - A fully functioning copy of a sprite that can move and run scripts on its own, separate from the original sprite.
Guiding Questions
- Have you heard of unconditional love? What does that mean to you?
- Can you think of things that have conditions? For example, if you do your chores then you get your allowance, or if you keep your room clean then you get a special privilege, like screen time.
Curriculum Links
Language – Writing
At the end of the module the group creates an if-then chain story. Students can continue this activity individually by writing their own if-then chain story and include more details. Think of the chain of requests in the If You Give a Mouse a Cookie or If You Give a Moose a Muffin stories. Once students are done writing their stories they can animate them in Scratch.
Mathematics – Solving Simple Equations
We use conditional statements when solving simple algebraic equations and most of us probably do it without realizing. For example, an equation that is missing a value, such as 5 + __ = 7. If 5 plus something is 7, then the something is 2.
Materials
- Scratch – Download Scratch
- Adobe AIR (required for Scratch to run) – Download Adobe AIR
- Ice Hopping art assets – Download Assets Folder (ZIP)
- Deck of cards
Non-Computer Activity
If-Then Coding Game
Each round has one programmer and the rest of the students are “computers.” Start with the teacher as the programmer until students understand how to play, then students take turns as the programmer. There are different ways to play that allow for varying levels of difficulty (chose based on the age of your group). Allow the students to get creative with this and try to trick each other.
Easy
If I do _____, then you do ______. For example, “if I hop on one foot, then you spin in a circle.” The computers follow the if-then statement and start and stop when the programmer starts and stops.
Moderate
If I do _____, then you do ______, else _______. An example would be “if I touch my nose, then you hop on your left foot, else hop on your right foot.” The programmer can make their statements increasingly difficult as the game continues.
Hard
For the hard level, students follow the moderate rules but eliminate students who incorrectly follow the commands or are the last to follow. If a student is eliminated they can become a “broken computer” and sit down.
If you find this activity too easy for your group, use the card activity from this document (PDF).
Computer Activity
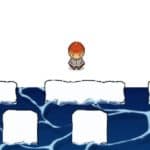
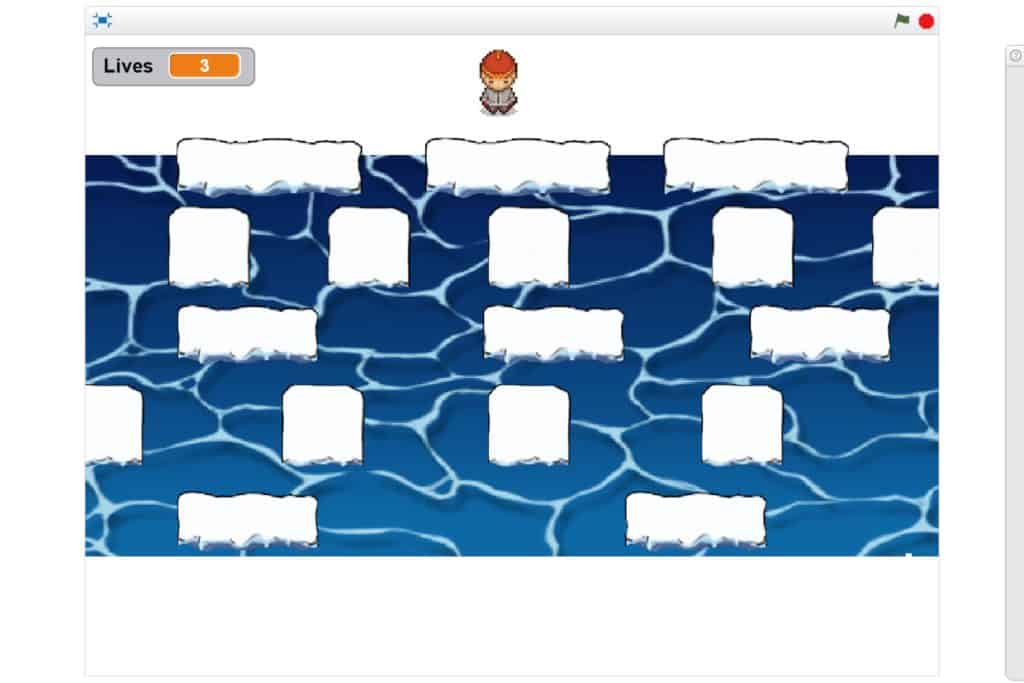
The game we will be creating is like the game Frogger, wherein the frog has to safely dodge traffic and other hazards to get across a road, but with ice moving across the screen (can be changed to logs for northern Ontario communities). The goal is to get the boy character safely to the other side. We will be using if-then statements to make our sprites move across the screen. The game will include “lives” which will be created as a variable. We will control what happens when the lives reach 0 using an if-then statement.
Activity
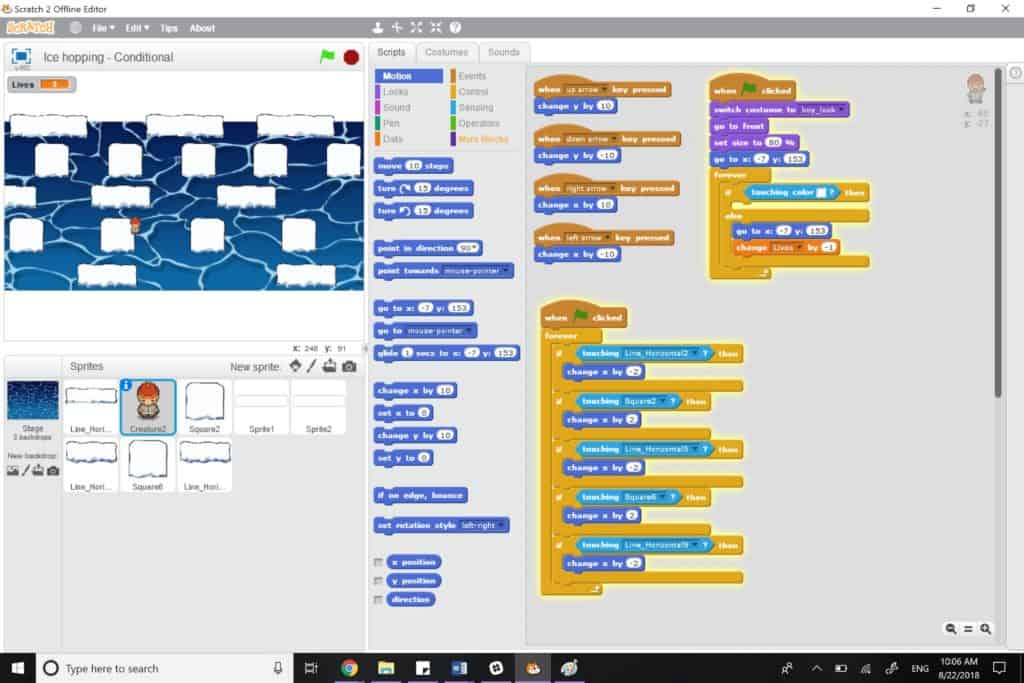
- Open a new Scratch project and delete the cat sprite.
- Upload the water background from the assets folder by clicking the file with the up arrow under “new backdrop”.
- Create the end zone sprites by clicking the paintbrush beside new sprite. Use the rectangle tool to create large white rectangles and place them where you would like them.
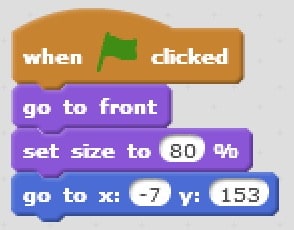
- Add the boy sprite by clicking the upload sprite icon, then set his starting location to one of the end zone sprites using the “go to” block.
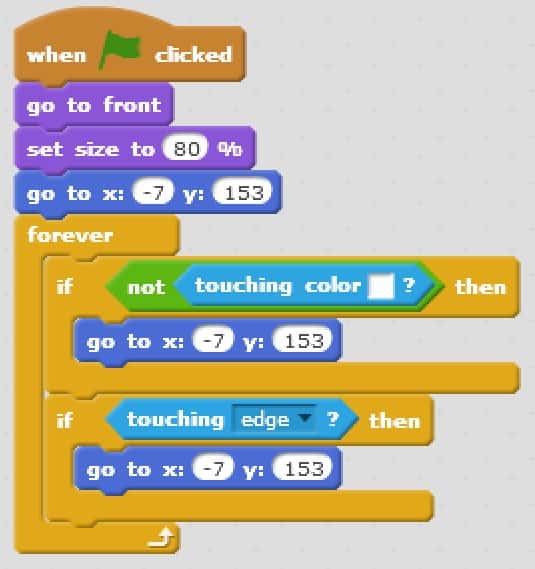
- To make the boy sprite larger and always on top of the other sprites you will need to go to the “looks” section and set size to 80% and “go to front”
- To make the boy move, program the arrow keys so that when they are pressed it changes the x and y directions. Remember that x is left and right, and y is up and down.
- Import your ice blocks. There are two different shapes, a square and a rectangle. These are the shapes the boy sprite will be walking on to make it safely across the water.
- Students should plan where they want the ice blocks, their direction of movement, and how many they want for each row. Try alternating directions and shapes within each row.
- Start by placing one ice block where you want it (near an edge is best for cloning purposes) and set that as your starting location.
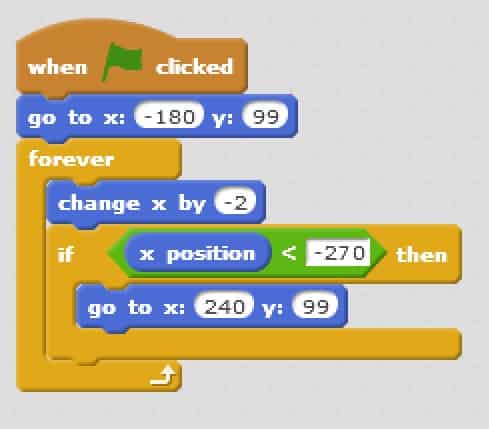
- Pick which direction you want the block to be moving in, and program it so that when it reaches the edge it goes to the other side of the screen using the “go to” block and an “if-then” statement.
- Below is an example for an ice block that is moving to the left. To move it to the right you need to change x to a positive number, and switch the condition to be x position > 245.
- Time to clone! A clone is created using the “create clone of myself” block in a “repeat” loop, both found in the “control” section.
- The repeat loop goes directly beneath the go to block. Change the number of times the loop repeats to match the number of clones you want.
- When a clone is created it will overlap the current sprite. To fix this add a “change x by” block. Adjust the numbers until you are happy with the spacing between your blocks.
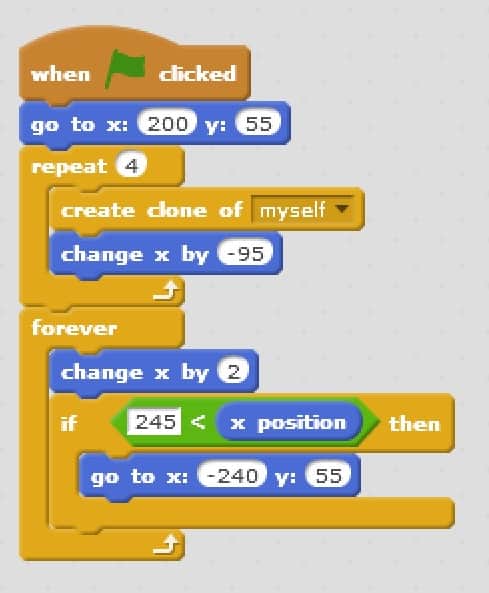
- Depending on the placement of the original ice block sprite you may need to change x by a positive or a negative number to move the clones.
- To tell the clones what to do, continue programming in the workspace for the original sprite. Start the script with a “when I start as a clone” block.
- Duplicate the forever loop from the original script and add it to the starting block. This gives the cloned blocks the same movement commands as the original sprite.
- Continue adding rows of ice blocks with a space between them until you reach the other side.
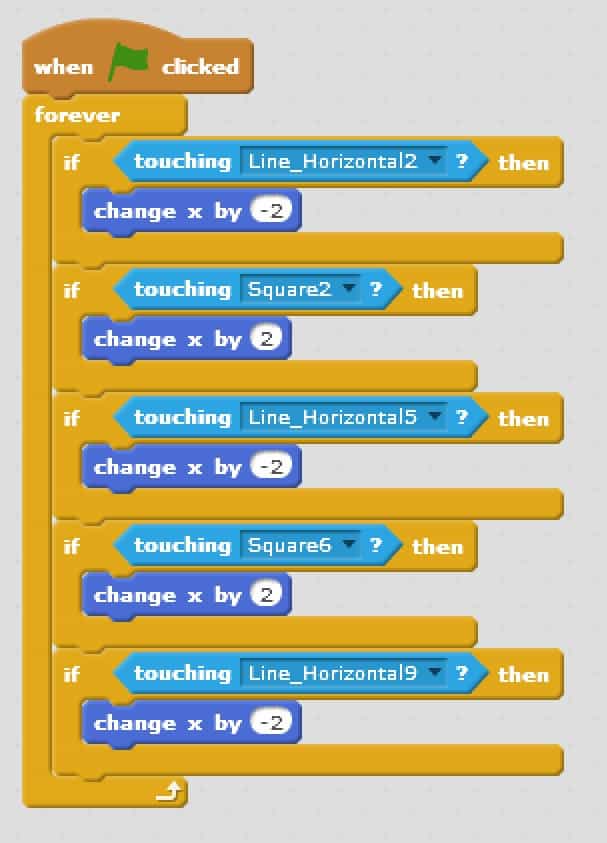
- When the boy is on the ice blocks we want him to move with them. To do this we will need a few if-then statements. The values and direction you enter will depend on the values applied to the blocks.
- As the backdrop has multiple colours, we need to program the boy to go back to the starting position when he is not touching white blocks.
- The program can behave irregularly if a sprite is moved along the edge of the screen. To control this, add another if-then statement for when the boy is touching the edge.
- Add the “boy win” costume by going to costumes and clicking the upload folder.
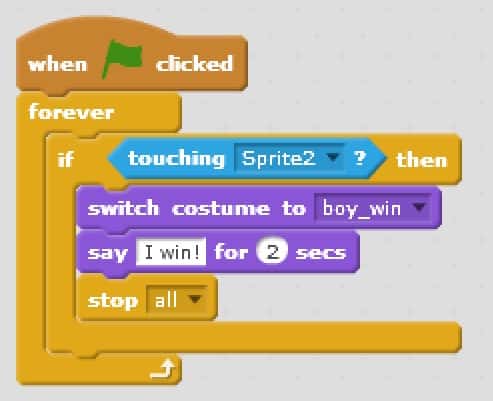
- To win the game the boy needs to make it safely to the other side. To have the boy switch costumes when he is touching the “end zone” sprite, use the “switch costume” block under the “looks” section.
- You can also add the boy saying “I win!” using the “speech” block under the “looks” section. Adding the “stop all” block ends the game.
- Under the “data” section we can make a variable. Make a variable for lives and set it to 3. We program what happens when a character runs out of lives using the if-then statement as follows.
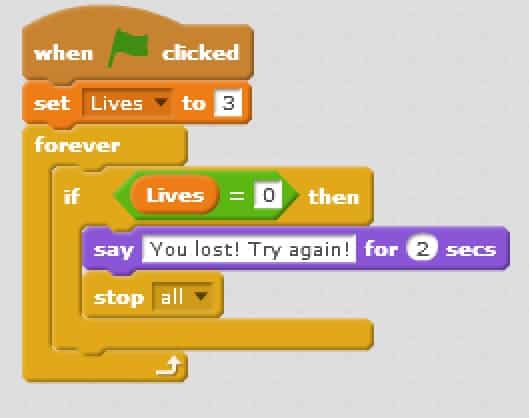
- To make our character lose lives, add the “change lives by -1” block into the if-then loops that send him back to the start.
- You also need to reset the costume for the boy when the green flag is clicked, so that he is not on the win costume when a new game starts.

Additional Challenges
Animate Your Boy Walking
To animate your boy walking you will need to upload the costumes from the asset folder. They are named based on the direction of movement (north, east, south and west). To keep this example simpler, there are only two costume changes, as more costumes slow down the characters movements.
Have instructions to start
Instructions can be added to the start of the game by having the boy say what to do or by having an opening screen. To have the boy give the instructions you will use the “say” block from the “looks” section. Type in the instructions you wish to give. For an opening screen you can make a new backdrop by clicking the paintbrush under new backdrop. From here you can add text and explain how the game works.
Add a Timer
See if players can finish in a set amount of time. Make a variable called “timer” or “time”, found under the data section. Set the amount of time you would like to give players. Program the time to decrease each second and stop at 0. When the timer reaches 0, have everything stop using the “stop all” block.
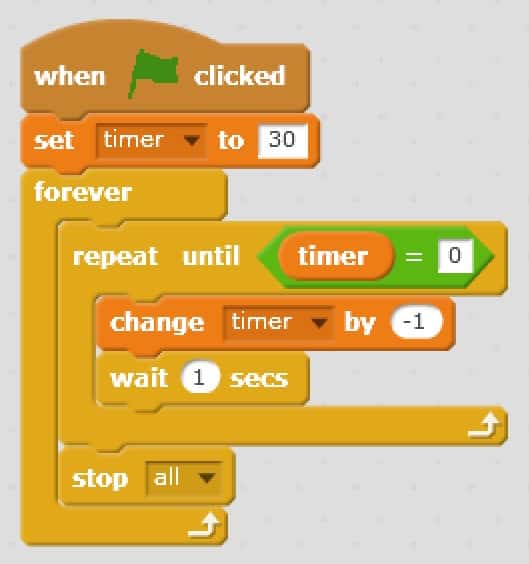
Alternatively you can create a timer that acts like a stopwatch and counts up from zero to record how fast players can complete the game.
Conclusion
This activity will show that everyone understands the concept of if-then statements and can apply them in a conversation. Have everyone sit in a circle. The teacher begins with a simple if-then statement such as “if I go home, then I’m going to play video games”. The next person continues the situation with an if-then statement that builds on the previous comment. For example “if I play video games, then I’m going to play fortnite”. Everyone goes around the circle adding to the story with if-then statements (reference: the Conditional Chain Game).
Resources
- Cloudy Heaven Games – A blog post that discusses how conditional statements can be used in game design.
- The Hour of Code website has a lot of resources for teaching programming. This is a link to a document that teaches conditionals and includes a card game activity. The card activity could be done instead of the introduction or conclusion activities.
- The Scratch website has a detailed explanation of the if-then and if-then-else blocks.
- Conditional Statements – A video that breaks down conditional statements into two pieces, the hypothesis and the conclusion. It goes into detail about conditional statements and provides a good explanation.
- Medium – A blog post that talks about introducing if-then statements. Within the blog there is a video of the kids marshmallow experiment which is worth watching and can lead into a discussion of conditional statements.
You might also like

Creating An Animated Card In Scratch
 Grade 1 – Grade 3
Learn the basics of animation in Scratch as we look through the Looks section and create a short card animation!

Creating A Theme Song In Scratch
Grade 1 – Grade 3
In this lesson students will explore Scratch’s music library, and putting them together through programming to make music.
Joke Telling Using Scratch
Grade 1 – Grade 3
In this fun lesson students will create their own jokes and discover their sense of humour using Scratch to share with their peers!
