

Introduction

This tutorial directly follows the “Fancy numbers in Scratch: Modifying and adapting existing code” tutorial and builds off of the code developed throughout it. In this tutorial, you will first learn how to manage the clones that are created during the number-writing process. Deleting these clones and redrawing numbers is how a readout, such as a score counter or timer, can be refreshed.
You will also learn how to write multiple number readouts and update them, through the use of custom blocks (the “My Blocks” category in Scratch). As part of using custom blocks, you will also learn about a feature specific to custom blocks that will allow you to write what is being written all at once. Since I’ve provided a starter project for this tutorial, you do not necessarily need to have completed the previous tutorial however I would strongly recommend that you do so.
Vocabulary
- My blocks (Scratch block category) – A feature in Scratch that allows for custom blocks which are blocks that are defined by the user and made out of other Scratch blocks.
Materials
- Scratch (online or desktop)
- Custom blocks in Scratch starter project
- Custom blocks in Scratch completed project
Computer Activity
Deleting and redrawing the clones
To start, ask yourself, “What does it mean to update a number or a readout?” Then, with that in mind, ask yourself, “What tools might we have that will help me update a number or a readout?”. When I asked myself the same questions, here are the answers that I came up with:
- To update a number readout would mean to change or modify its currently displayed number so that it displays a new or different number. Since the number that is written out is just a series of clones, this would mean making new clones that display the desired numbers when an update is requested.
- As a starting point, in terms of tools, Scratch provides three blocks that you can use to manage clones, shown below:

You should already be familiar with the first two blocks, “When I start as a clone” and “Create clone of myself”, since I used them as the basis for this clone-based Scratch writing technique. As you might have guessed, the third one, “Delete this clone”, is what you can use to delete the existing clones. To understand why this is the way that I’ve constructed this solution, I want you to think about the algorithm behind how our number writing works. As an exercise, try and express in plain language what it is that our writing algorithm does. This means thinking about what the number writer is doing in terms of:
- The number writer’s inputs (What information or data does it need to run?)
- The number writer’s outputs (What does it do or produce after it’s done running?)
- The steps that it takes to get from its inputs to its outputs (How does it run?)
Understanding the algorithm
Before seeing how I would answer those questions, try to come up with your own answers. Then, compare what you came up with to my answers below:
- As inputs, the writer needs:
- Text or a number to write.
- A starting position, in xy-coordinates, for the rightmost (ones) digit, which is determined by the position of the writer sprite.
- The writer produces a number display made of Scratch clones, one for each digit, to the left of the starting position.
- I would express the algorithm as step-by-step instructions:
- Take number and starting position
- Go to starting position
- For each digit in the number provided, starting with the ones column, do the following:
- Read the current digit
- Create a clone of the current digit
- Move the writer to the left
- Look at the next digit
With the algorithm laid out in the answer to #3 above, I want you to now think about what needs to change to be able to update a number, since as it’s currently set up, it will only write one number and then stop. After you’ve done that, I want you to compare it with what I think the solution should be:
- Take number and starting position
- Go to starting position
- For each digit in the number provided, starting with the ones column, do the following:
- Read the current digit
- Create a clone of the current digit
- Move the writer to the left
- Look at the next digit
- When update is requested:
- Delete all clones
- Go to #1 and repeat
In my solution above, I propose that when an update is requested, all the cloned digits that have been written by the number writer are deleted and then the first part of the algorithm is rerun to write the digits of the newly provided number.
Deleting all the clones
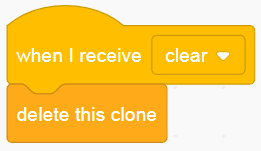
As you saw above, Scratch has a block for deleting a single clone, “Delete this clone”, but how might you delete all clones? You would need to be able to access or send a message to all the clones of the number writer sprite and tell them to run the “Delete this clone” block. In the Events block category, there are blocks that you can use to both send a message and react to messages sent:

By clicking on the small down arrow, you can also create a new message. In my case, I created a message called “clear” because I’m going to be using this message to tell all the clones to delete themselves, in effect clearing the number displayed. Since the block “Delete this clone” only deletes clones and won’t delete the original number writer sprite, the code to delete all clones is actually quite simple:
Now that I know how I could clear the number display, if you look at the modified algorithm, you’ll see that I still need to tell the writer sprite when to clear the display, i.e. when to use the “Broadcast clear” block. Considering the code that you already have in the number writer sprite, I want you to think about where an appropriate place might be to insert such a message. Try to do this yourself before looking at my answer below:
I put the clear block just before the digits of the number get written out. If you run that code you’ll find that it seems to run exactly the same as before and it should; I haven’t changed what’s being written nor am I trying to write anything extra. To see the effect of this code in action, I need to be trying to write or update the number being displayed. To make that easier to do, I will introduce you to Scratch’s custom blocks to make a custom “draw” block that will write whatever text is given to it.
Creating and using custom blocks
At the bottom of the list of categories in Scratch is the pink “My Blocks” category. In this category, you can create custom blocks that are made up of other Scratch blocks and can be reused within the sprite they were created. This is similar to how in many programming languages, you can (and often do) define your own functions or methods for pieces of code that you find yourself using or reusing. While it might not seem apparent, you will actually be reusing the part of your code that draws the digits of the number every time you want to update your number display.
I will give you step-by-step instructions to create a custom block and then discuss the resulting code.
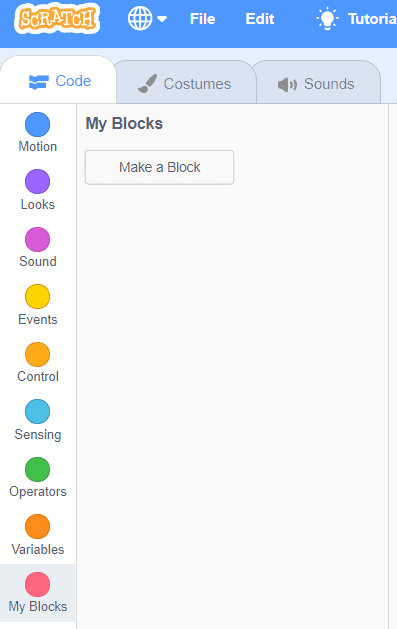
- Click on the “My Blocks” category. This will bring you to the bottom of the blocks section. You should see the button “Make a Block”, pictured below.
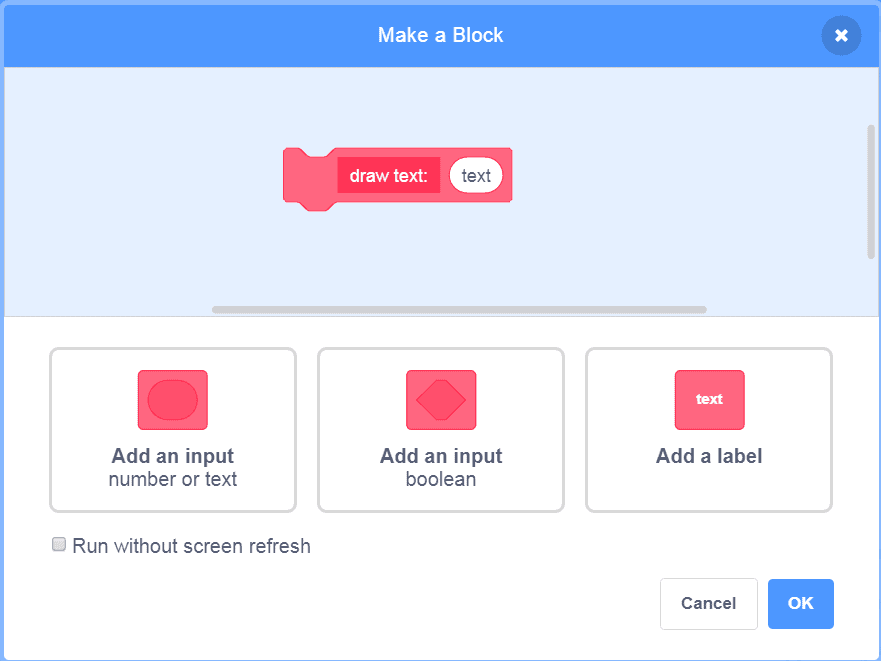
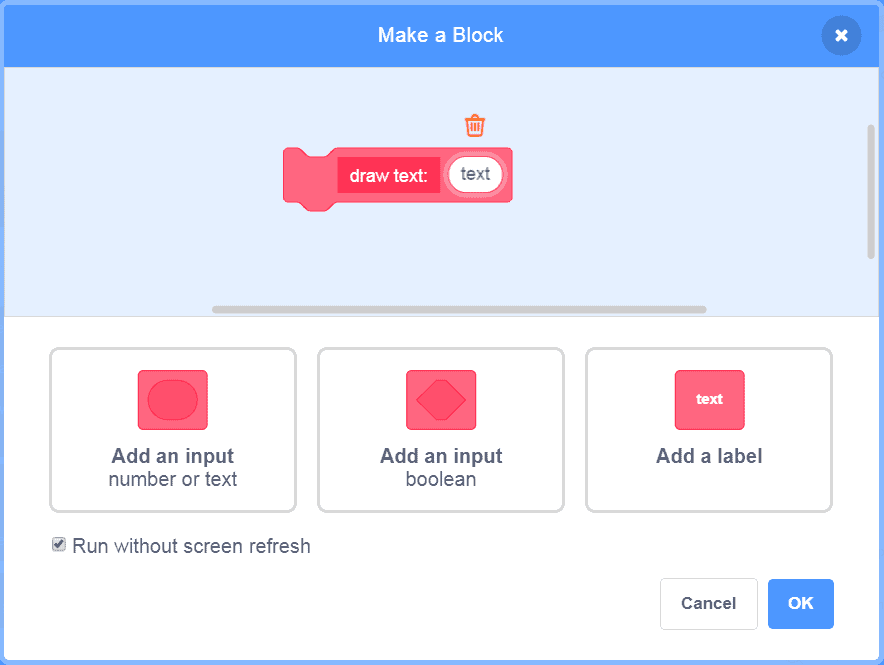
- Click on “Make a Block”, which will open the “Make a Block” pop-up menu (pictured below). In this menu, you can rename your block and add labels and inputs to the block. Before moving to step 3, think about what inputs, you might need for this block.
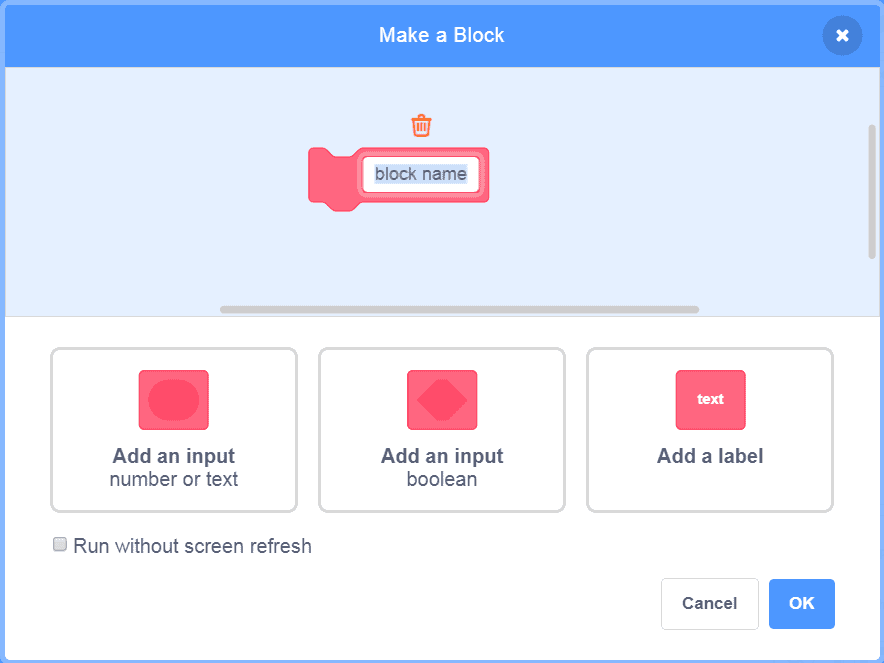
- Rename your block to “draw text:” by clicking on the block label and typing in your new name.
- Click on “Add an input (number or text)” on the left and rename the input to “text”, in keeping with the naming convention that you’ve used in the existing code. Your custom block menu should look as below:
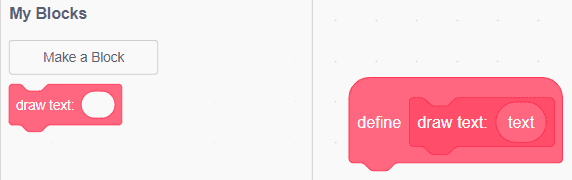
- Click “OK” to create the block. You should now see a new hat block named “Define draw text” and there should also be a block called “Draw text” in the My Blocks category, both pictured below:
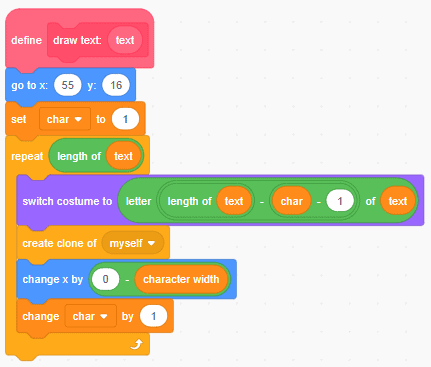
Whenever the “Draw text” block is run, all the code under the “Define draw text” hat block will run. What code do you think should be put in this custom block? Think about that question before continuing on to the next step (Hint: Remember back to the algorithm I defined for the writer and think about where any repetition occurs).
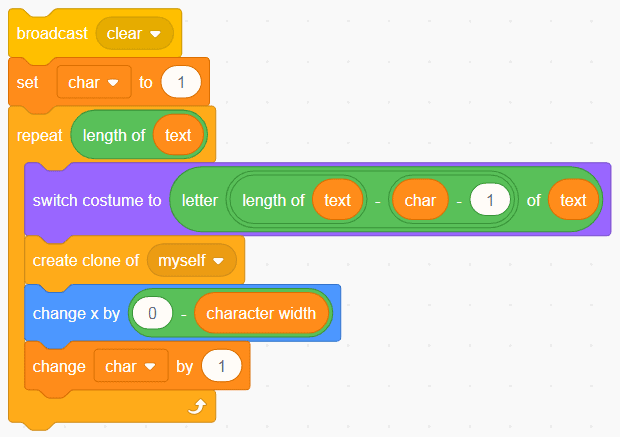
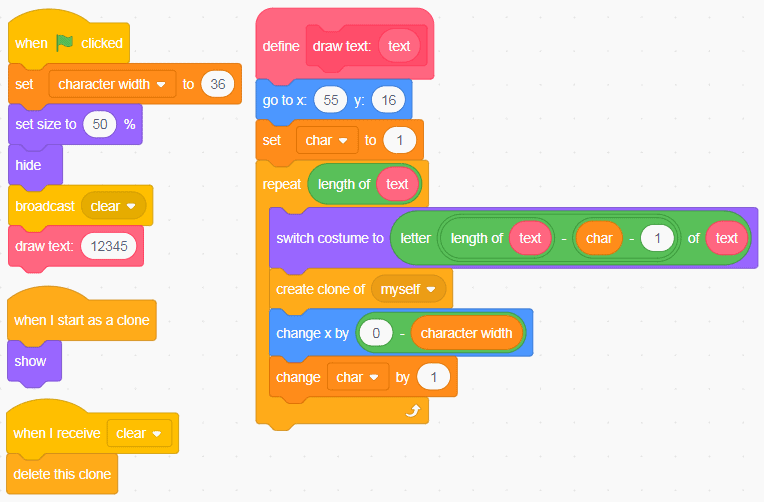
- Move all the code that needs to be repeated under the “Define draw text” block. The code that I think is necessary is shown below.
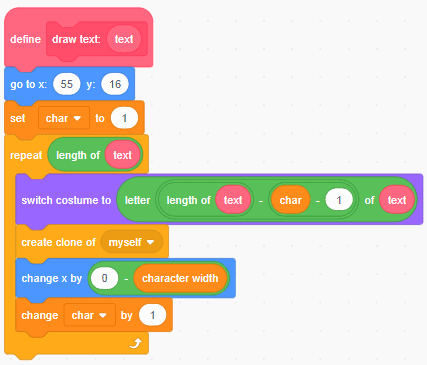
You can see that there are both pink and orange versions of the “text” variable. The pink version only exists within the custom block and the value of it is passed to the custom block when the custom block is used.
- Inside the custom block, replace each instance of orange “text” with the pink version by dragging the pink “text” bubble to where the orange bubbles are. This will pop the orange bubbles out and put in the pink ones. You can delete the orange bubbles by dragging them into the list of blocks on the left. Your resulting code should look as below:
- Underneath the “When green flag clicked” block, add a “Draw text” custom block where the drawing code used to be as below:

- Test your code to make sure it works, putting different values in the input for “Draw text”. Your completed code should look like this:
Since the code above still only draws one number and then stops, I want you to look at the code under the “When green flag clicked” block and think about how you might add a forever or repeat Control block to draw different numbers. What code needs to be repeated? Try to modify the code yourself before checking my solution (which is only one possible solution) below:
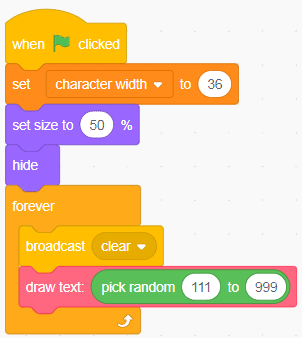
Before making the changes to your own code and running it, I want you to try to describe to yourself what it does. Once you have done so, make the changes to your code and compare what you thought would happen with what is actually happening. Is it the same? Is it different? If it is different, why did you think something else would happen?
The code I added simply has the number writer write a random number between 111 and 999 forever. If you run the code, you’ll see that the same problem of the numbers “rolling out” from right to left is still happening, and now, with the update being refreshed, there’s an unpleasant flickering going on.
Thankfully, for custom blocks, there’s a checkbox called “Run without screen refresh” that you can use to fix this problem. To enable it:
- Right click on the “Define draw text” block and click “Edit”. This will reopen the “Make a block” popup menu.
- In the bottom left, you should see a checkbox labelled “Run without screen refresh”. Check this box, as below:
- Click “OK” to save your change to the “Draw text” block.
- Run your code to see if the flicker persists.
When you run your code, you should notice two things:
- The flick is now gone.
- The code is running much faster.
To understand what’s happening, you need to understand a bit about how Scratch runs things like “Repeat” blocks. Generally speaking, Scratch will run the inside of a repeat block once and then display the result. In this case, since I used a “Repeat” block to read every digit, Scratch was refreshing the display for each digit, something like:
Read and clone 1s digit → Move over to 10s position → Display → Read and clone 10s digit → Move over to 100s position → Display → Read and clone 1000s digit → Move over to 10000s position → Display …
While this is useful in some instances, like when you use a Repeat block with a Move block and want to see each step or in the text writer example to have the text gradually appear, in this case, it caused the roll out effect for the number display, which was not desirable for what I was trying to achieve. Using “Run without screen refresh” made it so that the entire “Repeat” block would run before displaying, something like:
Read and clone 1s digit → Move over to 10s position → Read and clone 10s digit → Move over to 100s position → Read and clone 1000s digit → Move over to 10000s position → … → Display
The effect of this is that all numbers would show up at the same time.
Conclusion
With the completion of this tutorial, you are now able to create custom number readouts that can be refreshed at will and also refresh without flickering. I will leave it to you to use this code in your own projects, though I will include a couple of projects below that can be remixed as an exercise. Right now, the code that I provided above displays random numbers as fast as it can. In an actual scenario, this isn’t necessarily what will be the most useful, so I want you to think: How can the code be changed so that it’s updated as needed? Or, in the case of a timer, every second or tenth of a second? I will include some examples of projects that I have remixed and that you can remix that puts this code to use.
Also, like the end of the Fancy numbers in Scratch: Modifying and adapting existing code tutorial, I want you to think about how this code can be brought back to the text writer code. The modifications that you’ve made to the number writer should be compatible with the text writer code, since the number writer code is based off of the text writer code. What other considerations might be unique to the text writer that would require specific changes?
We want to see the awesome things you’re creating! Take a photo or video and share your work with us by emailing media@pinnguaq.com or tagging @pinnguaq on Facebook, Twitter, or Instagram. Don’t forget to include the hashtag #LearnWithPinnguaq! You can also upload your project to the Pinnguaq Studio.
Download Tutorial
Resources
You might also like
Fancy numbers in Scratch: Modifying and adapting existing code
In this tutorial, learners will analyse, modify and adapt code from a previous tutorial to display custom art for number-based readouts.
Player Control in Scratch: Basic Movement Techniques
In this lesson students will be introduced to three techniques for moving a player around the stage in Scratch!
Working with clones in Scratch: Making fancy text
In this tutorial, learners will explore using clones to display text using a custom font in Scratch.
