
Section Navigation

Introduction
In this module students will create a personality quiz in App Lab. Students will be learning how to use an if else loop and make a variable. They will plan their quiz, reason through possible outcomes, and think of ways to make the quiz fun for users. The quiz could focus on a specific topic to tie into any curriculum. This module is for those who have completed the Introduction to App Lab module, or those with a general understanding of App Lab.
Learning Goals
By the end of this module students will know how to create a quiz on App Lab. This will include the use of event loops, if-else statements and variables. At the end students will take each other’s quizzes and discuss what makes a quiz a success, and if and how they could be improved. Getting feedback and making adjustments is part of the app design process.
Vocabulary
Screen - displays what your app looks like on a mobile device.
Toolbox - contains the various blocks and elements needed for coding your app.
Workspace - where you place your coding blocks to program the different elements in your app.
Element - a part that can be programmed or interacted with.
Property - qualities and characteristic of elements.
Hex (hexadecimal) colour code - a 6-digit value that represents and specifies colour; often used with HTML.
Guiding Questions
- Have you ever completed an online personality quiz?
- Have you ever wanted to create your own to share with friends?
- What kinds of questions would you ask?
Curriculum Links
This module aligns with the Computer Science curriculum as it teaches basic programming skills and app development. It aligns with the English curriculum as students draw on their writing, language and critical thinking skills to create their questions, plan a wireframe, and provide feedback and reviews to their peers.
Materials
Code.org Account – Sign up for Code.org (email required)
Non-Computer Activity
Students will use App Lab to create a personality quiz app. Begin by thinking about various questions that would help students learn about someone’s personality? What kinds of questions would you ask? Record all the questions.
Complete an online personality quiz as a class. BuzzFeed has many to choose from. Select one ahead of time to ensure it is appropriate. Here is one that tells you which Frozen character you are most like.
The theme of the quiz could tie into a specific unit of study. For example, what book character are you most like, or what historical site or time period you should visit.
Computer Activity
Students will use App Lab to create a personality quiz app. Students will plan out their quiz including questions, responses, and corresponding points and results. Variables will be used to determine the final result. The value of the variables depend upon which answer is chosen. Students will think about which answers correspond with each end result.
Discuss what made the quiz fun and what could have been added to make it better. Talk through various ways of determining results. How did the quiz designer calculate the results of the quiz you just did as a class? How will you determine the outcomes based on the answers your user provides? For this module we will use a variable that gives varying amounts of points for the different answers.
Activity
Start a new project and rename it “Personality Quiz”
Make the home screen:
- Select the “Design” tab in the upper left and choose a background colour for your home screen.
- Drag a label element onto your screen.
- Click on the label to edit it, and in the text field under the Properties tab of your workspace, type an introduction to your quiz.
- Adjust the properties and position of your introduction to make it clear and visible.
- Drag a button onto your screen and change the text and properties as needed. This will be the button to start the quiz.
- Before programming the button, drag a Screen element to the app.
- Go back to ‘screen1’ and under “UI Controls” in the “Code” tab, drag an “onEvent” block to your workspace. Select “button1” for the id and “click” for the event type. Note: hovering over any block in the Toolbox gives you the name of the block.
- Inside the greenloop drag a “setScreen” block (second from the bottom in the “UI Controls” list) and change it to “screen2” (the new screen that was added in step 6).
- Under the “Variables” section drag a “vars x;” block to your workspace and change the ‘x’ to a name that represents your variable, such as “points”.
- Add the “x= ;” block. Change the ‘x’ to the name of our variable and assign it the value 0.
Making questions:
- In the drop down menu above the mobile device screen, select the new screen we added.
- Under the “Design” tab choose a background colour and change the id of the screen to “Question1” or something similar to keep track of the different screens.
- Use a label element to add a question to the screen. Adjust the properties and position as desired.
- Add answers or choices for the question by adding image or button elements. Upload images to represent answers or change the text on the buttons to the answer options, and give each a new id to make it easier to keep track of when programming.
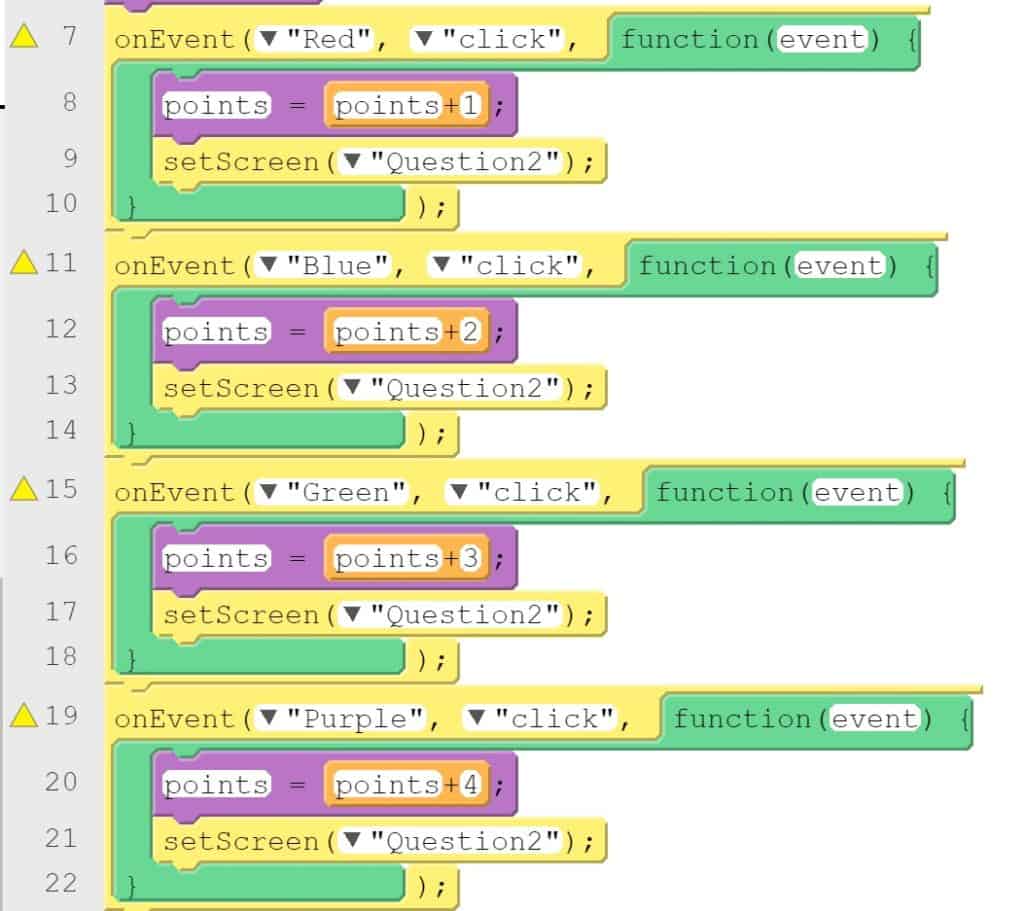
- Go back to the Code tab, and for each answer add an “onEvent” block (under “UI Controls”) and change the id to the different answers and set the event type to “click”.
- Assign different point values to each answer. Do this by dragging a“x= ;” block to each event block. Change x to the name of our variable (“points”).
- Set the variable as the variable plus the amount of points for the specific answer. You can type the name and value (for example “points+1”) or drag the add operator from the “Math” section and type the name and value in that way. The end point value determines the user’s results.
- From the “Design” tab, add a new screen element and name it “Question2” (or something similar). Then go back to the “Code” tab and add “setScreen” blocks within each event block as below. This makes the app go to the next question after the user selects their answer.
- Repeat this process for each question.
Getting results
- Add a new screen element and change the id to “GetResults” (or something similar).
- Choose a background colour for this screen and add a label that says “Are you ready to get your results?” Adjust properties as desired.
- Add a button element that users can click to get their results. Change the text and properties as desired.
- Add an “onEvent” block and change the id to match the button and set the event type to “click”.
- Within the event loop add an if-else block from the “Control” section. At the bottom of the if-else statement there is a minus and plus sign. These allow you to extend or shrink it.
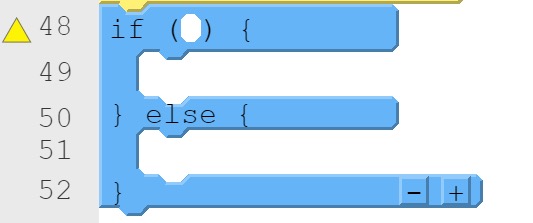
- With extended if-else statements, conditions are checked from top to bottom, therefore it is best to start with the most specific condition.
- The size of the if-else statement depends on the number of outcomes For example, if you have three outcomes, click the plus sign to extend the statement once for each outcome.
- When the variable value falls within a certain range it will display a specific result. The ranges will depend on the number of questions and the points given for each response.
- To set the if-else statement for the different ranges start with the highest possible point value. Insert a greater than or equal operator (“_>=_”) from the “Math” section.
- On the left of the operator type in the name of the variable and on the right add the value.
- Repeat this for the other result ranges until you have completed all portions of the if-else statement.
- Add a screen for each result. On each result page create a block of text that explains the result and an image to represent it.
- Within each part of the if-else statement, program the app to switch screens to display the correct result screen.
Conclusion
Once students have made their personality quizzes they can share them with their classmates. After taking each other’s quizzes, students write a review of what they they think worked well, and whether they would recommend it to a friend. As a class discuss what made the quizzes a success and what could be done to improve them. This feedback and assessment is a vital part of the app design process.
Resources
- Creative Spirits lists Indigenous apps with a summary and link to each app.
- Biznessapps explains in detail the process of building an app.
- Code.org has a studio where students can post projects they have made. Some projects were made using App Lab and could be helpful inspiration for students.
- Hongkait has a variety of technology resources. This is a link to an article about teenage app developers.
- Second Street Lab has an article on making great personality quizzes. It includes helpful tips such as sticking to a theme and making sure all outcomes are possible.
- BuzzFeed has a large library of personality quizzes that are fun to take. Some quizzes may not be appropriate for school, so be sure to screen before sharing with your students.
- App Lab has tutorials and videos that explain how to use the program. At the bottom of this page there are videos on variables, strings and conditional statements.
You might also like

Introduction To Graphic Design
Explore the basic terminology and principles of graphic design – including colour combinations using the colour wheel, balance, alignment, and focus.

Game & App Development
Our games and apps provide unique learning experiences tailored to teach digital skills and promote culture.
Introduction To App Lab
Using App Lab students will learn the basics of developing an app and the basics of programming using App Lab and code.org.
