
Overview
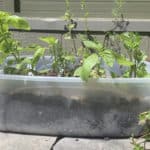
This activity will have you create a water system taken right from Mother Nature. Using a few household materials and plants that you wish to grow, you will be able to assemble a mini aquifer. An aquifer is a body of saturated rock through which water can easily move.This aquifer will make sure that you are not drowning or underwatering certain parts of your plants as the soil will naturally raise the water to dampen itself.
Background Information
Growing your first plant can be challenging, many home gardens run into the problem of plants dying. Sometimes this can be due to overwatering which causes your plants to appear light green but also not sprouting. Others forget to water as they have a busy life and plants get set on the back burner. This is all normal, but an easy fix for both problems is to create a system that has proved so effective that nature itself adopted it; aquifers!
Aquifers are a body of water that is below the surface level held together by rock and/ or sediment. They are created when groundwater seeps through the sediments and forms in an area creating a pool-like body of water. Groundwater is water that pools up underground. This water comes from the rain. It begins by landing onto the ground and then slowly moving its way down to what is called the water table. The water table is the line where the soil goes from unsaturated to saturated (unsaturated meaning dry and saturated meaning damp). The water moves through the unsaturated zone and rests beneath it in the saturated zone, then finally moves into the sediment.
This activity will showcase a confined aquifer which has a layer of soil above it. This soil will naturally pull water from the aquifer if it becomes dry. This allows for plant life to thrive as it is a self-watering system. The water is also able to be evenly distributed amongst the soil both vertically and horizontally. The water will rest in the saturated zone ensuring that plants do not drown as there will be an unsaturated area. Since the water will expand to cover the whole bottom of the container, it will reach all corners.
Materials
- Rocks, stones, pebbles
- Container
- Soil
- Sheet of plastic (should be larger than the area of the bottom of your container. I encourage you to find recycled plastic as the sheet could be made of anything as long as it is large enough and does not have holes!)
- Plants, herbs and succulents!
Step-by-Step Instructions
- First gather all of the materials.
- Before you start, begin by poking holes in the plastic sheet. The holes do not have to be very large, but they create a passage for the water to be pulled up out of the rocks and into the soil.
- Grab the container you wish to use and place the stones you collected at the bottom. Fill up to a quarter of the bottom of the container with these stones.
- Next place the plastic sheet on top of the stones.
- Fill the rest of the container with soil
- Plant your plants anywhere within the container. Depending on the size of your container you can have multiple plants. Every three square inches of a container add you are able to add a plant!
- Next pour the water down the side of the container, so that it goes down and pools into the rocks. The reason the water is poured down the side is because we want to mimic groundwater. Ground water is already beneath the surface so we cannot pour the water on top of the soil. We have to get the water to where it can mimic this sequence.
Follow Up
We want to see the awesome things you’re creating! Take a photo or video and share your work with us by emailing media@pinnguaq.com or tagging @pinnguaq on Facebook, Twitter, or Instagram. Don’t forget to include the hashtag #LearnWithPinnguaq!
Resources
You might also like
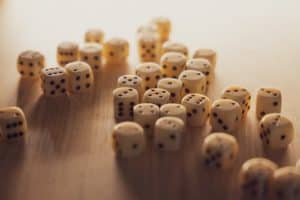
Roll the Dice Storytelling Activity
 Primary – Grade 3
Roll the Dice Storytelling is a side step from Story Storm Activity which will use a five box system to generate ideas for stories!

Story Storm Activity
Primary – Grade 6
This activity is the basis for storytelling, just a very simple way to get into the art of creating stories!
Unplugged Coding Activity Series
Primary – Grade 3
These unplugged activities are geared towards a younger audience with the intention of introducing basic coding concepts.
