Section Navigation
Introduction
In this module students will learn how to use x and y coordinates to place sprites on the workspace in Scratch. Using coordinates to locate or place items on Scratch can be transferred to graphing relationships and using coordinates on a map. This module also aligns with graphing positive and negative integers on a four quadrant grid.
Learning Goals
By the end of this module the learner will understand coordinate systems for positive and negative integers. They will also understand movements in the x and y directions
Vocabulary
XY Grid or Coordinate Plane - A plane that contains an x-axis (horizontal) and a y-axis (vertical). These are used to describe a location of a point on the plane or grid.
Coordinates - Are an ordered pair used to describe the location on a grid or plane. If given the ordered pair (2, 4) this would describe a point that is to the right 2 and up 4 from the origin
Origin - The origin is the point (0, 0) where the x-axis and y-axis intersect.
Variable - A place to store data that can change in the program. Examples include score and time.
Guiding Questions
- Where do you think the origin is (0, 0) on Scratch?
- What half of the workspace has positive y values? Negative y values?
Curriculum Links
This modules ties in to math curriculum for grades 5-7. Students will be able to practice their plotting skills using (x,y) coordinates. They will also gain knowledge on a four quadrant graphing system and how the sign of a number changes which quadrant it is in.
Materials
- Scratch – Download Scratch
- Adobe AIR (required for Scratch to run) – Download Adobe AIR
- XY Hide and Seek art assets – Download Art Assets Folder (ZIP)
- Cards for matching activity – Download Assets PDF (ZIP)
- Tape
Non-Computer Activity
The te(a)ch program has card downloads here (ZIP) you can use for this game.
- Have matching images on pieces of paper on the grid face down. If you have a younger group you can write the coordinates on the back.
- Give each student the chance to flip a piece of paper. In order to flip a piece of paper they have to correctly tell the instructor the coordinates of the piece.
- Once two pieces are flipped over flip them back to being face down. The goal of the class is to find pairs of matching images.
Note: The game only needs a few pairs on images, the whole grid doesn’t need to be filled.
The Free Math Help website has a good basic review of XY grids and coordinates.
Computer Activity
Just like our XY Grid game Scratch has a grid system that the sprites follow.
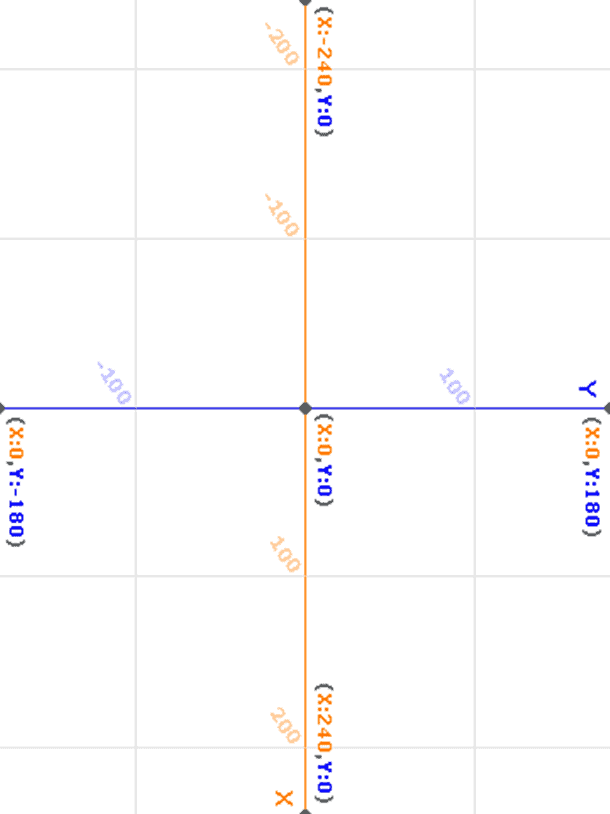
The Scratch workspace is a grid like the one pictured above. The X values range from -240 to 240 and Y values range from -180 to 180. This is important to know for when you are moving sprites or setting up their starting locations. The basic blocks for movements that use X and Y values are change X by ___ and change Y by ___ where you fill in your positive and negative values. The go to X: __ Y: __ uses ordered pairs to set the location of sprites.
Scratch has grids as preset backdrops so these can be used to demonstrate the different axis and how values change.
By the end of this activity the children will have a sprite that gives directions to a hidden object using ordered pairs. The player is supposed to move the sprite to the correct location to reveal the hidden object.
Activity:
- Start a new project and delete the cat sprite so that your project is empty.
- Upload the background included in this module the grid is in 30 px increments. You can also choose to use the backgrounds already in Scratch (xy-grid-20px or xy-grid-30px).
- Pick a sprite to move around the grid. We have included a boy sprite in this module. You may need to adjust the size of your sprite so that it is nicely visible without covering too much grid space at once. To do this use the size arrows at the top of the screen (above scripts and costumes)
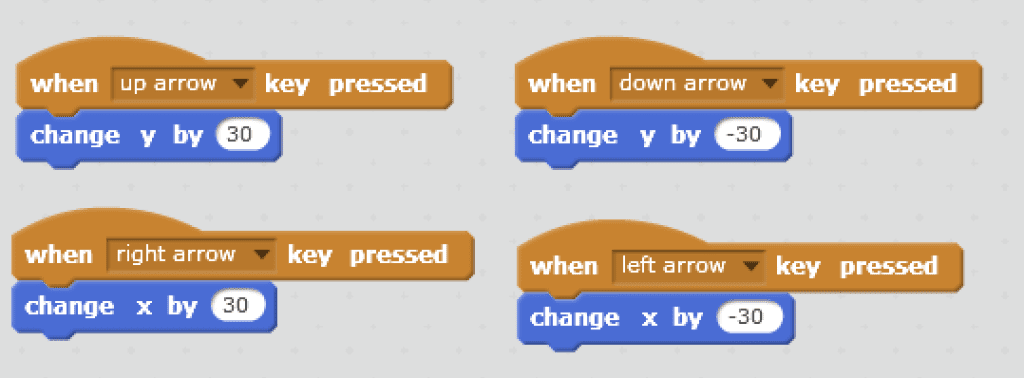
- Add the programming to move your sprite. The amount that you want to move by will depend on the background you have selected. For the 20px grid you will want to move by 20 and for the 30px grid you will want to move by 30.
- Remember x moves left and right and y moves up and down
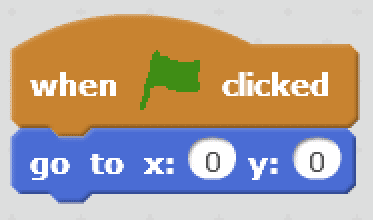
- Set your sprite to start at the origin using when flag clicked go to x: 0 y:0
- Choose another sprite to add to your program. We have included a fish that is jumping out of an ice fishing hole. This will be the sprite that will be hiding. Adjust the size as needed.
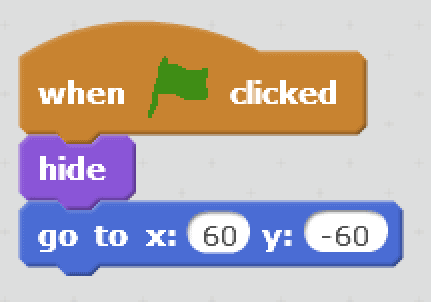
- Pick a location for your other sprite to hide. Pick a location that lines up with the grid. You will need to use increments of 20 or 30 for 20px and 30px backgrounds respectively. To add this make sure your second sprite is selected and use the when flag clicked start block. You are going to want the sprite to be hidden so we will start with a hide block then go to x: and y: block.
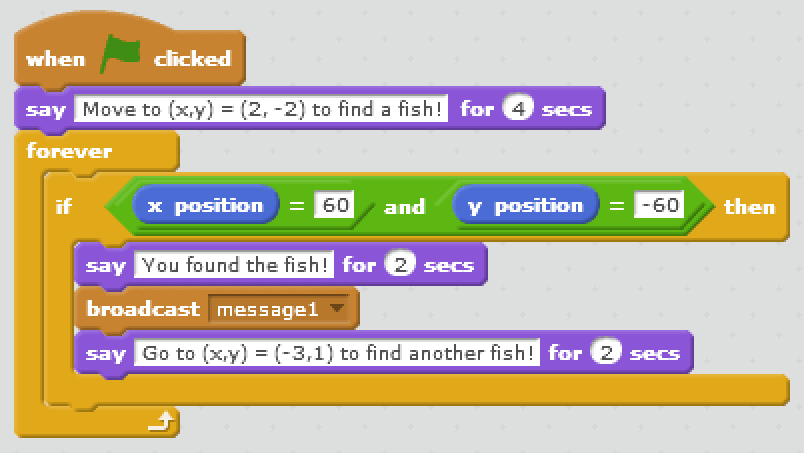
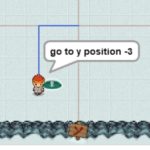
- You need to have your searching sprite say what position to go to. To know what grid location to go to take the numbers in your x and y positions and divide them by the size of your grid. If you are using the 20px grid you will divide by 20 and if you are using the 30px grid you will divide by 30. This is why working in multiples of 20 or 30 is important for this module. Above the x position is 60 which when divided by 30 is 2. The y position is -60 which when divided by 30 is -2. So below the (x, y) position is (2, -2)
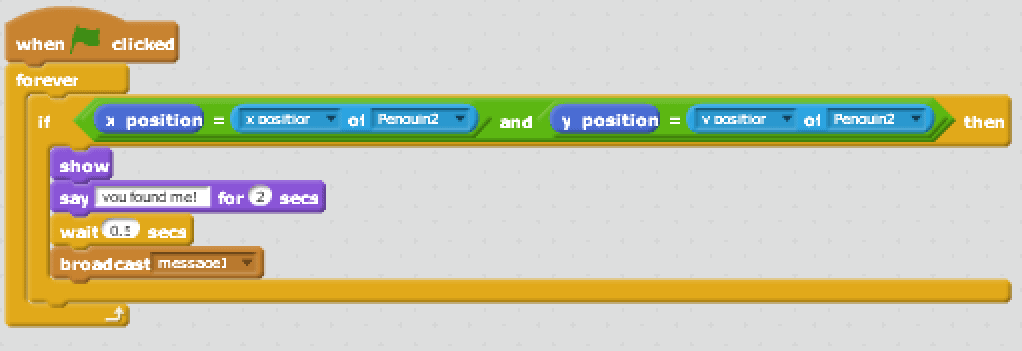
- Next you will need to set up the program so it will show the sprite when you are at the same location. To do this drag and drop the following blocks for the hiding sprite.
- This script is continually checking if the x and y position of the hiding sprite is the same as the boy (the sprite that is moving to find the hiding sprite). If they have the same x and y positions it means they are in the same spot and the hiding sprite will show.
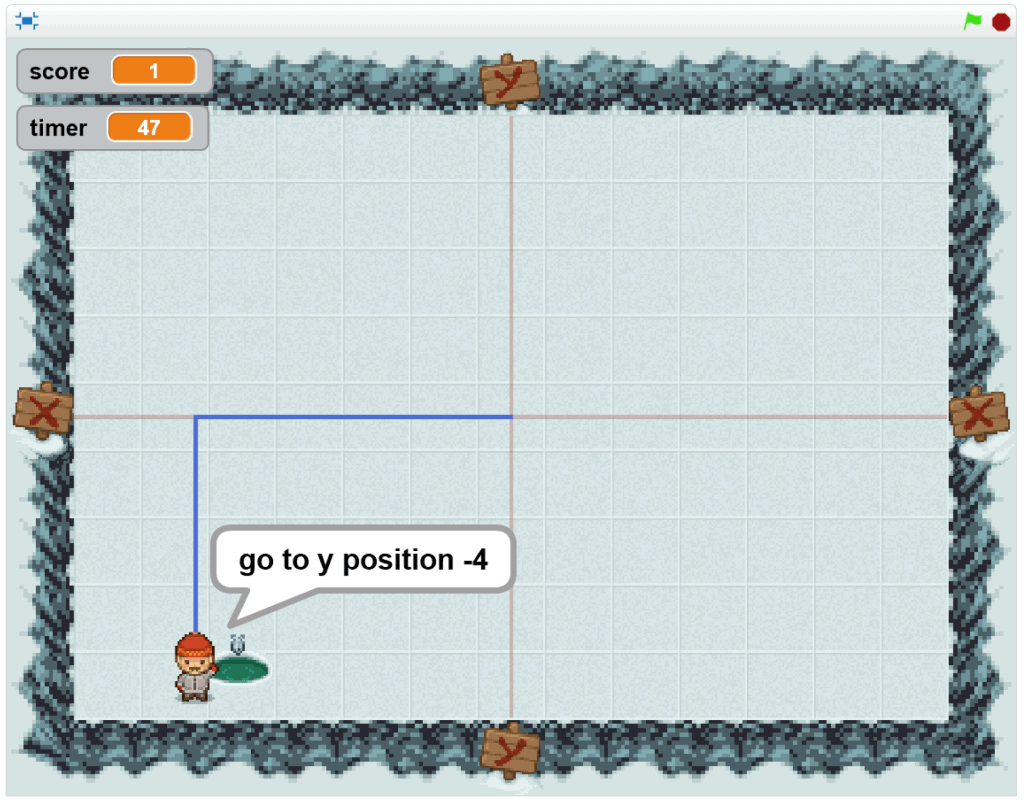
- Add instructions so the player knows what location to go to. I would also recommend adding the pen tool so it is easy to see where you have gone.
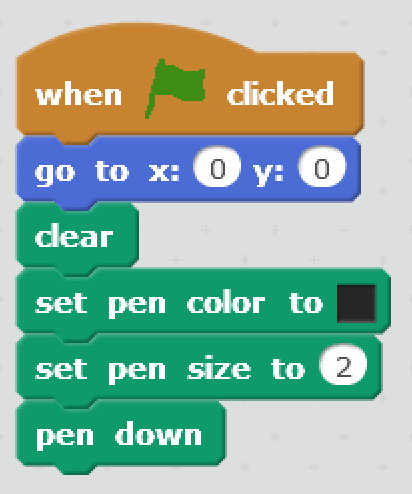
Pen Tool Instructions:- Go to the pen section on Scratch add the clear block at the start so all previous pen marks are removed.
- Add the set pen colour block and select a colour of your choice by clicking the coloured square
- Add set pen size block and set size to 2
- Add the pen down block
- Continue moving the hidden sprite to different points and instructing the player where to go. For this the broadcast and received message blocks work best. Continue to program as follows.
Searching Sprite:

- Continue adding If.. Then… statements (like above) into your forever loop and change the x and y position values to the positions of the next hiding spot. You will also need to change the broadcast message to message2 for the next location.
Hiding Sprite:
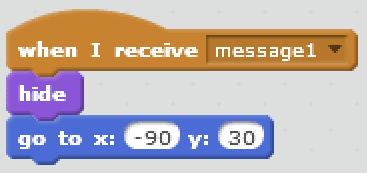
- This tells the sprite that once it receives the message after being found the first time it hides and move to the next location. This will have to be repeated for message2 and the next hiding location.
Additional Challenges:
Animate your sprite so it is walking when you are looking for the hidden sprite.
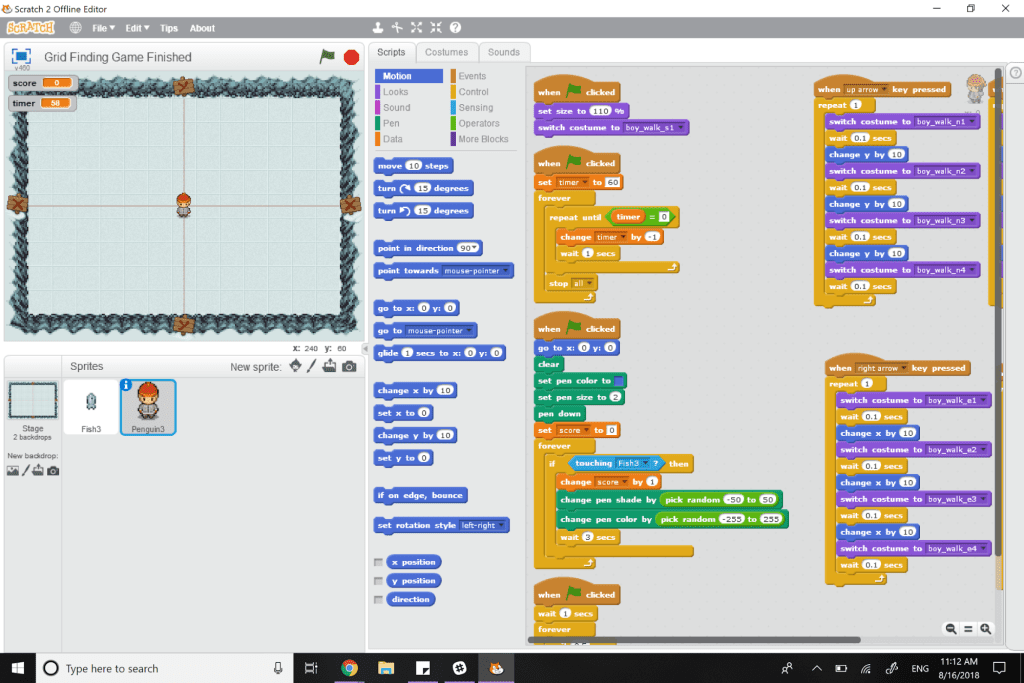
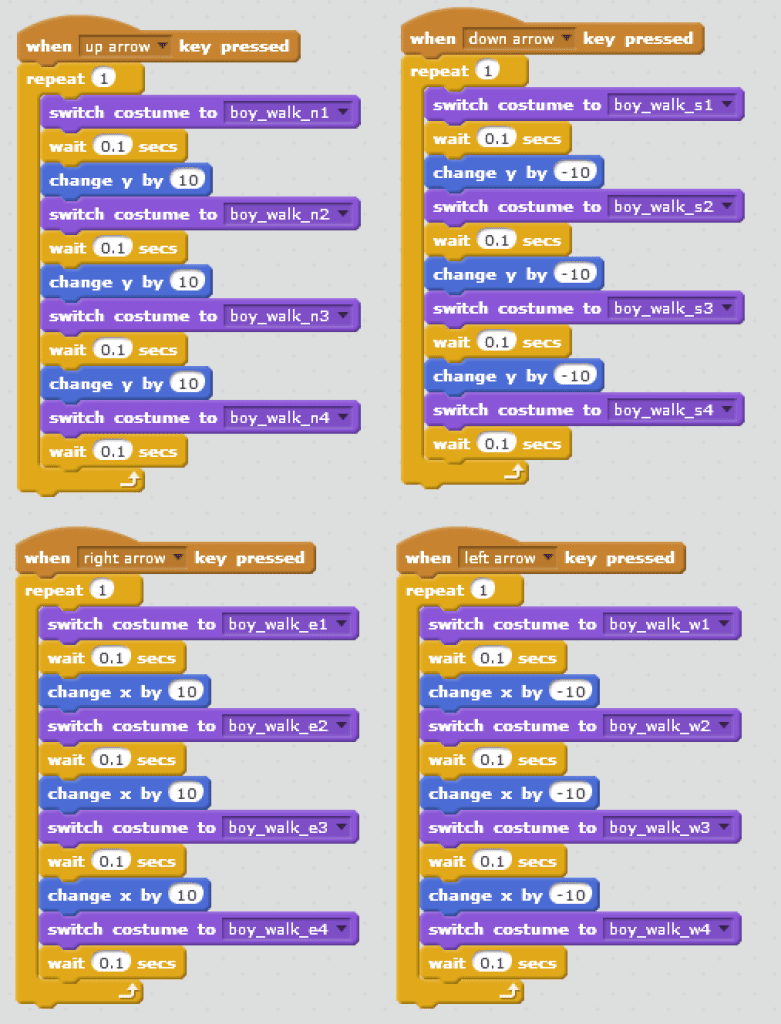
- To animate a sprite you will need to have different costumes for it to switch to. In the example above the boy sprite has costumes for walking in different directions. Upload the costumes by clicking on the boy and selecting costumes at the top. Click the folder button to upload the costumes. The costume names match up with the directions the boy can walk in.
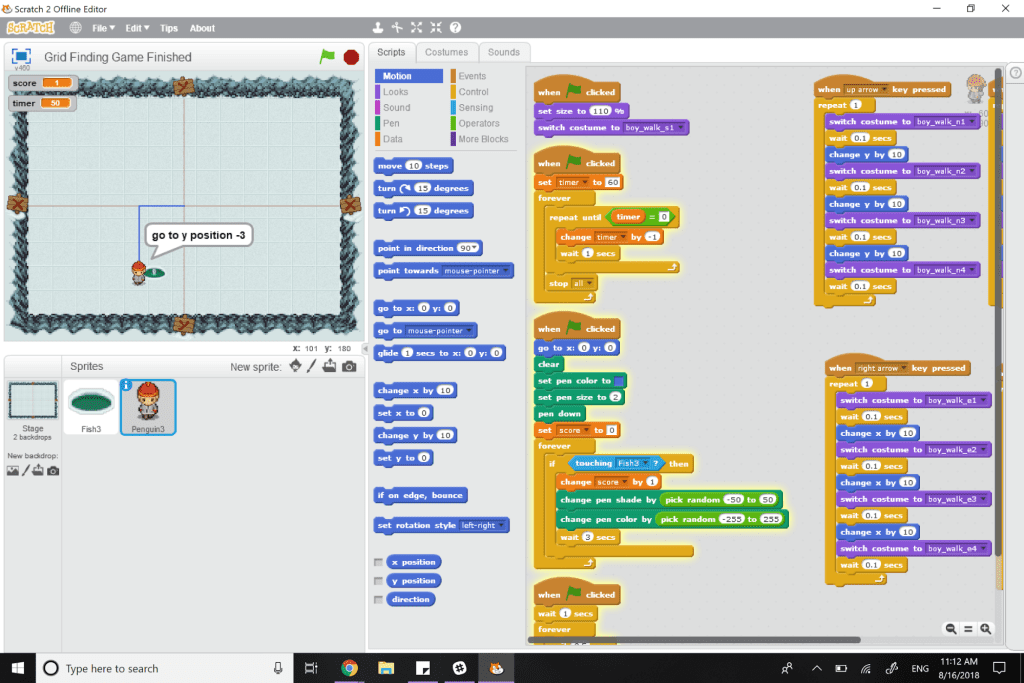
- The background I was using had 30px increments and to make the walking animation look smoother I broke up the changes of x and y within the costume changes.
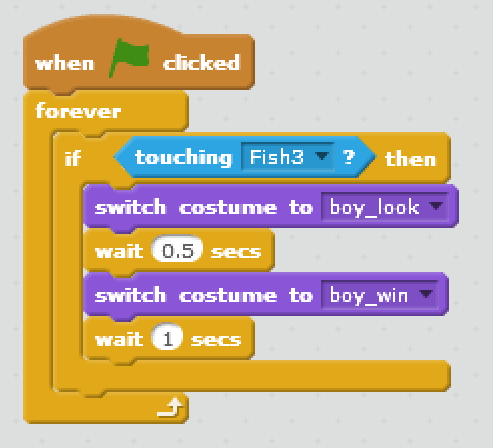
- There are also costumes for the boy to look down and to celebrate getting a fish. I added this animation by having an if statement that checks if the boy is touching the fish then switches to the looking costume waits then switches to the win costume.
Animate the fish
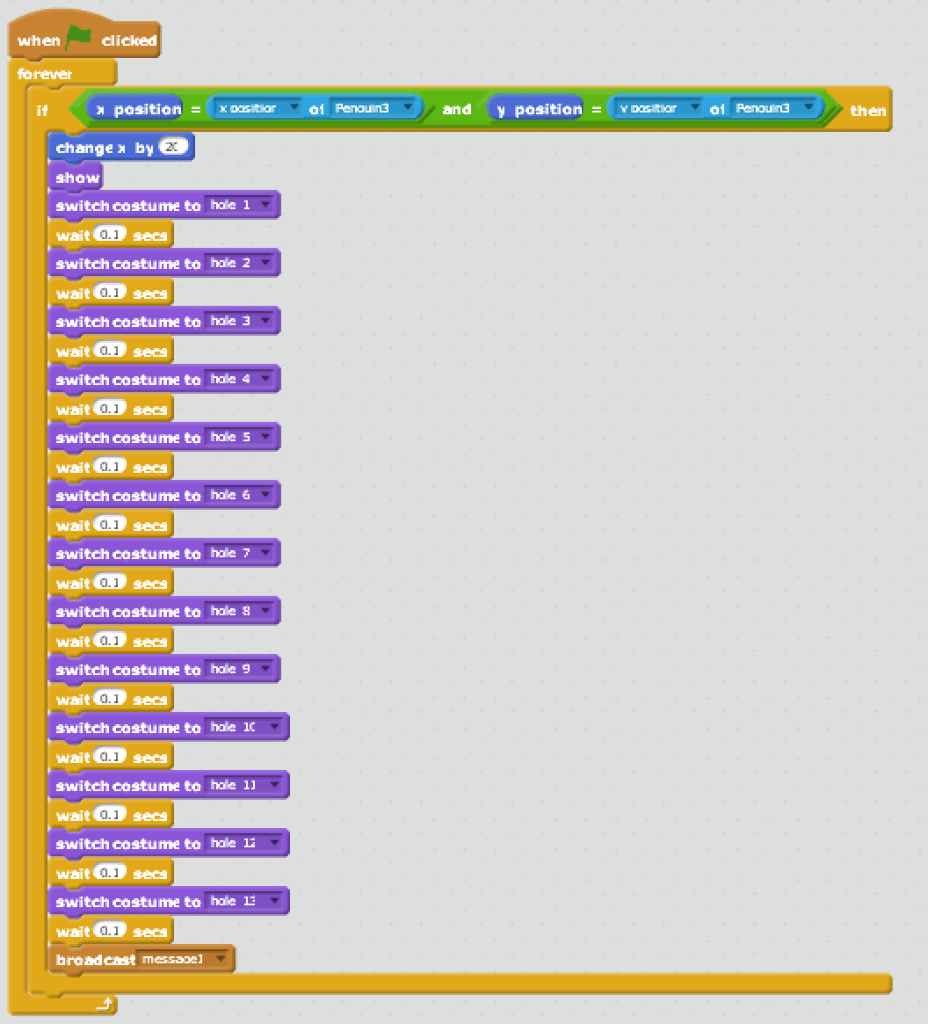
- The fish can be animated so that it jumps out of the ice fishing hole. To do this the costumes will need to be uploaded. There are 13 different costumes for the ice fishing hole. Add the costume changes into the script for showing the hiding sprite when both sprites are in the same location. Don’t forget to add wait blocks between each costume change so it is a smooth animation.

Add a score to see how many times you can find the hidden sprite.
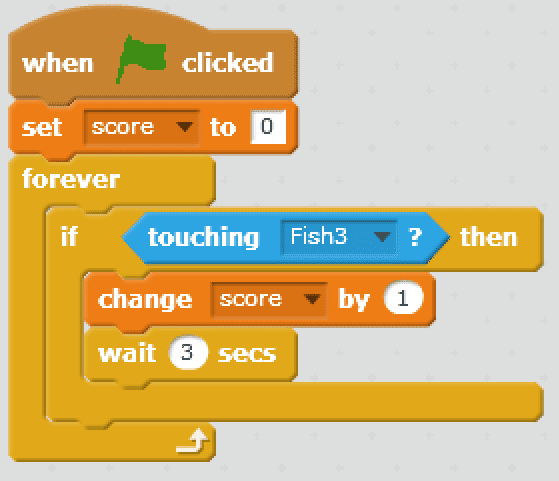
- Make a variable called score under the data palette. Add a conditional loop so that if the sprite is touching the other the score increases by 1. You will also want the score to reset to 0 whenever the game starts over.
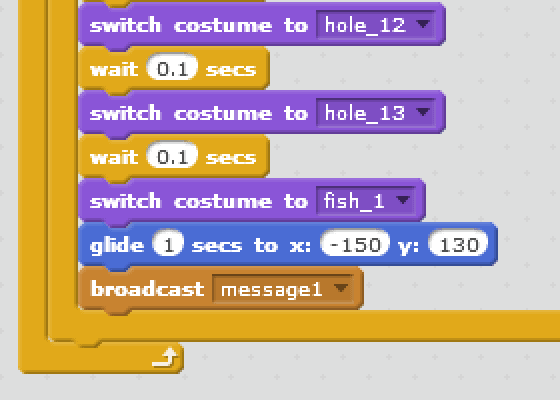
- You can also animate your fish to move to the scoreboard to represent getting a point. Switch to the fish costume in the same script where the fish was being animated and have is glide to your scoreboard.
Add a timer to see how many you hidden sprites you can find in a specific time.
- Make a variable called timer or time under the data palette. Have the timer start at the amount of time you want to complete the game. Have it decrease each second and stop once it reaches 0. When the timer reaches 0 have everything stop using the stop all block.
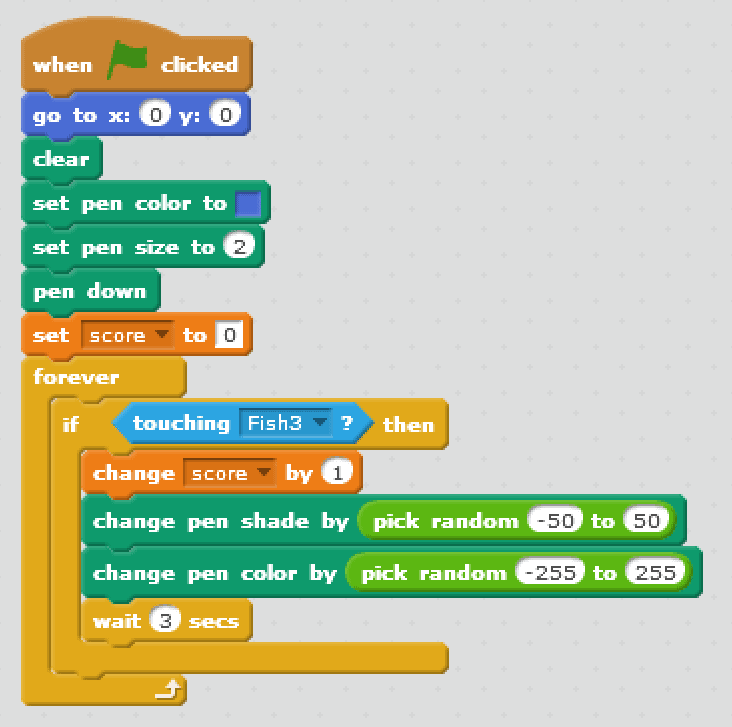
Change the pen colour each time you find the hiding sprite
- This works best if you don’t start with the colour black. Change your starting colour to anything other than black. Then where the score is changing add the change pen shade and the change pen colour blocks. To have this be random have it pick a random shade from -50 to 50 so you will have a mixture of bright and dark colours. To have the colour change randomly use the pick random from -255 to 255 so random colours will be picked. So now every time you find the hiding sprite the pen colour will change.
Randomize the location of the hidden sprite. (More challenging to program, for advanced grade 6 students and grade 7 students)
- Follow the above instructions until step 6.
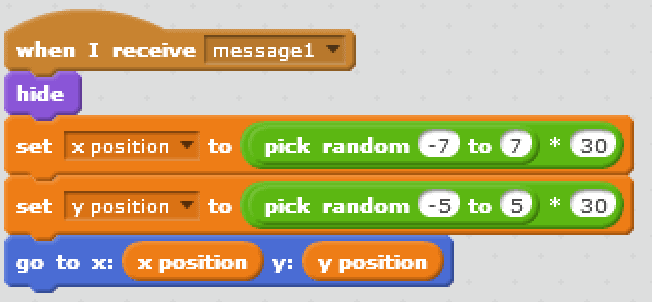
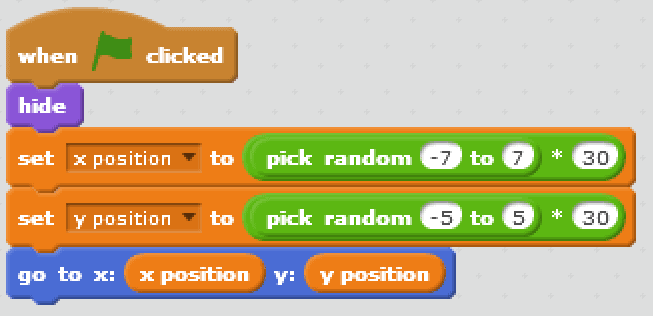
- To have the Hiding sprite pick a random grid location we need to make 2 variables one called x position and the other called y position. We will use operators to ensure that the points match up with a grid location. It should look as follows (for the hiding sprite).
- The 30px grid has x values from -7 to 7 without being on the edge of the screen and y values from -5 to 5 without being on the edge of the screen. This script tells the hiding sprite to randomly pick an x value from -7 to 7 and multiply by 30 so it lines up with the grid. It then sets the variable “x position” to that value and does the same for the y value between -5 and 5. The go to block then tells the sprite to go to the randomly chosen location.
- Now we need our searching sprite to tell us where to go. The join operator allows us to combine what we want the sprite to say with the position values. The x and y position are then divided by 30 to give us the grid location (using the 30px grid). This program runs forever so as the hiding sprite changes locations the new location will be displayed.
- Next we want our hiding sprite to reveal itself when we are on the hiding spot. To do this we have a forever loop that is continually checking if the x and y position of the hiding sprite is the same as our boy (searching sprite). If the x and y positions are the same the sprite shows itself and says “you found me!”. After it is found it broadcasts message1 which is received in the next step.
- We want the hiding sprite to continue hiding in random locations. To do that we duplicate the previous script for choosing a random location and put it under when I receive message1 block. It should look as follows.
- Now it will continually broadcast the message when it is found and go to a new hiding location.
Conclusion
Play the XY Grid game.
- On the floor tape out a grid of any size (8×8 or larger is best)
- Plan out a route to get from one side of the grid to the other.Note: Be sure to only have one safe square along the x-axis or the start line
- Students can move left, right or forward. You can add backwards for an additional challenge later on. Explain that moving left or right is moving along the x-axis and moving forward or backward is moving along the y-axis
- The goal is for the students to find their way through the grid and remember the correct path. They are to work as a team. Try to have them use proper terminology such as coordinates.
- Have students say their movements using proper terms such as increasing x by one (move right one), decrease x by 1 (move left one) and increase y by 1 (moving forward one)
- If you have space constraints the Robot Turtles Board works well for a grid and one of the tiles from the game can be used to move across the board. It could also be drawn on chart paper or a whiteboard.
- Telling the children that the grid is lava and there is only one safe way across grabs their attention. This can easily be changed to any other kind of situation where there is one safe path.
- If they pick a square that is not a safe spot they must go back to the start and follow the path correctly again.
| X | ||||||||
| X | ||||||||
| X | X | X | X | X | ||||
| X | X | X | ||||||
| X | X | |||||||
| X | ||||||||
| X | ||||||||
| X | X | X | ||||||
| X |
The Y Axis ↑ The X Axis →
In the above example the yellow X is the starting point. The next safe spot would be stepping forward. The students would say that they are changing Y by 1. They would continue this until they reach the green X and make it safely across the grid.
Resources
- This project is on the Scratch website. It is a good way to showcase how the x and y values change as you move across the workspace.
- A blog post from a writer who feels that people generally don’t think Indigenous people are good at math and talks about the reactions she gets when she mentions she enjoys math and is Indigenous.
- The OISE website has lots of links that demonstrate how to incorporate Indigenous aspects into math lessons.
- An educator website that has a great lesson on coordinate systems and how they are involved in mapping.
